Lexmark Es460dn User Guide - Page 149
Make sure the Paper Size and Paper Type settings are the same for each tray, Large jobs do not collate
 |
UPC - 734646275699
View all Lexmark Es460dn manuals
Add to My Manuals
Save this manual to your list of manuals |
Page 149 highlights
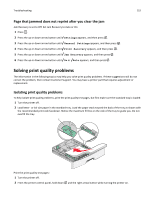
Troubleshooting 149 MAKE SURE THE PAPER SIZE AND PAPER TYPE SETTINGS ARE THE SAME FOR EACH TRAY 1 Print a menu settings page and compare the settings for each tray. 2 If necessary, adjust the settings from the Paper Size/Type menu. Note: None of the paper sources, trays, or feeders automatically sense the paper size. You must set the size from the Paper Size/Type menu on the printer control panel or from the Embedded Web Server. Large jobs do not collate These are possible solutions. Try one or more of the following: MAKE SURE COLLATE IS SET TO ON From Print Properties or the printer control panel Finishing menu, set Collate to On. Note: Setting Collate to Off in the software overrides the setting in the Finishing menu. REDUCE THE COMPLEXITY OF THE PRINT JOB Reduce the complexity of the print job by reducing the number and size of fonts, the number and complexity of images, and the number of pages in the job. MAKE SURE THE PRINTER HAS ENOUGH MEMORY Add printer memory. Unexpected page breaks occur Increase the Print Timeout value: 1 From the printer control panel, press . 2 Press the up or down arrow button until Settings appears, and then press . 3 Press the up or down arrow button until General Settings appears, and then press . 4 Press the up or down arrow button until Timeouts appears, and then press . 5 Press the up or down arrow button until Print Timeout appears, and then press . 6 Press the up or down arrow button until the value you want appears, and then press . Envelope seals when printing Due to humidity and heat, some envelopes become sealed during the printing process. If this happens, open the rear door of the printer to allow envelopes to exit there.
-
 1
1 -
2
-
3
-
4
-
5
-
6
-
7
-
8
-
9
-
10
-
11
-
12
-
13
-
14
-
15
-
16
-
17
-
18
-
19
-
20
-
21
-
22
-
23
-
24
-
25
-
26
-
27
-
28
-
29
-
30
-
31
-
32
-
33
-
34
-
35
-
36
-
37
-
38
-
39
-
40
-
41
-
42
-
43
-
44
-
45
-
46
-
47
-
48
-
49
-
50
-
51
-
52
-
53
-
54
-
55
-
56
-
57
-
58
-
59
-
60
-
61
-
62
-
63
-
64
-
65
-
66
-
67
-
68
-
69
-
70
-
71
-
72
-
73
-
74
-
75
-
76
-
77
-
78
-
79
-
80
-
81
-
82
-
83
-
84
-
85
-
86
-
87
-
88
-
89
-
90
-
91
-
92
-
93
-
94
-
95
-
96
-
97
-
98
-
99
-
100
-
101
-
102
-
103
-
104
-
105
-
106
-
107
-
108
-
109
-
110
-
111
-
112
-
113
-
114
-
115
-
116
-
117
-
118
-
119
-
120
-
121
-
122
-
123
-
124
-
125
-
126
-
127
-
128
-
129
-
130
-
131
-
132
-
133
-
134
-
135
-
136
-
137
-
138
-
139
-
140
-
141
-
142
-
143
-
 144
144 -
 145
145 -
 146
146 -
 147
147 -
 148
148 -
 149
149 -
 150
150 -
 151
151 -
 152
152 -
 153
153 -
 154
154 -
155
-
156
-
157
-
158
-
159
-
160
-
161
-
162
-
163
-
164
-
165
-
166
-
167
-
168
-
169
-
170
-
171
-
172
-
173
-
174
-
175
-
176
-
177
-
178
-
179
-
180
-
181
 |
 |
