Lexmark MB2546 Quick Reference - Page 3
Printing, Maintaining the printer
 |
View all Lexmark MB2546 manuals
Add to My Manuals
Save this manual to your list of manuals |
Page 3 highlights
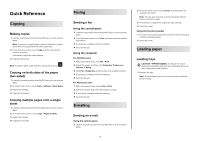
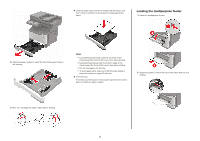
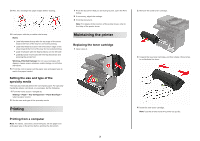
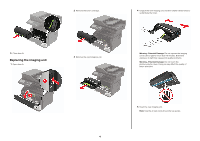
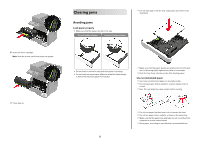
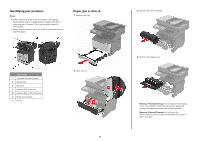
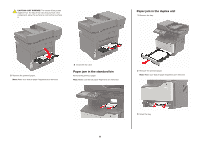
3 Flex, fan, and align the paper edges before loading. 4 Load paper with the printable side faceup. Notes: • Load letterhead faceup with the top edge of the sheet toward the front of the tray for one‑sided printing. • Load letterhead facedown with the bottom edge of the sheet toward the front of the tray for two‑sided printing. • Load envelopes with the flap facedown on the left side. • Load European envelopes with the flap facedown and entering the printer first. Warning-Potential Damage: Do not use envelopes with stamps, clasps, snaps, windows, coated linings, or self‑stick adhesives. 5 From the control panel, set the paper size and paper type to match the paper loaded. Setting the size and type of the specialty media The trays automatically detect the size of plain paper. For specialty media like labels, card stock, or envelopes, do the following: 1 From the home screen, navigate to: Settings > Paper > Tray Configuration > Paper Size/Type > select a paper source 2 Set the size and type of the specialty media. Printing Printing from a computer Note: For labels, card stock, and envelopes, set the paper size and paper type in the printer before printing the document. 1 From the document that you are trying to print, open the Print dialog. 2 If necessary, adjust the settings. 3 Print the document. Note: For details of the function of the printer driver, refer to the Help of the printer driver. Maintaining the printer Replacing the toner cartridge 1 Open door A. 3 2 Remove the used toner cartridge. 3 Unpack the new toner cartridge, and then shake it three times to redistribute the toner. 4 Insert the new toner cartridge. Note: Use the arrows inside the printer as guides.
-
 1
1 -
 2
2 -
 3
3 -
 4
4 -
 5
5 -
 6
6 -
 7
7 -
 8
8 -
 9
9
 |
 |
