Lexmark MX310 Network Scan Drivers - Page 18
Troubleshooting, Printer scans the but image is not displayed on the computer - driver windows 8
 |
View all Lexmark MX310 manuals
Add to My Manuals
Save this manual to your list of manuals |
Page 18 highlights
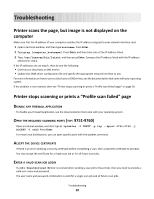
Troubleshooting Printer scans the page, but image is not displayed on the computer Make sure that the IP address of your computer matches the IP address assigned to your network interface card. 1 Open a terminal window, and then type hostname. Press Enter. 2 Type ping [computer_hostname]. Press Enter, and then take note of the IP address listed. 3 Type /usr/lexscan/bin/lsinet, and then press Enter. Compare the IP address listed with the IP address obtained in step 2. If the IP addresses do not match, then do one the following: • Correct your /etc/hosts or DNS entries. • Update the SANE driver configuration file and specify the appropriate network interface to use. For more information on how to correct /etc/hosts or DNS entries, see the documentation that came with your operating system. If the problem is not resolved, then see "Printer stops scanning or prints a 'Profile scan failed' page" on page 18. Printer stops scanning or prints a "Profile scan failed" page DISABLE ANY FIREWALL APPLICATION To disable your firewall application, see the documentation that came with your operating system. OPEN THE REQUIRED SCANNING PORTS (TCP: 9751-9760) Open a terminal window, and then type # iptables -I INPUT -p tcp --dport 9751:9760 -j ACCEPT -i eth0. Press Enter. For most Linux distributions, you can open specific ports with the iptables command. ACCEPT THE DEVICE CERTIFICATE If there is an error verifying a security certificate before completing a scan, then accept the certificate to proceed. You may accept the certificate for a single scan job or for all future scan jobs. ENTER A VALID SCAN JOB LOGIN If a 401 Unauthorized Error is received when sending a scan job to the printer, then you need to provide a valid user name and password . The user name and password combination is valid for a single scan job and all future scan jobs. Troubleshooting 18
-
 1
1 -
2
-
3
-
4
-
5
-
6
-
7
-
8
-
9
-
10
-
11
-
12
-
 13
13 -
 14
14 -
 15
15 -
 16
16 -
 17
17 -
 18
18 -
 19
19 -
 20
20 -
 21
21
 |
 |