Lexmark MX310 Network Scan Drivers - Page 8
Scanning using GIMP, Scanning using a terminal window, Scanning multiple s, Using scanimage - troubleshooting
 |
View all Lexmark MX310 manuals
Add to My Manuals
Save this manual to your list of manuals |
Page 8 highlights
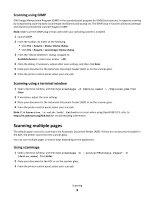
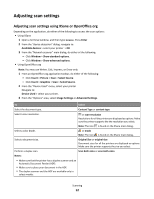
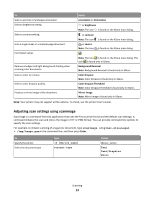
Scanning using GIMP GNU Image Manipulation Program (GIMP) is the standard paint program for UNIX/Linux systems. It supports scanning by using existing scanning tools (xscanimage and XSane) used as plug-ins. The GIMP plug-in function allows xscanimage and XSane to provide the scanned image to GIMP. Note: Make sure the GIMP plug-in that came with your operating system is installed. 1 Launch GIMP. 2 From the toolbar, do either of the following: • Click File > Acquire > XSane: Device dialog. • Click File > Acquire > xscanimage: Device dialog. 3 From the "device detection" dialog, navigate to: Available devices > select your printer > OK 4 From the dialog, if necessary, adjust other scan settings, and then click Scan. 5 Place your document in the Automatic Document Feeder (ADF) or on the scanner glass. 6 From the printer control panel, select your scan job. Scanning using a terminal window 1 Open a terminal window, and then type scanimage -d [device_name] > /tmp/scan.pnm. Press Enter. 2 If necessary, adjust the scan settings. 3 Place your document in the Automatic Document Feeder (ADF) or on the scanner glass. 4 From the printer control panel, select your scan job. Note: If an Assertion 'c->xlib.lock' failed error occurs when using OpenSUSE 10.3, refer to http://en.opensuse.org/Xlib.lock for troubleshooting information. Scanning multiple pages The default paper source for scanning is the Automatic Document Feeder (ADF). If there are no documents loaded in the ADF, the printer scans from the scanner glass. You can scan multiple pages in several ways depending on the application. Using scanimage 1 Open a terminal window, and then type scanimage -b --source="Multiple Pages" -d [device_name]. Press Enter. 2 Place your document in the ADF or on the scanner glass. 3 From the printer control panel, select your scan job. Scanning 8
-
 1
1 -
2
-
 3
3 -
 4
4 -
 5
5 -
 6
6 -
 7
7 -
 8
8 -
 9
9 -
 10
10 -
 11
11 -
 12
12 -
 13
13 -
14
-
15
-
16
-
17
-
18
-
19
-
20
-
21
 |
 |