Lexmark MX6500e 6500e Scan to Sharepoint Administrator's Guide - Page 7
Configuring confirmation options, Deleting a profile, Print Confirmation
 |
View all Lexmark MX6500e 6500e manuals
Add to My Manuals
Save this manual to your list of manuals |
Page 7 highlights
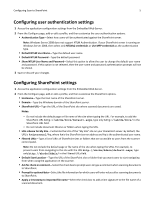
Configuring Scan to SharePoint 7 • Scan Resolution-Adjust the default quality of the scanned document. If users will be scanning photographs, drawings with fine lines, or documents with very small text, then increase the resolution setting. Higher resolution settings result in larger file sizes and longer time needed to scan the original document. • Scan Color-Determine whether the document will be scanned in color or in black and white. Select this option to scan in color, or clear it to scan in black and white. • Scan Contrast-Specify a setting to increase or decrease the difference between lights and darks in a scanned image. Select Best for Content if you want the scanner to adjust the contrast automatically, or select a value from 0 (least contrast) to 5 (most contrast). • Scan File Format-Specify the output format for scanned images saved on the SharePoint server. Note: The JPEG file format does not support multiple pages. If users will be scanning documents containing more than one page, then select either TIFF or PDF as the scan file format. • Content Type-Select the default type that best represents the scanned document. • Background Removal-Specify the degree of background to remove from the scan job. Type values from 1 to 10, with 10 for maximum background removal. • Shadow Detail-Specify the degree of shadow detail to apply to the scan job. Type values from 1 to 10, with 10 for maximum shadow detail. 3 Save or discard your changes. Configuring confirmation options 1 Access the application configuration settings from the Embedded Web Server. 2 From the Configure page, add or edit a profile, and then customize the confirmation options. • Display Confirmation Page-Select this option to specify that users will see a confirmation page on the scanner control panel after scanning documents to the SharePoint server. • Print Confirmation Page-Select this option to specify that the printer will print a confirmation page after users scan documents to the SharePoint server. • Email Confirmation Page-Select this option to specify that the scanner will send a confirmation e-mail after users scan documents to the SharePoint server. Addresses for recipients must be specified in the "Email To" field. • Email To-If you select the Email Confirmation Page option, then you must specify at least one recipient's e‑mail address in this field. Multiple addresses should be separated by commas. 3 Save or discard your changes. Deleting a profile 1 Access the application configuration settings from the Embedded Web Server. 2 From the Configure page, select a profile from the list, and then click Delete. 3 Click Delete to confirm.
-
 1
1 -
 2
2 -
 3
3 -
 4
4 -
 5
5 -
 6
6 -
 7
7 -
 8
8 -
 9
9 -
 10
10 -
 11
11 -
 12
12 -
13
-
14
-
15
-
16
-
17
-
18
-
19
-
20
-
21
-
22
-
23
-
24
-
25
-
26
 |
 |
