Lexmark Optra T616 Setup Guide (1.4 MB) - Page 18
Installing Printer Memory, or Flash Memory
 |
View all Lexmark Optra T616 manuals
Add to My Manuals
Save this manual to your list of manuals |
Page 18 highlights
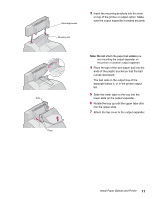
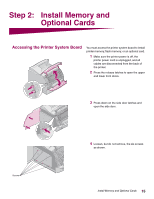
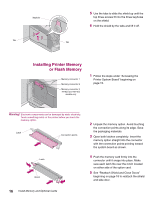
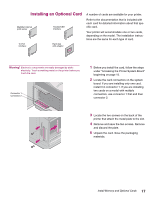
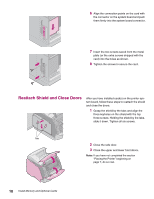
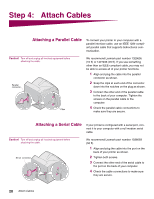
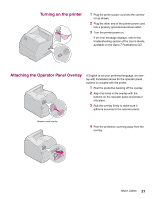
Keyhole Tab 5 Use the tabs to slide the shield up until the top three screws fit into the three keyholes on the shield. 6 Hold the shield by the tabs and lift it off. Tab Installing Printer Memory or Flash Memory Memory connector 1 Memory connector 2 Memory connector 3 T616(n) and T614(n) models only 1 Follow the steps under "Accessing the Printer System Board" beginning on page 15. Warning! Electronic components can be damaged by static electricity. Touch something metal on the printer before you touch the memory option. Latch Connection points Latch Notch 2 Unpack the memory option. Avoid touching the connection points along its edge. Save the packaging materials. 3 Open both latches completely. Insert the memory option straight into the connector with the connection points pointing toward the system board as shown. 4 Push the memory card firmly into the connector until it snaps into place. Make sure each latch fits over the notch located on either side of the option card. 5 See "Reattach Shield and Close Doors" beginning on page 18 to reattach the shield and side door. 16 Install Memory and Optional Cards
-
 1
1 -
2
-
3
-
4
-
5
-
6
-
7
-
8
-
9
-
10
-
11
-
12
-
 13
13 -
 14
14 -
 15
15 -
 16
16 -
 17
17 -
 18
18 -
 19
19 -
 20
20 -
 21
21 -
 22
22 -
 23
23 -
24
-
25
-
26
-
27
-
28
-
29
-
30
-
31
-
32
-
33
-
34
-
35
-
36
-
37
 |
 |
