Lexmark X264 Tech Notes - Page 2
Creating a custom form, using the PostScript emula, tion driver - user manual
 |
View all Lexmark X264 manuals
Add to My Manuals
Save this manual to your list of manuals |
Page 2 highlights
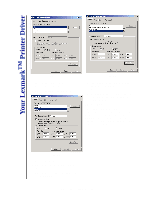
Your LexmarkTM Printer Driver Figure 2 6 Select the desired Paper size and Paper type from the drop-down lists. 7 Select the Overlay or Watermark options as needed from the drop-down lists. 8 Choose where to apply the selections using the option buttons. (See Figure 3.) 9 Click OK to save the new custom form. This form will now be available to administrators for editing or removal from the Figure 3 Existing custom forms drop-down list (see figure 3). A handy textual summary of the options selected for your uniquely-named custom form appears below the Existing forms list. Users can print on the custom form by selecting it from the Paper size drop-down list on the Paper tab. In the illustrated example, the custom form named My_Report prints on Letter-sized, colored paper. A personally created logo overlay appears on the front of the page over other images or text contained in the document. A watermark named "confidential watermark" that reads CONFIDENTIAL also appears on the front side of the page, but it will be printed underneath other images or text in the document. Creating a custom form using the PostScript emula- tion driver Creating a custom form using the PostScript emulation driver involves a slightly different set of steps since the PostScript emulation driver does not include a Forms tab. Also, some options that you can automatically associate with your custom form using the PCL emulation driver (such as watermark and overlay selections) are not available for custom form association in the PostScript emulation driver. They can still be selected for use with your custom form, but must be manually selected from the Overlays and Watermarks dialog boxes before you send your document to the printer. These dialog boxes appear on the Other Options tab. The Other Options tab is located on the Printing Preferences dialog box. See the Online Help for your printer driver for more information about creating watermarks and overlays. To begin, you must access the Printers folder, then open the Server Properties sheet for your printer in order to create and associate a name with a custom form: 1 Open the Printers folder by clicking Start à Settings à Printers. 2 Select File. 3 Select Server Properties. (See Figure 4 on the next page.) 4 Click Create a New Form. This enables the Form Description for: text box and Lexmark Tech Notes, March 2004, Page 2
-
 1
1 -
 2
2 -
 3
3
 |
 |
