Lexmark X264 Tech Notes - Page 3
English, Metric, Form Description for, Save Form, Forms on, Close
 |
View all Lexmark X264 manuals
Add to My Manuals
Save this manual to your list of manuals |
Page 3 highlights
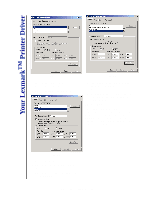
Your LexmarkTM Printer Driver Figure 4 the available options in the Measurements group. 5 Choose English or Metric for the Figure 6 8 Type a name for the new form in the Form Description for: text box. (See Figure 5.) 9 Click Save Form. This places the name of your new form in the Forms on: list. (See Figure 6.) 10 Click Close. This form will now be available to administrators for editing or removal from the Forms on: list on the Print Server Properties dialog box. Users can print on the custom form by selecting it from the Paper size dropdown list on the Paper tab. Figure 5 measurement units. 6 Specify the physical width and height of the form. 7 Specify the left, right, top, and bottom printer area margins. Lexmark Tech Notes, March 2004, Page 3
-
 1
1 -
 2
2 -
 3
3
 |
 |
