Lexmark X340 User's Guide - Page 19
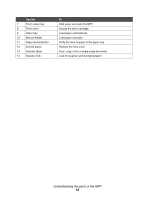
Use the, Lift the MFP.
 |
View all Lexmark X340 manuals
Add to My Manuals
Save this manual to your list of manuals |
Page 19 highlights
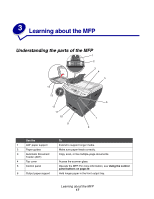
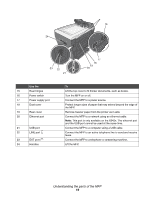
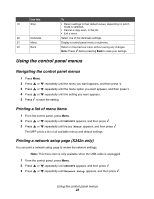
16 24 23 22 21 17 18 19 20 Use the 15 Rear hinges 16 Power switch 17 Power supply port 18 Dust cover 19 Rear cover 20 Ethernet port 21 USB port 22 LINE port 23 EXT port 24 Handles To Lift the top cover to fit thicker documents, such as books. Turn the MFP on or off. Connect the MFP to a power source. Protect longer sizes of paper that may extend beyond the edge of the MFP. Remove heavier paper from the printer as it exits. Connect the MFP to a network using an ethernet cable. Note: This port is only available on the X342n. The ethernet port and the USB port cannot be used at the same time. Connect the MFP to a computer using a USB cable. Connect the MFP to an active telephone line to send and receive faxes. Connect the MFP to a telephone or answering machine. Lift the MFP. Understanding the parts of the MFP 19
-
 1
1 -
2
-
3
-
4
-
5
-
6
-
7
-
8
-
9
-
10
-
11
-
12
-
13
-
 14
14 -
 15
15 -
 16
16 -
 17
17 -
 18
18 -
 19
19 -
 20
20 -
 21
21 -
 22
22 -
 23
23 -
 24
24 -
25
-
26
-
27
-
28
-
29
-
30
-
31
-
32
-
33
-
34
-
35
-
36
-
37
-
38
-
39
-
40
-
41
-
42
-
43
-
44
-
45
-
46
-
47
-
48
-
49
-
50
-
51
-
52
-
53
-
54
-
55
-
56
-
57
-
58
-
59
-
60
-
61
-
62
-
63
-
64
-
65
-
66
-
67
-
68
-
69
-
70
-
71
-
72
-
73
-
74
-
75
-
76
-
77
-
78
-
79
-
80
-
81
-
82
-
83
-
84
-
85
-
86
-
87
-
88
-
89
-
90
-
91
-
92
-
93
-
94
-
95
-
96
-
97
-
98
-
99
-
100
-
101
-
102
-
103
-
104
-
105
 |
 |