Lexmark X342N User's Guide - Page 85
Print quality troubleshooting, AaBbCc - specs
 |
UPC - 734646256292
View all Lexmark X342N manuals
Add to My Manuals
Save this manual to your list of manuals |
Page 85 highlights
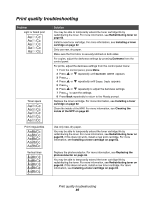
Print quality troubleshooting Problem Light or faded print AaBbCc AaBbCc AaBbCc AaBbCc AaBbCc Toner specs AaBbCc AaBbCc AaBbCc AaBbCc AaBbCc Print irregularities AaBbCc AaBbCc AaBbCc AaBbCc AaBbCc Vertical lines AaBbCc AaBbCc AaBbCc AaBbCc AaBbCc Solution You may be able to temporarily extend the toner cartridge life by redistributing the toner. For more information, see Redistributing toner on page 63. Install a new toner cartridge. For more information, see Installing a toner cartridge on page 62. Only use new, dry paper. Make sure the front door is securely latched on both sides. For copies, adjust the darkness settings by pressing Darkness from the control panel. For prints, adjust the darkness settings from the control panel menu: 1 From the control panel, press Menu. 2 Press or repeatedly until MACHINE SETUP appears. 3 Press . 4 Press or repeatedly until Toner Dark appears. 5 Press . 6 Press or repeatedly to adjust the darkness settings. 7 Press to save the settings. 8 Press Back repeatedly to return to the Ready prompt. Replace the toner cartridge. For more information, see Installing a toner cartridge on page 62. Clean the inside of the MFP. For more information, see Cleaning the inside of the MFP on page 68. Use only new, dry paper. You may be able to temporarily extend the toner cartridge life by redistributing the toner. For more information, see Redistributing toner on page 63. if this does not work, install a new print cartridge. For more information, see Installing a toner cartridge on page 62. Replace the photoconductor. For more information, see Replacing the photoconductor on page 65. You may be able to temporarily extend the toner cartridge life by redistributing the toner. For more information, see Redistributing toner on page 63. if this does not work, install a new toner cartridge. For more information, see Installing a toner cartridge on page 62. Print quality troubleshooting 85
-
 1
1 -
2
-
3
-
4
-
5
-
6
-
7
-
8
-
9
-
10
-
11
-
12
-
13
-
14
-
15
-
16
-
17
-
18
-
19
-
20
-
21
-
22
-
23
-
24
-
25
-
26
-
27
-
28
-
29
-
30
-
31
-
32
-
33
-
34
-
35
-
36
-
37
-
38
-
39
-
40
-
41
-
42
-
43
-
44
-
45
-
46
-
47
-
48
-
49
-
50
-
51
-
52
-
53
-
54
-
55
-
56
-
57
-
58
-
59
-
60
-
61
-
62
-
63
-
64
-
65
-
66
-
67
-
68
-
69
-
70
-
71
-
72
-
73
-
74
-
75
-
76
-
77
-
78
-
79
-
 80
80 -
 81
81 -
 82
82 -
 83
83 -
 84
84 -
 85
85 -
 86
86 -
 87
87 -
 88
88 -
 89
89 -
 90
90 -
91
-
92
-
93
-
94
-
95
-
96
-
97
-
98
-
99
-
100
-
101
-
102
-
103
-
104
-
105
 |
 |
