Lexmark X3690 User's Guide - Page 79
Printing photos from a PictBridge-enabled digital camera, Notes, Warning-Potential Damage
 |
View all Lexmark X3690 manuals
Add to My Manuals
Save this manual to your list of manuals |
Page 79 highlights
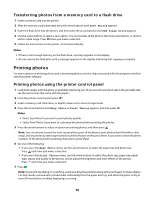
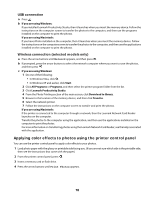
5 Press the arrow buttons to select an option on how to print the photos, and then press . Note: You can choose to print the most recent photo, print all the photos, print photos that fall within a date range, or print photos by selecting photo numbers. Lighter/Darker appears on the display. 6 Press the arrow buttons to adjust the brightness of the photo, and then press . Photo Effects appears on the display. 7 Press the arrow buttons to select a color effect. You can choose to auto-enhance the photo, or print the photo in sepia, antique grey, or antique brown. Press when you make a selection. Note: The color effect applies to all the photos you print until the active memory card or flash drive is removed. 8 Use the arrow buttons to select the photo size, paper size, paper type, layout, and quality of the photos. Press each time you make a selection. 9 Press to print the photos. Note: You can also apply color effects to photos using the Lexmark Productivity Studio (if you installed the program during software installation). For more information on applying color effects to photos, see the Help associated with the program. Printing photos from a PictBridge-enabled digital camera PictBridge is a technology available in most digital cameras that lets you print directly from your digital camera without using a computer. You can connect a PictBridge-enabled digital camera to the printer, and use the camera to control printing photos. 1 Insert one end of the USB cable into the camera. Note: Use only the USB cable that came with the camera. 2 Insert the other end of the cable into the PictBridge port on the front of the printer. Notes: • Make sure that the PictBridge-enabled digital camera is set to the correct USB mode. If the camera USB selection is incorrect, then the camera is detected as a USB storage device, or an error message will be displayed on the printer control panel. For more information, see the camera documentation. • The printer reads only one media device at a time. Warning-Potential Damage: Do not touch the USB cable, any network adapter, any connector, or the printer in the area shown while actively printing from a PictBridge-enabled digital camera. A loss of data can occur. Also, do not remove the USB cable or network adapter while actively printing from a PictBridge-enabled digital camera. 79
-
 1
1 -
2
-
3
-
4
-
5
-
6
-
7
-
8
-
9
-
10
-
11
-
12
-
13
-
14
-
15
-
16
-
17
-
18
-
19
-
20
-
21
-
22
-
23
-
24
-
25
-
26
-
27
-
28
-
29
-
30
-
31
-
32
-
33
-
34
-
35
-
36
-
37
-
38
-
39
-
40
-
41
-
42
-
43
-
44
-
45
-
46
-
47
-
48
-
49
-
50
-
51
-
52
-
53
-
54
-
55
-
56
-
57
-
58
-
59
-
60
-
61
-
62
-
63
-
64
-
65
-
66
-
67
-
68
-
69
-
70
-
71
-
72
-
73
-
 74
74 -
 75
75 -
 76
76 -
 77
77 -
 78
78 -
 79
79 -
 80
80 -
 81
81 -
 82
82 -
 83
83 -
 84
84 -
85
-
86
-
87
-
88
-
89
-
90
-
91
-
92
-
93
-
94
-
95
-
96
-
97
-
98
-
99
-
100
-
101
-
102
-
103
-
104
-
105
-
106
-
107
-
108
-
109
-
110
-
111
-
112
-
113
-
114
-
115
-
116
-
117
-
118
-
119
-
120
-
121
-
122
-
123
-
124
-
125
-
126
-
127
-
128
-
129
-
130
-
131
-
132
-
133
-
134
-
135
-
136
-
137
-
138
-
139
-
140
-
141
-
142
 |
 |