Lexmark X466dtwe Setup Guide
Lexmark X466dtwe Manual
 |
View all Lexmark X466dtwe manuals
Add to My Manuals
Save this manual to your list of manuals |
Lexmark X466dtwe manual content summary:
- Lexmark X466dtwe | Setup Guide - Page 1
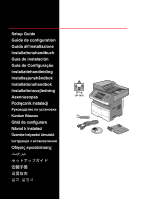
Setup Guide Guide de configuration Guida all'installazione Installationshandbuch Guía de instalación Guia de Configuração Installatiehandleiding Installasjonshåndbok Installationshandbok Installationsvejledning Asennusopas Podręcznik instalacji Kurulum Kılavuzu Ghid de - Lexmark X466dtwe | Setup Guide - Page 2
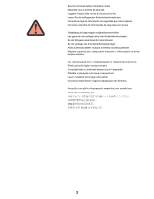
See the enclosed safety information sheet. Reportez-vous à la fiche de sécurité. Leggere il foglio delle norme di sicurezza fornito. Lesen Sie die beiliegenden Sicherheitsinformationen. Consulte la hoja de información de seguridad que viene adjunta. Consulte a planilha de informações de segurança em - Lexmark X466dtwe | Setup Guide - Page 3
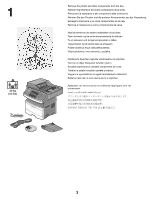
1 Remove the printer and other components from the box. Retirez l'imprimante et les autres composants los otros componentes de la caja. Remova a impressora e outros componentes da caixa. Haal de printer en de andere onderdelen uit de doos. Fjern skriveren og de andre komponentene fra boksen. Ta ur - Lexmark X466dtwe | Setup Guide - Page 4
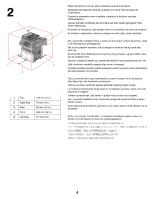
2 1 5 3 4 1 Top 2 Right Side 3 Rear 4 Front 5 Left Side 178 mm (7 in.) 76 mm (3 in.) 90 mm (3.5 in.) 406 mm (16 in.) 51 mm (2 in.) When the printer is set up, allow clearance around it as shown. Respectez les espaces indiqués ci-dessus lors de la mise en place de l'imprimante. Quando la - Lexmark X466dtwe | Setup Guide - Page 5
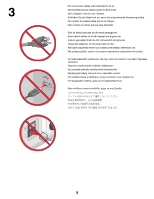
3 Do not connect cables until instructed to do so. Ne branchez pas les câbles avant d'y être invité. Non collegare i cavi se non richiesto. Schließen Sie die Kabel erst an, wenn - Lexmark X466dtwe | Setup Guide - Page 6
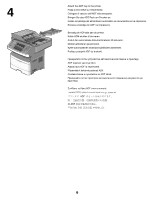
del alimentador automático de documentos en la impresora. Encaixe a bandeja do ADF na impressora. Bevestig de ADI-lade aan de printer. Koble ADM-skuffen til skriveren. Anslut den automatiska dokumentmataren till skrivaren. Monter arkføderen på printeren. Kytke automaattinen asiakirjansyöttölaite - Lexmark X466dtwe | Setup Guide - Page 7
5 1 2 Press the door release button and lower the front door. Poussez le bouton d'ouverture, puis abaissez la porte avant. Premere il pulsante di rilascio dello sportello e abbassare lo sportello anteriore. Drücken Sie auf die Entriegelung und öffnen Sie die vordere Klappe. Presione el botón de - Lexmark X466dtwe | Setup Guide - Page 8
6 Remove the photoconductor kit and toner cartridge. Retirez le kit du photoconducteur et la cartouche de toner. Rimuovere il kit fotoconduttore e la cartuccia di toner. Entnehmen Sie das Fotoleiter-Kit und die Druckkassette. Extraiga el kit del fotoconductor y el cartucho de tóner. Remova o kit - Lexmark X466dtwe | Setup Guide - Page 9
7 Remove the packaging material. Retirez l'emballage. Rimuovere il materiale di imballaggio. Entfernen Sie das Verpackungsmaterial. Extraiga el material de embalaje. Retire o material de embalagem. Verwijder het - Lexmark X466dtwe | Setup Guide - Page 10
8 Insert the photoconductor kit and toner cartridge. Insérez le kit du photoconducteur et la cartouche de toner. Inserire il kit fotoconduttore e la cartuccia di toner. Setzen Sie das Fotoleiter-Kit und die Druckkassette wieder ein. Inserte el kit del fotoconductor y el cartucho de tóner. Insira o - Lexmark X466dtwe | Setup Guide - Page 11
de tóner mediante la palanca. Pressione o botão no kit fotocondutor. Puxe o cartucho de toner para cima e para fora utilizando a alça. Druk op de knop op de fotoconductorkit. Trek de tonercartridge omhoog en uit de printer met behulp van de handgreep. Trykk på knappen på fotoledersettet. Trekk - Lexmark X466dtwe | Setup Guide - Page 12
Tasoita väriaine ravistamalla värikasettia edestakaisin ja sivuttain. Potrząśnij kasetą z tonerem na boki, do przodu i do tyłu, aby rozprowadzić toner. Toneri eşit dağıtmak için, toner kartuşunu iki yana ve önden arkaya doğru sallayın. Scuturaţi cartuşul dintr-o parte în alta şi înainte-înapoi, de - Lexmark X466dtwe | Setup Guide - Page 13
Sie die Druckkassette so ein, dass sie hörbar einrastet. Inserte el cartucho de tóner hasta que encaje en su lugar. Insira o cartucho de toner até encaixar no lugar. Druk de tonercartridge naar binnen tot deze vastklikt. Sett inn tonerkassetten til den klikker på plass. Tryck in tonerkassetten tills - Lexmark X466dtwe | Setup Guide - Page 14
12 Close the front door. Refermez la porte avant. Chiudere lo sportello anteriore. Schließen Sie die vordere Klappe. Cierre la puerta frontal. Feche a porta frontal. Sluit de voorklep. Lukk frontdekselet. Stäng den främre luckan. Luk frontpanelet. Sulje etuluukku. Zamknij przednie drzwiczki. n - Lexmark X466dtwe | Setup Guide - Page 15
13 Remove the paper tray, and then adjust the paper guides. Retirez le tiroir papier, puis réglez les guide-papier. Rimuovere il vassoio carta, quindi regolare le guide carta. Entfernen Sie das Papierfach und passen Sie die Papierführungen an. Extraiga la bandeja de papel y ajuste las guías de - Lexmark X466dtwe | Setup Guide - Page 16
14 Load the paper tray. Chargez le tiroir papier. Caricare il vassoio carta. Legen Sie Papier in das Fach ein. Cargue la bandeja de papel. Carregue a bandeja de papel. Plaats papier in de lade. Legg papir i papirskuffen. Fyll på pappersmagasinet. Læg papir i skuffen. Lisää lokeroon paperia. Załaduj - Lexmark X466dtwe | Setup Guide - Page 17
15 Choose a connection method. For Local USB setup, see page 19. For Network setup, see page 35. If you purchased a wireless printer, see the Wireless Setup Guide. Choisissez une méthode de connexion. Pour une configuration USB locale, reportez-vous à la page 19. Pour une configuration réseau, - Lexmark X466dtwe | Setup Guide - Page 18
15 USB 19 35 Bir bağlantı yöntemi seçin. Yerel kurulumu için, bkz. sayfa 19. Ağ kurulumu için, bkz. sayfa 35. Kablosuz yazıcı satın aldıysanız, bkz. Kablosuz Kurulum Kılavuzu. Alegeţi o metodă de conectare. Pentru configurare USB locală, consultaţi pagina 19. Pentru configurare reţea, - Lexmark X466dtwe | Setup Guide - Page 19
Local USB 16.1 Install the software. Installez le logiciel. Installare il software. Installieren Sie die Software. Instale el software. Instale o software. Installeer de software. Installer programvaren. Installera programvaran. Installer softwaren. Asenna ohjelmisto. Zainstaluj oprogramowanie. - Lexmark X466dtwe | Setup Guide - Page 20
16.2 1 2 Remove the yellow label covering the USB port. Connect the USB cable to the printer and the computer. Retirez l'étiquette . Verwijder het gele etiket op de USB-poort. Sluit de USB-kabel aan op de printer en de computer. Fjern den gule etiketten som dekker USB-porten. Koble USB-kabelen til - Lexmark X466dtwe | Setup Guide - Page 21
e seja de fácil acesso. Ligue a impressora. Sluit het netsnoer aan op de printer en vervolgens op een geaard stopcontact dat zich dicht in de buurt van de printer bevindt en dat eenvoudig bereikbaar is. Zet de printer aan. Koble strømledningen til skriveren og deretter til en skikkelig jordet - Lexmark X466dtwe | Setup Guide - Page 22
fax now, connect the fax cables. See the User's Guide on the Software and Documentation CD for help deciding how to connect the cables. Si vous souhaitez configurer la fonction de télécopie maintenant, branchez les câbles du télécopieur. Reportez-vous au Guide de l'utilisateur sur le CD Logiciel et - Lexmark X466dtwe | Setup Guide - Page 23
pulse Continuar. No painel de controle da impressora, selecione seu idioma e o país ou região, e depois toque em Continuar. Selecteer op het bedieningspaneel van de printer uw taal en uw land of regio en raak dan Doorgaan aan. Fra skriverens kontrollpanel velger du ditt språk og land eller område - Lexmark X466dtwe | Setup Guide - Page 24
16.6 Select your time zone, and then touch Continue. Sélectionnez le fuseau horaire, puis appuyez sur Continuer. Selezionare il fuso orario, quindi toccare Continua. Wählen Sie Ihre Zeitzone aus und berühren Sie dann Fortfahren. Seleccione su zona horaria y pulse Continuar. Selecione seu fuso horá - Lexmark X466dtwe | Setup Guide - Page 25
you plan to set up later, such as Fax or E-mail, and then touch Continue. Désélectionnez les fonctions que vous souhaitez installer plus tard, telles que Télécopie ou Courrier électronique, puis appuyez sur Continuer. Deselezionare qualsiasi funzione che si intende impostare in seguito, ad esempio - Lexmark X466dtwe | Setup Guide - Page 26
16.8 Select any additional buttons you want to display on the home screen, and then touch Continue. Sélectionnez les boutons supplémentaires que vous souhaitez faire apparaître sur l'écran d'accueil, puis appuyez sur Continuer. Selezionare eventuali pulsanti aggiuntivi che si desidera visualizzare - Lexmark X466dtwe | Setup Guide - Page 27
.9 If fax is enabled, type in your Fax Station name, and then touch Enter. For more information, see your system support person; or touch the Back button to go back and deselect Fax. Si Télécopie est activée, saisissez le nom du poste, puis appuyez sur Entrer. Pour plus d'informations, contactez un - Lexmark X466dtwe | Setup Guide - Page 28
16.9 Faks etkinleştirilmişse, Faks İstasyonu adınızı yazın ve Giriş öğesine basın. Daha fazla bilgi için, sistem destek personelinizle görüşün veya geri dönüp Faks seçimini kaldırmak için Geri düğmesine basın. Dacă opţiunea Fax este activată, tastaţi numele de Staţie fax, apoi atingeţi Enter. - Lexmark X466dtwe | Setup Guide - Page 29
16.10 If fax is enabled, then enter the Fax Station (phone) number for this printer, and then touch Continue. Si Télécopie est activée, faxen is ingeschakeld, voert u het (telefoon)nummer van het faxstation voor deze printer in en raakt u Doorgaan aan. Dersom faksalternativet er aktivert, angir du - Lexmark X466dtwe | Setup Guide - Page 30
E-mail is enabled, type in the Primary SMTP (mail server) Gateway address, and then touch Enter. For more information, see your system support person; or messagerie), puis appuyez sur Entrer. Pour plus d'informations, contactez un agent du support technique ou appuyez sur le bouton Retour afin - Lexmark X466dtwe | Setup Guide - Page 31
16.11 SMTP E-posta etkinleştirilmişse, Birincil SMTP (posta sunucusu) Ağ Geçidi adresini yazın ve Giriş öğesine basın. Daha fazla bilgi için, sistem destek personelinizle görüşün veya geri dönüp E-posta seçimini kaldırmak için Geri düğmesine basın. Dacă este activată Poşta electronică, - Lexmark X466dtwe | Setup Guide - Page 32
16.12 If prompted, set the date and time, and then touch Continue. Si vous y êtes invité, sélectionnez une date et une heure, puis appuyez sur Continuer. Se richiesto, impostare la data e l'ora, quindi toccare Continua. Geben Sie ggf. Datum und Uhrzeit ein und berühren Sie Fortfahren. Si se le - Lexmark X466dtwe | Setup Guide - Page 33
Xxxxx Xxxxx xxx.xxxxxxx.xxx Local setup is complete. For more information, see the User's Guide. La configuration locale est terminée. Pour plus d'informations, reportez-vous au Guide de l'utilisateur. L'impostazione locale è completata. Per ulteriori informazioni, consultare la Guida per l'utente - Lexmark X466dtwe | Setup Guide - Page 34
el cable de red a la impresora y a la red. Conecte o cabo de rede à impressora e depois à rede. Sluit de netwerkkabel aan op de printer en vervolgens op het netwerk. Koble nettverkskabelen til skriveren og deretter til nettverket. Anslut nätverkskabeln till skrivaren först och sedan till nätverket - Lexmark X466dtwe | Setup Guide - Page 35
fax now, connect the fax cables. See the User's Guide on the Software and Documentation CD for help deciding how to connect the cables. Si vous souhaitez installer la télécopie maintenant, branchez les câbles du télécopieur. Reportez-vous au Guide de l'utilisateur sur le CD Logiciel et documentation - Lexmark X466dtwe | Setup Guide - Page 36
e seja de fácil acesso. Ligue a impressora. Sluit het netsnoer aan op de printer en vervolgens op een geaard stopcontact dat zich dicht in de buurt van de printer bevindt en dat eenvoudig bereikbaar is. Zet de printer aan. Koble strømledningen til skriveren og deretter til en skikkelig jordet - Lexmark X466dtwe | Setup Guide - Page 37
pulse Continuar. No painel de controle da impressora, selecione seu idioma e o país ou região, e depois toque em Continuar. Selecteer op het bedieningspaneel van de printer uw taal en uw land of regio en raak dan Doorgaan aan. Fra skriverens kontrollpanel velger du ditt språk og land eller område - Lexmark X466dtwe | Setup Guide - Page 38
16.5 Select your time zone, and then touch Continue. Sélectionnez le fuseau horaire, puis appuyez sur Continuer. Selezionare il fuso orario, quindi toccare Continua. Wählen Sie Ihre Zeitzone aus und berühren Sie dann Fortfahren. Seleccione su zona horaria y pulse Continuar. Selecione seu fuso horá - Lexmark X466dtwe | Setup Guide - Page 39
you plan to set up later, such as Fax or E-mail, and then touch Continue. Désélectionnez les fonctions que vous souhaitez installer plus tard, telles que Télécopie ou Courrier électronique, puis appuyez sur Continuer. Deselezionare qualsiasi funzione che si intende impostare in seguito, ad esempio - Lexmark X466dtwe | Setup Guide - Page 40
16.7 Select any additional buttons you want to display on the home screen, and then touch Continue. Sélectionnez les boutons supplémentaires que vous souhaitez faire apparaître sur l'écran d'accueil, puis appuyez sur Continuer. Selezionare eventuali pulsanti aggiuntivi che si desidera visualizzare - Lexmark X466dtwe | Setup Guide - Page 41
.8 If fax is enabled, type in your Fax Station name, and then touch Enter. For more information, see your system support person; or touch the Back button to go back and deselect Fax. Si Télécopie est activée, saisissez le nom du poste, puis appuyez sur Entrer. Pour plus d'informations, contactez un - Lexmark X466dtwe | Setup Guide - Page 42
16.8 Faks etkinleştirilmişse, Faks İstasyonu adınızı yazın ve Giriş öğesine basın. Daha fazla bilgi için, sistem destek personelinizle görüşün veya geri dönüp Faks seçimini kaldırmak için Geri düğmesine basın. Dacă opţiunea Fax este activată, tastaţi numele de Staţie fax, apoi atingeţi Enter. - Lexmark X466dtwe | Setup Guide - Page 43
16.9 If fax is enabled, then enter the Fax Station (phone) number for this printer, and then touch Continue. Si Télécopie est ingeschakeld, voert u het (telefoon)nummer van het faxstation in voor deze printer en raakt u Doorgaan aan. Dersom faksalternativet er aktivert, angir du faksstasjonsnummeret - Lexmark X466dtwe | Setup Guide - Page 44
E-mail is enabled, type in the Primary SMTP (mail server) Gateway address, and then touch Enter. For more information, see your system support person; or messagerie), puis appuyez sur Entrer. Pour plus d'informations, contactez un agent du support technique ou appuyez sur le bouton Retour afin - Lexmark X466dtwe | Setup Guide - Page 45
16.10 SMTP E-posta etkinleştirilmişse, Birincil SMTP (posta sunucusu) Ağ Geçidi adresini yazın ve Giriş öğesine basın. Daha fazla bilgi için, sistem destek personelinizle görüşün veya geri dönüp E-posta seçimini kaldırmak için Geri düğmesine basın. Dacă este activată Poşta electronică, - Lexmark X466dtwe | Setup Guide - Page 46
16.11 If prompted, set the date and time, and then touch Continue. Si vous y êtes invité, sélectionnez une date et une heure, puis appuyez sur Continuer. Se richiesto, impostare la data e l'ora, quindi toccare Continua. Geben Sie ggf. Datum und Uhrzeit ein und berühren Sie Fortfahren. Si se le - Lexmark X466dtwe | Setup Guide - Page 47
16.12 Ready Touch any button to begin. On the home screen, touch . Sur l'écran d'accueil, appuyez sur . Nella schermata principale, toccare . Berühren Sie im Startbildschirm . En la pantalla de inicio, pulse . Na tela início, toque em . Raak aan op het Home-scherm. Trykk på startsiden. På - Lexmark X466dtwe | Setup Guide - Page 48
16.13 Touch Reports, and then touch Network Setup Page. Appuyez sur Rapports, puis sur Page de configuration réseau. Toccare Report, quindi Pagina impostazioni rete. Wählen Sie Berichte und danach Netzwerk-Konfigurationsseite. Pulse Informes y, a continuación, Página de configuración de la red. - Lexmark X466dtwe | Setup Guide - Page 49
16.14 XXX.XXX.XX.XX XXX.XXX.XX.X XXX.XXX.XX.X XXX.XXX.XXX.XX XXX.XXX.XXX.XXX Find the IP address on the network setup page. Identifiez l'adresse IP sur la page de configuration réseau. Individuare l'indirizzo IP nella pagina delle impostazioni di rete. Suchen Sie die IP-Adresse auf der Netzwerk- - Lexmark X466dtwe | Setup Guide - Page 50
16.15 Install the software. Use the network setup page to find the IP address. Installez le logiciel. Utilisez la page de configuration réseau pour identifier l'adresse IP. Installare il software. Utilizzare la pagina delle impostazioni di rete per individuare l'indirizzo IP. Installieren Sie die - Lexmark X466dtwe | Setup Guide - Page 51
Xxxxxx Xxxxx Xxxxx xxx.xxxxxxx.xxx Network setup is complete. For more information, see the User's Guide. La configuration réseau est terminée. Pour plus d'informations, reportez-vous au Guide de l'utilisateur. L'impostazione di rete è completata. Per ulteriori informazioni, consultare la Guida per - Lexmark X466dtwe | Setup Guide - Page 52
PN 3048476 Rev 001 © 2008 Lexmark International, Inc. All rights reserved. 3048476 11/08
-
 1
1 -
 2
2 -
 3
3 -
 4
4 -
 5
5 -
 6
6 -
 7
7 -
8
-
9
-
10
-
11
-
12
-
13
-
14
-
15
-
16
-
17
-
18
-
19
-
20
-
21
-
22
-
23
-
24
-
25
-
26
-
27
-
28
-
29
-
30
-
31
-
32
-
33
-
34
-
35
-
36
-
37
-
38
-
39
-
40
-
41
-
42
-
43
-
44
-
45
-
46
-
47
-
48
-
49
-
50
-
51
-
52
 |
 |

Setup Guide
Guide de configuration
Guida all'installazione
Installationshandbuch
Guía de instalación
Guia de Configuração
Installatiehandleiding
Installasjonshåndbok
Installationshandbok
Installationsvejledning
Asennusopas
Podr
ę
cznik instalacji
Руководство по установке
Kurulum K
ı
lavuzu
Ghid de configurare
Návod k instalaci
Üzembe helyezési útmutató
Інструкція з встановлення
Οδηγός
εγκατάστασης
セットアップガイド
安裝手冊
设置指南
설치 설명서
20 kg
(44 lbs)
ﺩﻟﻴﻞ ﺍﻹﻋﺪﺍﺩ