Lexmark X642E Quick Reference
Lexmark X642E - X642E Manual
 |
UPC - 734646258746
View all Lexmark X642E manuals
Add to My Manuals
Save this manual to your list of manuals |
Lexmark X642E manual content summary:
- Lexmark X642E | Quick Reference - Page 1
Lexmark™ X642 Quick Reference Loading paper and specialty media Loading standard trays and optional trays Note: Do not remove a tray when a job is printing or when the control panel green indicator light is blinking. Doing so may cause a jam. 1 Remove the tray from the MFP, and place it on a flat, - Lexmark X642E | Quick Reference - Page 2
first. Warning: Never use envelopes with stamps, clasps, snaps, windows, coated linings, or self-stick adhesives. These envelopes may severely damage the MFP. Simplex (single sided) Duplex 6 Slide the side guide toward the inside of the tray until it lightly rests against the edge of the media - Lexmark X642E | Quick Reference - Page 3
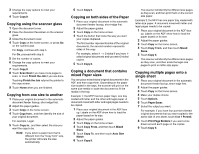
Size Match. 6 Touch Copy It. The scanner will identify the different size pages as they scan, and then print them on the correct size paper. Example 2: the MFP has one paper tray, loaded with letter-size paper. A document mixed with letter and legal pages needs to be copied. 1 Place your original - Lexmark X642E | Quick Reference - Page 4
prints, it is deleted from printer memory. Printing from a USB flash memory device 1 Make sure the MFP is on and Ready or Busy appears. 2 Insert a USB flash memory device into the USB Direct interface. Note: If you insert the memory device when the MFP requires attention such as when a paper jam - Lexmark X642E | Quick Reference - Page 5
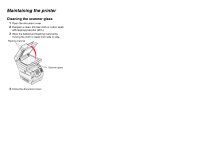
Maintaining the printer Cleaning the scanner glass 1 Open the document cover. 2 Dampen a clean, lint-free cloth or cotton swab with isopropyl alcohol (95%). 3 Wipe the flatbed and backing material by moving the cloth or swab from side to side. Backing material Scanner glass 4 Close the document
-
 1
1 -
 2
2 -
 3
3 -
 4
4 -
 5
5
 |
 |

Lexmark™ X642
Quick Reference
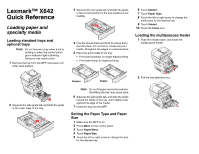
Loading paper and
specialty media
Loading standard trays and
optional trays
Note:
Do not remove a tray when a job is
printing or when the control panel
green indicator light is blinking.
Doing so may cause a jam.
1
Remove the tray from the MFP, and place it on
a flat, level surface.
2
Squeeze the side guide tab, and slide the guide
to the outer edge of the tray.
3
Squeeze the rear guide tab, and slide the guide
to the correct position for the size media you are
loading.
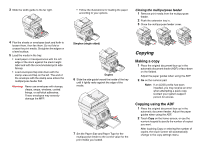
4
Flex the sheets back and forth to loosen them,
then fan them. Do not fold or crease the print
media. Straighten the edges on a level surface.
5
Place the print media in the tray:
•
Print side facedown for single-sided printing
•
Print side faceup for duplex printing
Note:
Do not fill paper above the load line.
Overfilling the tray may cause jams.
6
Squeeze the side guide tab, and slide the guide
toward the inside of the tray until it lightly rests
against the edge of the media.
7
Insert the tray into the MFP.
Setting the Paper Type and Paper
Size
1
Make sure the MFP is on.
2
Press
Menu
on the control panel.
3
Touch
Paper Menu
.
4
Touch
Paper Size
.
5
Touch the left or right arrow to change the size
for the desired tray.
6
Touch
Submit
.
7
Touch
Paper Type
.
8
Touch the left or right arrow to change the
media type for the desired tray.
9
Touch
Submit
.
10
Touch the
home
icon.
Loading the multipurpose feeder
1
Push the release latch, and lower the
multipurpose feeder.
2
Pull the tray extension out.
Simplex
Duplex