Lexmark X651DE Troubleshooting Guide - Page 4
Solving fax problems - reviews
 |
UPC - 734646093729
View all Lexmark X651DE manuals
Add to My Manuals
Save this manual to your list of manuals |
Page 4 highlights
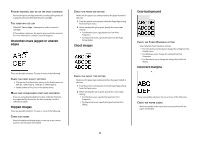
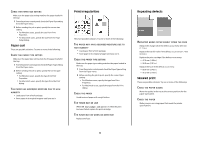
Poor scanned image quality These are possible solutions. Try one or more of the following: CHECK THE DISPLAY FOR ERROR MESSAGES Clear any error messages. THE SCANNER GLASS MAY BE DIRTY Clean the scanner glass with a clean, lint-free cloth dampened with water. ADJUST THE SCAN RESOLUTION Increase the resolution of the scan for a higher quality output. CHECK THE QUALITY OF THE ORIGINAL DOCUMENT Make sure the quality of the original document is satisfactory. CHECK THE DOCUMENT PLACEMENT Make sure the document or photo is loaded facedown on the scanner glass in the upper left corner. Partial document or photo scans These are possible solutions. Try one or more of the following: CHECK THE DOCUMENT PLACEMENT Make sure the document or photo is loaded facedown on the scanner glass in the upper left corner. CHECK THE PAPER SIZE SETTING Make sure the paper size setting matches the paper loaded in the tray: 1 From the printer control panel, check the Paper Size setting from the Paper menu. 2 Before sending the job to print, specify the correct size setting: • For Windows users, specify the size from Print Properties. • For Macintosh users, specify the size from the Page Setup dialog. Cannot scan from a computer These are possible solutions. Try one or more of the following: CHECK THE DISPLAY FOR ERROR MESSAGES Clear any error messages. CHECK THE POWER Make sure the printer is plugged in, the power is on, and Ready appears. CHECK THE CABLE CONNECTIONS Make sure the network or USB cable is securely connected to the computer and the printer. Solving fax problems Caller ID is not shown Contact your telecommunications company to verify that your telephone line is subscribed to the caller ID service. If your region supports multiple caller ID patterns, you may have to change the default setting. There are two settings available: FSK (pattern 1) and DTMF (pattern 2). The availability of these settings by way of the Fax menu depends on whether your country or region supports multiple caller ID patterns. Contact your telecommunications company to determine which pattern or switch setting to use. Cannot send or receive a fax These are possible solutions. Try one or more of the following: CHECK THE DISPLAY FOR ERROR MESSAGES Clear any error messages. CHECK THE POWER Make sure the printer is plugged in, the power is on, and Ready appears. 4 CHECK THE PRINTER CONNECTIONS Make sure the cable connections for the following hardware are secure, if applicable: • Telephone • Handset • Answering machine CHECK THE TELEPHONE WALL JACK 1 Plug a telephone into the wall jack. 2 Listen for a dial tone. 3 If you do not hear a dial tone, then plug a different telephone into the wall jack. 4 If you still do not hear a dial tone, then plug a telephone into a different wall jack. 5 If you hear a dial tone, then connect the printer to that wall jack. REVIEW THIS DIGITAL PHONE SERVICE CHECKLIST The fax modem is an analog device. Certain devices can be connected to the printer so that digital telephone services can be used. • If you are using an ISDN telephone service, then connect the printer to an analog telephone port (an R-interface port) on an ISDN terminal adapter. For more information and to request an R-interface port, contact your ISDN provider. • If you are using DSL, then connect to a DSL filter or router that will support analog use. For more information, contact your DSL provider. • If you are using a PBX telephone service, then make sure you are connecting to an analog connection on the PBX. If none exists, consider installing an analog telephone line for the fax machine. CHECK FOR A DIAL TONE • Place a test call to the telephone number to which you want to send a fax to make sure that it is working correctly. • If the telephone line is being used by another device, then wait until the other device is finished before sending a fax. • If you are using the On Hook Dial feature, then turn up the volume to verify a dial tone.
-
 1
1 -
 2
2 -
 3
3 -
 4
4 -
 5
5 -
 6
6 -
 7
7 -
 8
8 -
 9
9 -
 10
10 -
11
-
12
 |
 |
