Lexmark X952 User's Guide - Page 100
Printing on specialty media, Tips on using letterhead, Tips on using transparencies
 |
View all Lexmark X952 manuals
Add to My Manuals
Save this manual to your list of manuals |
Page 100 highlights
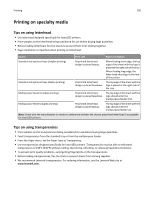
Printing 100 Printing on specialty media Tips on using letterhead • Use letterhead designed specifically for laser/LED printers. • Print samples on the letterhead being considered for use before buying large quantities. • Before loading letterhead, flex the sheets to prevent them from sticking together. • Page orientation is important when printing on letterhead. Source Print side Paper orientation Standard and optional trays (simplex printing) Preprinted letterhead design is placed faceup. When feeding short edge, the top edge of the sheet with the logo is placed at the right side of the tray. When feeding long‑edge, the letter head should go to the rear of the printer. Standard and optional trays (duplex printing) Preprinted letterhead The top edge of the sheet with the design is placed facedown. logo is placed at the right side of the tray. Multipurpose feeder (simplex printing) Preprinted letterhead The top edge of the sheet with the design is placed facedown. logo should enter the multipurpose feeder first. Multipurpose feeder (duplex printing) Preprinted letterhead design is placed faceup. The top edge of the sheet with the logo should enter the multipurpose feeder last. Note: Check with the manufacturer or vendor to determine whether the chosen preprinted letterhead is acceptable for laser/LED printers. Tips on using transparencies • Print samples on the transparencies being considered for use before buying large quantities. • Feed transparencies from the standard tray or from the multipurpose feeder. • From the Paper menu, set the Paper Type to Transparency. • Use transparencies designed specifically for laser/LED printers. Transparencies must be able to withstand temperatures of 230°C (446°F) without melting, discoloring, offsetting, or releasing hazardous emissions. • To prevent print quality problems, avoid getting fingerprints on the transparencies. • Before loading transparencies, flex the stack to prevent sheets from sticking together. • We recommend Lexmark transparencies. For ordering information, see the Lexmark Web site at www.lexmark.com.
-
 1
1 -
2
-
3
-
4
-
5
-
6
-
7
-
8
-
9
-
10
-
11
-
12
-
13
-
14
-
15
-
16
-
17
-
18
-
19
-
20
-
21
-
22
-
23
-
24
-
25
-
26
-
27
-
28
-
29
-
30
-
31
-
32
-
33
-
34
-
35
-
36
-
37
-
38
-
39
-
40
-
41
-
42
-
43
-
44
-
45
-
46
-
47
-
48
-
49
-
50
-
51
-
52
-
53
-
54
-
55
-
56
-
57
-
58
-
59
-
60
-
61
-
62
-
63
-
64
-
65
-
66
-
67
-
68
-
69
-
70
-
71
-
72
-
73
-
74
-
75
-
76
-
77
-
78
-
79
-
80
-
81
-
82
-
83
-
84
-
85
-
86
-
87
-
88
-
89
-
90
-
91
-
92
-
93
-
94
-
 95
95 -
 96
96 -
 97
97 -
 98
98 -
 99
99 -
 100
100 -
 101
101 -
 102
102 -
 103
103 -
 104
104 -
 105
105 -
106
-
107
-
108
-
109
-
110
-
111
-
112
-
113
-
114
-
115
-
116
-
117
-
118
-
119
-
120
-
121
-
122
-
123
-
124
-
125
-
126
-
127
-
128
-
129
-
130
-
131
-
132
-
133
-
134
-
135
-
136
-
137
-
138
-
139
-
140
-
141
-
142
-
143
-
144
-
145
-
146
-
147
-
148
-
149
-
150
-
151
-
152
-
153
-
154
-
155
-
156
-
157
-
158
-
159
-
160
-
161
-
162
-
163
-
164
-
165
-
166
-
167
-
168
-
169
-
170
-
171
-
172
-
173
-
174
-
175
-
176
-
177
-
178
-
179
-
180
-
181
-
182
-
183
-
184
-
185
-
186
-
187
-
188
-
189
-
190
-
191
-
192
-
193
-
194
-
195
-
196
-
197
-
198
-
199
-
200
-
201
-
202
-
203
-
204
-
205
-
206
-
207
-
208
-
209
-
210
-
211
-
212
-
213
-
214
-
215
-
216
-
217
-
218
-
219
-
220
-
221
-
222
-
223
-
224
-
225
-
226
-
227
-
228
-
229
-
230
-
231
-
232
-
233
-
234
-
235
-
236
-
237
-
238
-
239
-
240
-
241
-
242
-
243
-
244
-
245
-
246
-
247
-
248
-
249
-
250
-
251
-
252
-
253
-
254
-
255
-
256
-
257
-
258
-
259
-
260
-
261
-
262
-
263
-
264
-
265
-
266
-
267
-
268
-
269
-
270
-
271
-
272
-
273
-
274
-
275
-
276
-
277
-
278
-
279
-
280
-
281
-
282
-
283
-
284
-
285
-
286
-
287
-
288
-
289
-
290
-
291
-
292
-
293
-
294
-
295
-
296
-
297
-
298
-
299
-
300
-
301
-
302
-
303
-
304
-
305
-
306
-
307
-
308
-
309
-
310
-
311
-
312
-
313
-
314
-
315
-
316
-
317
-
318
-
319
-
320
-
321
-
322
-
323
-
324
-
325
-
326
-
327
-
328
-
329
-
330
-
331
-
332
-
333
-
334
-
335
-
336
-
337
-
338
-
339
-
340
-
341
-
342
-
343
-
344
-
345
-
346
-
347
-
348
-
349
-
350
-
351
-
352
-
353
-
354
-
355
-
356
-
357
-
358
-
359
-
360
-
361
-
362
-
363
-
364
-
365
-
366
-
367
-
368
-
369
-
370
-
371
-
372
 |
 |