LiftMaster EL2000 EL25 - QUICK START GUIDE Manual - Page 2
Click the ACCESS DETAILS Tab, Click the NEW TENANT ICON, Click the AUTO CONFIGURATION ICON, Click - port a is down
 |
View all LiftMaster EL2000 manuals
Add to My Manuals
Save this manual to your list of manuals |
Page 2 highlights
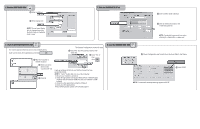
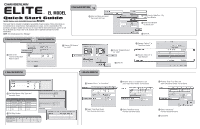
6. Click the NEW TENANT ICON 1 Enter Last Name 1 2 Enter Display Info 2 NOTE: The unit uses Display Info for transactions when the Entry Code or Credential Code is used. 7. Click the ACCESS DETAILS Tab 1 Enter an Entry Code (optional) 2 Click on Select and create a new 1 Credential (optional) 2 NOTE: A credential is a generic term when referring to a transmitter or swipe card. 8. Click the AUTO CONFIGURATION ICON If a window appears informing you to close all applications, make sure to close other applications and click OK 1 2 1 Wait for Versa XS to identify modems 2 Select a Connect Set from the "Connect Set" list 3 3 Click OK The Custom Configuration screen will open 4 Check the "Use This Connect Set for Unit" check box 5 Click "Test It" then click 4 5 A pop-up window will inform you that the Connect Set was sucessfully tested. NOTE: If "Test It" button fails, try one of the following: 1. Be sure your modem is turned on. 2. Check the appropriate Connection Mode (Direct or Modem) type confirms with the selected COM port (see you computer's COM settings). 3. Close any other application using the COM port. 4. Close any other applications. If the problem persists, please call technical support. 9. Click the TRANSFER DATA ICON 1 Check Configuration and Tenant Info in the Send Data to Unit frame 1 2 2 Click START NOTE: If a mismatch message/warning appears click OK.
-
 1
1 -
 2
2 -
 3
3 -
 4
4
 |
 |
