LiftMaster EL2000 EL25 - QUICK START GUIDE Manual - Page 3
Quick Start Guide - manual
 |
View all LiftMaster EL2000 manuals
Add to My Manuals
Save this manual to your list of manuals |
Page 3 highlights
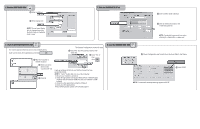
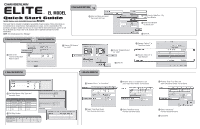
® EL MODEL Quick Start Guide For Multi-Family or single-Family (With Directory Codes) Versa XS This Quick Start is intended to highlight a typical Multi-Tenant Complex. These instructions are not intended to be comprehensive. Each application is unique, it is the responsibility of the purchasers, designer, installer and end user to ensure that the total control access system is safe for its intended use. Please refer to the manuals and/or qualified technician for further information. NOTE: The default password is "Manager." 1. Click the NEW UNIT ICON 1 Enter Unit Name and select the correct Unit Type 2 2 Enter Country, State/Prov., City and Phone Number 3 3 Enter Phone Number to dial into unit 4 4 Click OK 2. Click the Unit Configuration ICON Select the DEVICES Tab 1 1 Click on the "Device Configuration Wizard" button 2 Choose "RF Receiver" for "J407" 5 Rename "Device 1" to "Back Door Reader" 3 Choose "Wiegand Device" for "J400" 5 6 Rename "Device 3" to "Gate Receiver" 6 2 3 4 4 Click OK 3. Select the RELAYS Tab 4. Click the DOORS Tab Disabled Disabled 1 Set Relay Names, Relay Types and Activation Times: 1 Relay # Relay Name Relay Type Relay Activation Time 1 Front Strike Strike 10 Seconds 2 Security Light Control 60 Seconds 2 3 Back Strike Strike 10 Seconds 4 Gate Strike 2 Seconds 2 Set Relay Groups: Relay Group Name Front Strike Security Light Back Strike Gate Front Door Group X X Back Door Group X Gate Group X 1 Rename "Door 1" to "Front Door" 1 2 2 Select "Front Door Group" from the drop-down menu 3 Rename "Door 2" to "Back Door" and select "Back Door Reader" for the Device 3 4 4 Select "Back Door Group" from the drop-down menu 5 Rename "Door 3" to "Gate" and select "Back Door Reader" for the Device 5 6 7 6 Select "Gate Group" from the drop-down menu 7 Click SAVE
-
 1
1 -
 2
2 -
 3
3 -
 4
4
 |
 |
