LiftMaster GH GH Logic 4 Quick Start Guide Manual - Page 2
Factory Setting is C2, Board Selector Dial, OPEN Mid Stop Programming, Timer-to-Close Programming, - 10 11 2
 |
View all LiftMaster GH manuals
Add to My Manuals
Save this manual to your list of manuals |
Page 2 highlights
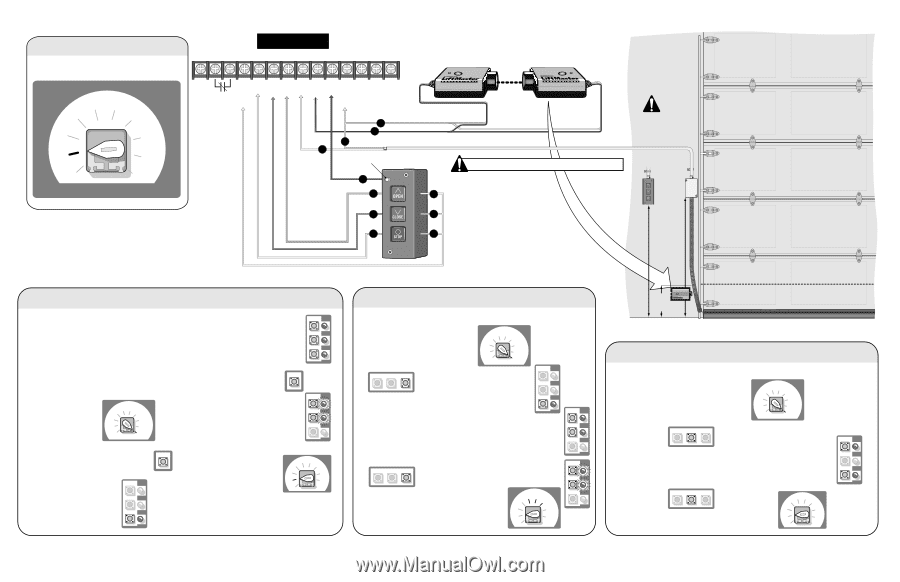
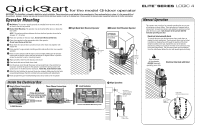
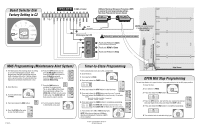
Board Selector Dial Factory Setting is C2 CONTROL WIRING 20 AWG or Greater USE COPPER WIRE ONLY 1 2 3 4 5 6 7 8 9 10 11 12 13 14 LiftMaster Monitored Entrapment Protection (LMEP) is required for most programmable settings. Thru-Beam Photoelectric Sensors (Shown) 24VAC 24VAC Timer Defeat Common MAS LMEP Edge Open Close Stop Common SBC T TS E2 FSTS D1 DIAG C2 OPTN B2 PROG 11 White 9 White/Black 11 8 Maintenance Alert LED NEVER run Control wiring in same conduit as the Power wiring! Follow ALL national and local electrical codes 10 OPEN 7 4 Push and Release to Open CLOSE (without Mid Stop programming) STOP 6 4 Push and Hold to Close 5 4 Push and Release to Stop Approximately 5 Feet Half the Height of the Door MAS Programming (Maintenance Alert System) 1. The MAS assists the installing dealer in setting up a routine maintenance program. Once programmed, the MAS notifies the end user (with a flashing LED on the 3 button station) when a preset number of cycles/months has elapsed and scheduled maintenance is due. 2. Close the Door. 3. Turn the selector dial to PROG. T TS E2 FSTS D1 DIAG C2 OPTN B2 PROG 6. Press the OPEN button once for every 5,000 Cycles increments. Press the CLOSE button once for every 3 Month increments. Press the STOP button once to Clear the MAS Setting. OPEN D20 CLOSE D21 STOP D13 MAS 7. Press the MAS button to complete the programming. The on board LED will flash back the programmed settings. The OPEN LED will flash once for every 5,000 cycles. The CLOSE LED will flash once for every 3 months. OPEN D20 CLOSE D21 STOP D13 MAS 4. Press and release the MAS button. OPEN D20 5. Press the STOP button once CLOSE D21 to clear the MAS counter. STOP D13 8. Turn the selector dial back to the desired wiring type. T TS E2 FSTS D1 DIAG C2 OPTN B2 PROG 01-35245 Timer-to-Close Programming Timer automatically closes door after a preset time. 1. Close the Door. 2. Turn selector to PROG. 3. Press and release the TIMER button. T TS E2 FSTS D1 DIAG C2 OPTN B2 PROG MRT MID TIMER OPEN D20 CLOSE D21 4. Press and release the STOP button to clear the timer. STOP D13 5. Press and release the OPEN button once for every 1 second. Press and release the CLOSE button once for every 15 seconds. Example: Push CLOSE + Push OPEN + Push OPEN = 17 seconds total (15 seconds) (1 second) (1 second) 6. Press and release the TIMER button to complete programming. MRT MID TIMER The OPEN LED will flash once for every 1 sec. The CLOSE LED will flash once for every 15 sec. 7. Turn selector to T, TS or FSTS wiring types. NOTE: Must have at least one LiftMaster Monitored Entrapment Protection (LMEP) device installed. T E2 D1 C2 B2 TS FSTS DIAG OPTN PROG OPEN D20 CLOSE D21 STOP D13 OPEN D20 CLOSE D21 STOP D13 © 2010, The Chamberlain Group Inc. All Rights Reserved 6" max above the floor Edge Sensor OPEN Mid Stop Programming The mid stop feature is to open the door to a preset point prior to the fully open position. 1. Close the Door. 2. Turn selector to PROG. 3. Press and release the MID button. T TS E2 FSTS D1 DIAG C2 OPTN B2 PROG MRT MID TIMER OPEN D20 4. Press the OPEN button, wait until the door reaches the desired mid stop height, then press and release the STOP button. 5. Press and release the MID button to complete programming. CLOSE D21 STOP D13 MRT MID TIMER 6. Turn selector back to selected wiring type. T TS E2 FSTS D1 DIAG C2 OPTN B2 PROG
-
 1
1 -
 2
2
 |
 |