Linksys WET54GS5 User Guide - Page 23
Utility. Otherwise, go to Connecting the Wireless-G Ethernet Bridge for Network Use. - review
 |
UPC - 745883559022
View all Linksys WET54GS5 manuals
Add to My Manuals
Save this manual to your list of manuals |
Page 23 highlights
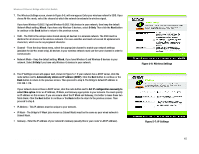
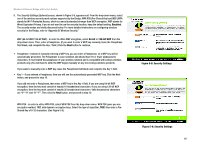
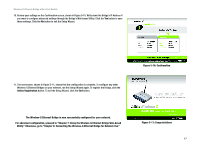
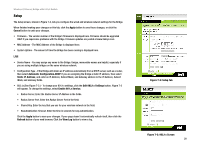
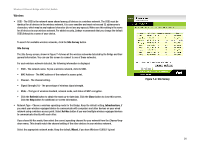
Wireless-G Ethernet Bridge with 5-Port Switch 10. Review your settings on the Confirmation screen, shown in Figure 5-10. Write down the Bridge's IP Address if you want to configure advanced settings through the Bridge's Web-based Utility. Click the Yes button to save these settings. Click the No button to exit the Setup Wizard. 11. The next screen, shown in Figure 5-11, shows that the configuration is complete. To configure any other Wireless-G Ethernet Bridges on your network, run this Setup Wizard again. To register the Bridge, click the Online Registration button. To exit the Setup Wizard, click the Exit button. Figure 5-10: Confirmation The Wireless-G Ethernet Bridge is now successfully configured for your network. For advanced configuration, proceed to "Chapter 7: Using the Wireless-G Ethernet Bridge Web-based Utility." Otherwise, go to "Chapter 6: Connecting the Wireless-G Ethernet Bridge for Network Use." Chapter 5: Setting Up the Wireless-G Ethernet Bridge Figure 5-11: Congratulations 17
-
 1
1 -
2
-
3
-
4
-
5
-
6
-
7
-
8
-
9
-
10
-
11
-
12
-
13
-
14
-
15
-
16
-
17
-
 18
18 -
 19
19 -
 20
20 -
 21
21 -
 22
22 -
 23
23 -
 24
24 -
 25
25 -
 26
26 -
 27
27 -
 28
28 -
29
-
30
-
31
-
32
-
33
-
34
-
35
-
36
-
37
-
38
-
39
-
40
-
41
-
42
-
43
-
44
-
45
-
46
-
47
-
48
-
49
-
50
-
51
-
52
-
53
-
54
-
55
-
56
-
57
-
58
-
59
-
60
-
61
-
62
-
63
-
64
-
65
-
66
-
67
-
68
-
69
 |
 |
