Linksys WRE54G Quick Installation Guide - Page 1
Linksys WRE54G - Wireless-G Range Expander Repeater Manual
 |
UPC - 745883559046
View all Linksys WRE54G manuals
Add to My Manuals
Save this manual to your list of manuals |
Page 1 highlights
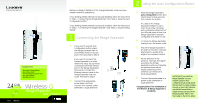
® A Division of Cisco Systems, Inc. Package Contents • One Wireless-G Range Expander • One AC Power Adapter • One Setup Wizard CD with User Guide • One Quick Installation • One Registration Card 2.4GHz 802.11g Wireless Wireless-G Range Expander Quick Installation ModMeloNdoe.l No. WRE54G Before you begin installation of the Range Expander, make sure your wireless network is operational. If your existing wireless network has security disabled, follow the instructions in "Step 1: Connecting the Range Expander" and "Step 2: Using the Auto Configuration Button." If your existing wireless network has security enabled, follow the instructions in "Step 1: Connecting the Range Expander" and "Step 3: Using the Setup Wizard." 1 Connecting the Range Expander A If you want to use the Auto Configuration button, place the Range Expander next to your wireless router or access point. Then proceed to step B. If you want to connect the Range Expander to a wired network for setup, flip up the lid covering the Ethernet network port on the Range Expander's front panel. Connect the B Ethernet network cable to the Range Expander and your OR router. Proceed to step B. B Connect the appropriate power plate, and then connect it to a power outlet, preferably a surge protector. 2 Using the Auto Configuration Button A Press the Range Expander's Auto configuration button and hold it down for five seconds. Then release the button. The LEDs on the Range Expander will flash for up to one minute while it is being auto-configured. When both of the LEDs are solidly lit blue, the Range Expander is properly configured and ready for use. B To move the Range Expander, unplug it from the power outlet. C Place the Range Expander in an optimum location. The best placement is usually at the edge of your wireless network. D Fix the direction of the antenna. Normally, the higher you place the Range Expander's antenna, the better the performance will be. Proper positioning of the antenna can enhance its receiving sensitivity. E Connect the power plate to a power outlet, preferably a surge protector. Congratulations! The installation of the Wireless-G Range Expander is complete. D IMPORTANT:If you install the Range Expander into your network using the Auto configuration button and decide that you want to enable wireless security on your entire network, use the Web-based Utility to enable wireless security on the Range Expander. Refer to the User Guide on the CD for details.
-
 1
1 -
 2
2
 |
 |