Linksys WRT55AG User Guide - Page 33
The Access Restrictions Tab - Internet Access Policy, Internet Access Policy
 |
UPC - 745883553891
View all Linksys WRT55AG manuals
Add to My Manuals
Save this manual to your list of manuals |
Page 33 highlights
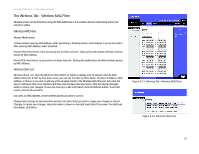
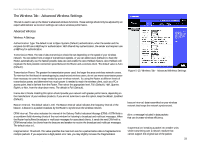
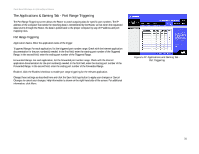
Dual-Band Wireless A+G Broadband Router The Access Restrictions Tab - Internet Access Policy The Internet Access Policy screen allows you to block or allow specific kinds of Internet usage and traffic, such as Internet access, designated applications, websites, and inbound traffic during specific days and times. Internet Access Policy Access Policy. Access can be managed by a policy. Use the settings on this screen to establish an access policy (after the Save Settings button is clicked). Selecting a policy from the drop-down menu will display that policy's settings. To delete a policy, select that policy's number and click the Delete This Policy button. To view all the policies, click the Summary button. On the Summary screen, the policies are listed with the following information: No., Policy Name, Access, Days, Time, and status (Enabled). You can change the type of access, days, and times of a policy. To activate a policy, click the Enabled checkbox. To delete a policy, click its Delete button. Click the Save Settings button to save your changes, or click the Cancel Changes button to cancel your changes. To return to the Internet Access Policy tab, click the Close button. To view the list of PCs for a specific policy, click the Edit List button. On the List of PCs screen, you can select a PC by MAC Address or IP Address. You can also enter a range of IP Addresses if you want this policy to affect a group of PCs. After making your changes, click the Save Settings button to apply your changes or Cancel Changes to cancel your changes. Click the Close button to exit this screen. To create an Internet Access policy: 1. Select a number from the Access Policy drop-down menu. 2. Enter a Policy Name in the field provided. 3. To enable this policy, select Enabled from the Status drop-down menu. Figure 5-18: Access Restrictions Tab - Internet Access Policy Figure 5-19: Summary Chapter 5: Configuring the Dual-Band Wireless A+G Broadband Router 27 The Access Restrictions Tab - Internet Access Policy
-
 1
1 -
2
-
3
-
4
-
5
-
6
-
7
-
8
-
9
-
10
-
11
-
12
-
13
-
14
-
15
-
16
-
17
-
18
-
19
-
20
-
21
-
22
-
23
-
24
-
25
-
26
-
27
-
 28
28 -
 29
29 -
 30
30 -
 31
31 -
 32
32 -
 33
33 -
 34
34 -
 35
35 -
 36
36 -
 37
37 -
 38
38 -
39
-
40
-
41
-
42
-
43
-
44
-
45
-
46
-
47
-
48
-
49
-
50
-
51
-
52
-
53
-
54
-
55
-
56
-
57
-
58
-
59
-
60
-
61
-
62
-
63
-
64
-
65
-
66
-
67
-
68
-
69
-
70
-
71
-
72
-
73
-
74
-
75
-
76
-
77
-
78
-
79
-
80
-
81
-
82
-
83
 |
 |