Linksys WVC54GC User Guide - Page 27
Placement Options, Stand Option
 |
UPC - 745883566754
View all Linksys WVC54GC manuals
Add to My Manuals
Save this manual to your list of manuals |
Page 27 highlights
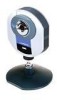
Compact Wireless-G Internet Video Camera Placement Options The Camera can stand on a surface or be mounted on a wall. Depending on the positioning you want, you can attach the Camera head to its stand at two different points. Stand Option 1. Insert the screw end of the stand into the hole on the bottom panel. 2. Tighten the screw end and then the gray thumbscrew. 3. Place the Camera, and adjust the tilt of its head accordingly. Figure 5-19: Stand Option Chapter 5: Setting up and Mounting the Compact Wireless-G Internet Video Camera Placement Options Figure 5-20: Camera in Standing Position 19
-
 1
1 -
2
-
3
-
4
-
5
-
6
-
7
-
8
-
9
-
10
-
11
-
12
-
13
-
14
-
15
-
16
-
17
-
18
-
19
-
20
-
21
-
 22
22 -
 23
23 -
 24
24 -
 25
25 -
 26
26 -
 27
27 -
 28
28 -
 29
29 -
 30
30 -
 31
31 -
 32
32 -
33
-
34
-
35
-
36
-
37
-
38
-
39
-
40
-
41
-
42
-
43
-
44
-
45
-
46
-
47
-
48
-
49
-
50
-
51
-
52
-
53
-
54
-
55
-
56
-
57
-
58
-
59
-
60
-
61
-
62
-
63
-
64
-
65
-
66
-
67
-
68
-
69
-
70
-
71
-
72
-
73
-
74
-
75
-
76
-
77
-
78
-
79
-
80
-
81
-
82
-
83
-
84
-
85
-
86
-
87
-
88
-
89
-
90
-
91
 |
 |

19
Chapter 5: Setting up and Mounting the Compact Wireless-G Internet Video Camera
Placement Options
Compact Wireless-G Internet Video Camera
Placement Options
The Camera can stand on a surface or be mounted on a wall. Depending on the positioning you want, you can
attach the Camera head to its stand at two different points.
Stand Option
1.
Insert the screw end of the stand into the hole on the bottom panel.
2.
Tighten the screw end and then the gray thumbscrew.
3.
Place the Camera, and adjust the tilt of its head accordingly.
Figure 5-19: Stand Option
Figure 5-20: Camera in
Standing Position