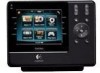
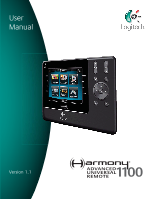
Logitech 915-000074 User Manual
Logitech 915-000074 - Harmony 1100 Universal Remote Control Manual
 |
UPC - 097855054081
View all Logitech 915-000074 manuals
Add to My Manuals
Save this manual to your list of manuals |
Logitech 915-000074 manual content summary:
- Logitech 915-000074 | User Manual - Page 1
UUsseerr MMaannuuaall VVeerrssiioonn11..10 - Logitech 915-000074 | User Manual - Page 2
an Activity ...10 Switching between Activities 10 Turning off your devices 10 Using the Help button 11 Controlling your devices individually 12 Charging your remote 12 Setting up your Harmony 1100 for the first time 13 Overview of the setup process 13 1. Creating your user account 14 - Logitech 915-000074 | User Manual - Page 3
IR commands (speed settings 28 Maintaining your Harmony 1100 29 Testing your remote settings after a remote upgrade 29 Troubleshooting problems with your Harmony 1100 30 Figuring out which inputs your system uses 32 Figuring out which type of input control you have 32 Step 1- Turn on all - Logitech 915-000074 | User Manual - Page 4
Extender from your network 40 Getting help with your Harmony remote 41 Contacting Customer Support 41 Finding answers to questions 41 Getting help with your online setup 41 Using the On-Remote Help 42 Logitech's Harmony Remote user forums 42 Appendix A - Device Information 43 Appendix - Logitech 915-000074 | User Manual - Page 5
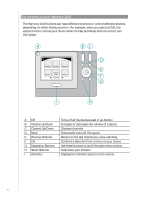
, this User Manual provides you with useful information to get you going. Getting to know your remote How your Harmony 1100 works The Harmony 1100 is an Activity-based infrared (IR) universal remote control. Using the Harmony Remote Software, you can configure the Harmony 1100 to control up to 15 - Logitech 915-000074 | User Manual - Page 6
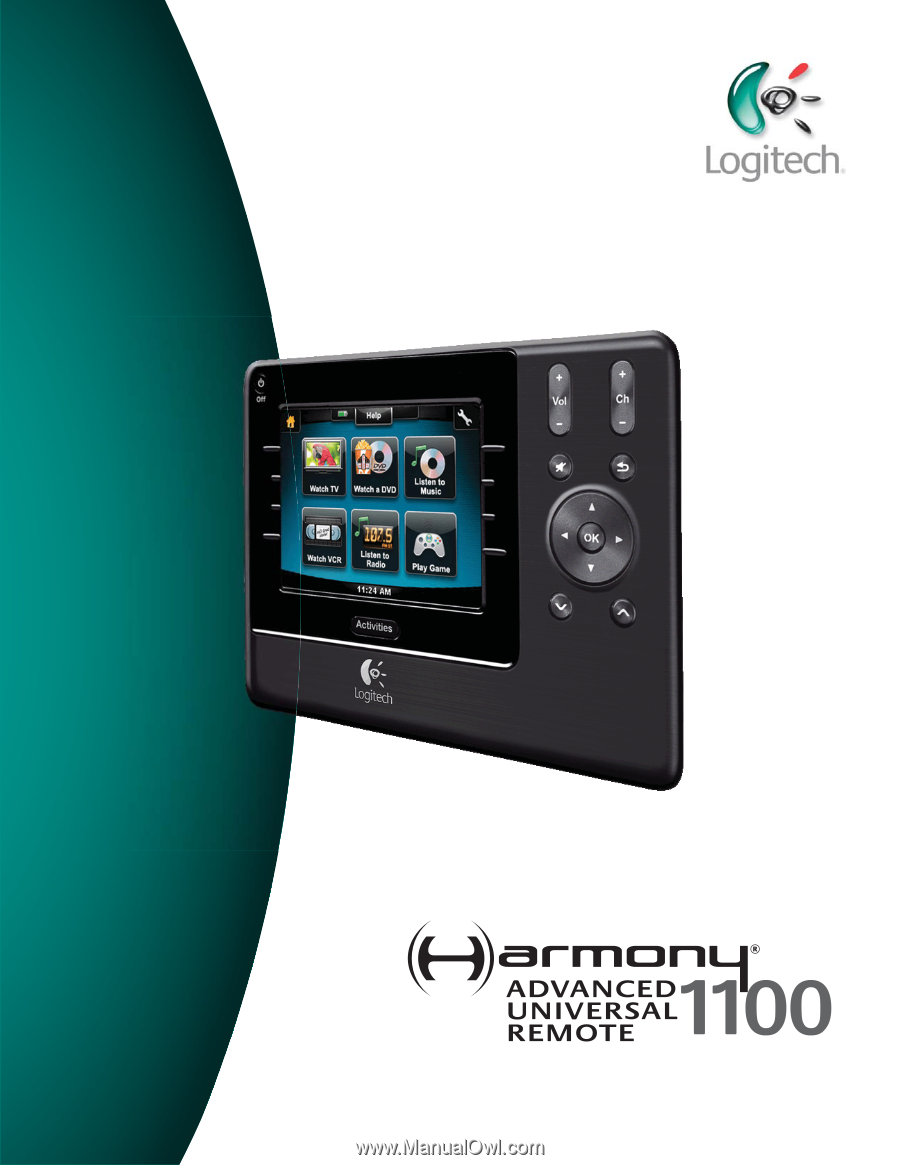
Harmony 1100 The Harmony 1100 buttons can have different functions or control different devices, depending on which Activity you're in. For example, when you watch a DVD, the volume button controls your stereo while the Play and Pause buttons control Displays the Activities screen on the remote 6 - Logitech 915-000074 | User Manual - Page 7
Channels Displays a list of your favorite channels in the TV Activities. To use this feature, you must set up favorite channels in the Harmony Remote Software. Custom Control Displays secondary Activity controls (depending on the Activ- ity) and additional buttons that you can customize. Game - Logitech 915-000074 | User Manual - Page 8
Guide Info Exit Help A B C Live TV 12 3 31 2 15 295 100 301 Watch TV Guide Info Exit List Activities The Activities screen is your starting point on the Harmony 1100 or if you are in an Activity, by pressing the Custom Control icon. From there, press the Devices button. A Help Play - Logitech 915-000074 | User Manual - Page 9
icons The status indicator flashes whenever an IR command is being sent from your Harmony 1100. The battery indicator shows the battery level or charging status. To ensure your Harmony stays properly charged, see Charging your remote. The clock is on your main Activity screen so you always know what - Logitech 915-000074 | User Manual - Page 10
Using your Harmony 1100 Selecting an Activity The Activities screen displays the Activities you created for the remote. You can start an the Activities button, and then select the Activity you want to enjoy. The Harmony 1100 takes care of powering on the needed devices, and powering off the ones not - Logitech 915-000074 | User Manual - Page 11
device to not respond and your Harmony 1100 becomes "out of sync" with your devices. The Help feature guides you through a series of questions to help you fix the problem and bring your devices back "in sync" with your remote. To use the Help feature to get your Harmony 1100 back "in sync" with your - Logitech 915-000074 | User Manual - Page 12
of commands until you find the command you need. Once you've finished, return to Activities for optimal control of your entertainment system. Charging your remote Your Harmony 1100 comes with a charging station. The charging station plugs into a wall outlet and charges the battery every time you - Logitech 915-000074 | User Manual - Page 13
up your Harmony 1100 for the first time Overview of the setup process When you insert the Harmony remote CD in your computer, the guided online setup launches. Follow the easy setup instructions to install the Harmony Remote Software. For more information on installing the Harmony Remote Software - Logitech 915-000074 | User Manual - Page 14
you want to add a new Activity or device, troubleshoot a problem with an Activity, or customize remote buttons, the Harmony Remote Software home page is the place to start. 2. Connecting your Harmony 1100 to your computer To connect your Harmony 1100 to your PC, use the USB cable provided. 1. Remove - Logitech 915-000074 | User Manual - Page 15
all the entertainment components you want to control with your Harmony 1100. You should use the Device Worksheet to gather all your device information before starting the setup process. To set up the devices you want to control, from the Harmony Remote Software: 1. Select the Device Type for each - Logitech 915-000074 | User Manual - Page 16
After you enter your device and Activity information, the software saves your information. It also transfers the information to your Harmony 1100. After the software updates your remote, you're ready to test your setup. For specific details about testing your setup, see the chapter on Testing your - Logitech 915-000074 | User Manual - Page 17
your setup. If you run into specific issues while testing your remote, refer to the Troubleshooting section of this manual for suggestions and possible fixes for your problems. The process of testing your Harmony 1100 is straightforward. It involves simply trying the Activities you use most often - Logitech 915-000074 | User Manual - Page 18
1100 setup. The following sections provide you with the information to help you with these tasks. Adding and changing your Activities To add or change an Activity, from the Harmony Remote Software: 1. Select the Activities tab. 2. To add an Activity, click Add Activity. 3. To remove an Activity - Logitech 915-000074 | User Manual - Page 19
the Harmony Remote Software: 1. Select the Activities tab. 2. Click Settings next to the appropriate Activity. 3. Select review the settings for this Activity. 4. Select Yes, but I want to add more control of options and devices for this Activity. 5. Click Next. 6. Follow the online instructions to - Logitech 915-000074 | User Manual - Page 20
a specific Activity. To customize the on-remote help, from the Harmony Remote Software: 1. Select the Remote Settings tab. 2. Click Display Settings. 3. Follow the online instructions. Controlling the Remote Assistant The Harmony 1100 Remote Assistant guides you through starting Activities. It also - Logitech 915-000074 | User Manual - Page 21
21 - Logitech 915-000074 | User Manual - Page 22
appear at the top of the list. To change the order of Activities on your Harmony 1100 screen, from the Harmony Remote Software: 1. Select the Activities tab. 2. Click Re-order Activities. 3. Follow the online instructions. Setting up your favorite channels To set up your favorite channels, from the - Logitech 915-000074 | User Manual - Page 23
a button. 3. Click Customize Buttons. 4. Follow the online instructions. Adding custom-labeled buttons to an Activity If you want a button to do something specific, or if there's a function on your device's original remote that's not on the Harmony 1100, you can create your own buttons that appear on - Logitech 915-000074 | User Manual - Page 24
on your Harmony 1100. To add a slideshow to your Harmony 1100, from the Harmony Remote Software: 1. Click the Remote Settings tab. 2. Click Set Up a Slideshow. 3. Follow the online instructions. Viewing a slideshow on your Harmony 1100 screen You can also use the Harmony 1100 to manually start the - Logitech 915-000074 | User Manual - Page 25
4. Follow the online instructions. Setting a background You can change the background on your Harmony 1100 by either selecting a new background from the list of Harmony defaults or by uploading your own. To change the background on your Harmony remote, from the Harmony Remote Software: 1. Select the - Logitech 915-000074 | User Manual - Page 26
15 cm To use the Harmony 1100 learning feature, from the Harmony Remote Software: 1. Select the Devices tab. 2. Click Learn IR located next to the device you want to control. 3. Follow the online instructions. Naming a new command your remote learned When you teach your Harmony a new command, you - Logitech 915-000074 | User Manual - Page 27
default, different devices take different amounts of time to react to a command from a remote control. To accommodate these differences in your devices, the Harmony 1100 uses several types of delays, or speed settings, to control your devices. Power On Delay The Power On Delay is the amount of time - Logitech 915-000074 | User Manual - Page 28
1100 uses several different delays to control your devices. For more information on which delay you need to adjust, see Types of delays or speed settings. To adjust the delay between IR commands, from the Harmony Remote Software: 1. Click the Devices tab. 2. Select the device for which you want - Logitech 915-000074 | User Manual - Page 29
Harmony 1100 Testing your remote settings after a remote upgrade After you finish making any changes to your Harmony 1100 configuration, you should test the new setup to ensure everything is working the way you expect. This testing process is the same as the one you did when you set up your Harmony - Logitech 915-000074 | User Manual - Page 30
Troubleshooting problems with your Harmony 1100 In this section, you'll find some commonly reported issues and the suggested solutions. These solutions may help you fix problems you're experiencing. If you still cannot fix the problem, refer to Getting help with your Harmony 1100. The TV doesn't turn - Logitech 915-000074 | User Manual - Page 31
. If we're missing the command, the Harmony 1100 can learn it from your original remote. For more information, see Teaching your Harmony 1100 new commands using your old remote. The Harmony Remote software is unable to communicate with the Harmony 1100. • Try disabling any Internet security software - Logitech 915-000074 | User Manual - Page 32
your audio connections. After you know how your devices are connected, you can use the information to create your Activities using the Harmony Remote Software. Figuring out which type of input control you have The first step in determining which inputs you have is to figure out how you use your device - Logitech 915-000074 | User Manual - Page 33
appears on your TV screen. Then, you use another button on the remote to choose the input you want, and then a third button to select Turn on all your devices To determine which devices are using which inputs, Logitech recommends you start by turning on all the devices in your entertainment system. - Logitech 915-000074 | User Manual - Page 34
TV to your stereo so the sound comes out of your stereo speakers. You must use your AV Receiver's original remote control to switch between inputs. 1. Using your AV Receiver's original remote, select each input one-at-a-time. 2. For each input, note which device appears to be connected to that input - Logitech 915-000074 | User Manual - Page 35
RF Wireless Extender The RF Wireless Extender extends the range of your Harmony remote so that you can control devices that are not in plain view. For example, you can put the components of your entertainment system inside a cabinet and close the door and - Logitech 915-000074 | User Manual - Page 36
the RF Wireless Extender, from your Harmony software: 1. Click the Remote Settings tab. 2. Click Manage Devices. 3. Click Control Devices. 4. Select whether to control each device with the remote or the RF Wireless Extender. 5. Click Next. 6. Click Done. Note: Logitech recommends that you use the RF - Logitech 915-000074 | User Manual - Page 37
• from individual ports (A, B, C or D) • from the top-mounted IR blaster Controlling a device with the Harmony remote If you set the remote to control a device, the remote sends IR signals to the device. For the remote to control a device, there must be a direct line of sight between the signal sent - Logitech 915-000074 | User Manual - Page 38
line of sight with the RF Wireless Extender. Logitech recommends that you make sure all of your devices infrared) emitters that can control up to eight devices. Each emitter can control two devices. There are nd where to place the emitters: 1. Take the remote you use to turn the device on or off, - Logitech 915-000074 | User Manual - Page 39
Attaching the emitters To attach the emitters: 1. Locate the area on the device where the signals are received. 2. Attach an emitter directly to this area, or if you do not want to place the emitter on the device, attach it to a surface above, below, or in front of this area on the device. 3. - Logitech 915-000074 | User Manual - Page 40
a device to a specific port on the RF Wireless Extender, from your Harmony Remote Software home page: 1. Click the Remote Settings tab. 2. Click Manage Remotes. 3. In the Manage Remotes page, click Control Devices. 4. In the Control Devices page, at the very bottom of the page, select Assign IR Port - Logitech 915-000074 | User Manual - Page 41
of your Harmony remote: Harmony Remote Software Provides instructional help to guide you through a series of question-and-answer steps to accomplish a task. FAQs (Frequently Asked Questions) A searchable list of customer questions with answers provided by the Harmony 1100 support center. More - Logitech 915-000074 | User Manual - Page 42
switch inputs correctly, you can use the Help button on the remote for simple troubleshooting. Answer the questions on your Harmony remote to re-synchronize it with your entertainment system. See Using the Help button. Logitech's Harmony Remote user forums You can also access the user forums to see - Logitech 915-000074 | User Manual - Page 43
use as your guide. List the entertainment components below that you would like your new remote to control. Device Type example be different than model name • also found in the component's user manual • NOT model number on the old remote control • NOT serial number (SN) which is usually much longer • - Logitech 915-000074 | User Manual - Page 44
video information than that of a TV set, creating a much crisper, more detailed picture. Light controller A device that is connected to a set of lights and allows the lights to be powered or dimmed remotely. Mini-system A single unit that is some combination of the functionality of a DVD, VCR - Logitech 915-000074 | User Manual - Page 45
range of your Harmony remote so that you can control devices that are inside a cabinet or in a different room. SACD (Super Audio CD) A read-only optical audio disc aimed at providing much higher quality of digital audio reproduction than the compact disc. Satellite Radio A service in the United - Logitech 915-000074 | User Manual - Page 46
Stereo receiver Tuner Power strip Also referred to as a tuner or a receiver. A stereo receiver is any component that receives or tunes, broadcast signals, or AM/FM radio. Typically refers to the single component that includes a preamplifier, surround processor, multi-channel amplifier, and AM/FM - Logitech 915-000074 | User Manual - Page 47
Maximum number of devices per account Backlit keypad Backlight Color IR Learning IR Transmitters IR Transmission Range Weight Dimensions Supported Platforms 3.5" Diagonal 320 x 240 (QVGA) 64K Color Resistive Rechargeable Lithium Ion 5,000+ 225,000+ 15 Yes White Yes (Up to 200 Khz) 2 Up to 65ft - Logitech 915-000074 | User Manual - Page 48
© 2008 Logitech Inc. All rights reserved. Logitech's trademarks are either registered trademarks or trademarks of Logitech in the US and other countries. All other trademarks are the property of their respective owners. 48
-
 1
1 -
 2
2 -
 3
3 -
 4
4 -
 5
5 -
 6
6 -
 7
7 -
8
-
9
-
10
-
11
-
12
-
13
-
14
-
15
-
16
-
17
-
18
-
19
-
20
-
21
-
22
-
23
-
24
-
25
-
26
-
27
-
28
-
29
-
30
-
31
-
32
-
33
-
34
-
35
-
36
-
37
-
38
-
39
-
40
-
41
-
42
-
43
-
44
-
45
-
46
-
47
-
48
 |
 |
User
Manual
Version 1.0
User
Manual
Version 1.
1