MSI K8N NEO2 PLATINUM User Guide - Page 106
Next., Finish, The Completing the NVIDIA Rebuild Array appears.
 |
UPC - 816909006148
View all MSI K8N NEO2 PLATINUM manuals
Add to My Manuals
Save this manual to your list of manuals |
Page 106 highlights
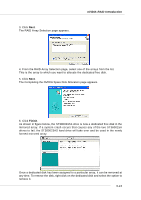
MS-7025 ATX Mainboard 4. Click Next. The Disk Selection page appears. 5. Select the drive that you want to rebuild by clicking it from the list, then click Next. The Completing the NVIDIA Rebuild Array page appears. 6. Click Finish. The array rebuilding starts after a few seconds, and a small pop-up message appears towards the bottom right corner of the screen as shown in the figure below. During the rebuilding process, the NVRAID Management utility screen shows the status under the System Tasks and Details sections. 5-20
-
 1
1 -
2
-
3
-
4
-
5
-
6
-
7
-
8
-
9
-
10
-
11
-
12
-
13
-
14
-
15
-
16
-
17
-
18
-
19
-
20
-
21
-
22
-
23
-
24
-
25
-
26
-
27
-
28
-
29
-
30
-
31
-
32
-
33
-
34
-
35
-
36
-
37
-
38
-
39
-
40
-
41
-
42
-
43
-
44
-
45
-
46
-
47
-
48
-
49
-
50
-
51
-
52
-
53
-
54
-
55
-
56
-
57
-
58
-
59
-
60
-
61
-
62
-
63
-
64
-
65
-
66
-
67
-
68
-
69
-
70
-
71
-
72
-
73
-
74
-
75
-
76
-
77
-
78
-
79
-
80
-
81
-
82
-
83
-
84
-
85
-
86
-
87
-
88
-
89
-
90
-
91
-
92
-
93
-
94
-
95
-
96
-
97
-
98
-
99
-
100
-
 101
101 -
 102
102 -
 103
103 -
 104
104 -
 105
105 -
 106
106 -
 107
107 -
 108
108 -
 109
109 -
 110
110 -
 111
111 -
112
-
113
 |
 |

5-20
MS-7025 ATX Mainboard
4
.
Click
Next.
The Disk Selection page appears.
5.
Select the drive that you want to rebuild by clicking it from the list, then click
Next
.
The Completing the NVIDIA Rebuild Array page appears.
6.
Click
Finish
. The array rebuilding starts after a few seconds, and a small pop-up
message appears towards the bottom right corner of the screen as shown in the
figure below.
During the rebuilding process, the NVRAID Management utility screen shows the
status under the System Tasks and Details sections.