MSI K8N NEO2 PLATINUM User Guide - Page 81
Left-side: Current system status, Right-side: PC hardware status during real time operation
 |
UPC - 816909006148
View all MSI K8N NEO2 PLATINUM manuals
Add to My Manuals
Save this manual to your list of manuals |
Page 81 highlights
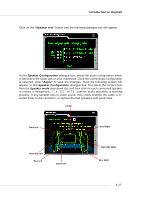
Introduction to DigiCell Left-side: Current system status In the left sub-menu, you can configure the settings of FSB, Vcore, Memory Voltage and AGP Voltage by clicking the radio button in front of each item and make it available (the radio button will be lighted as yellow when selected), use the "+" and "-" buttons to adjust, then click "OK" to apply the changes. Then you can click "Save" to save the desired FSB you just configured. Also you may click "Auto" to start testing the maximum CPU overclocking value. The CPU FSB will automatically increase the testing value until the PC reboots. Or you may click "Default" to restore the default values. Right-side: PC hardware status during real time operation In the right sub-menu, here you can configure the PC hardware status such as CPU & system temperatures and fan speeds. You may use the scroll bars to adjust each item, then click "OK" to apply the changes. The values you set for the temperatures are the maximum thresholds for the system warnings, and the values for fan speeds are the minimum thresholds. Center-side: Cool'n'Quiet / User mode Here you may adjust the CPU fan speed. If you choose User mode, you may adjust the CPU fan speed in 8 different modes, from High Speed to Low speed. If you choose Cool'n'Quiet, the system will automatically configure an optimal setting for you. MSI Reminds You... To ensure that Cool'n'Quiet function is activated and will be working properly, it is required to double confirm that: 1. Run BIOS Setup, and se- lect Cell Menu. Under Cell Menu, find Cool'n'Quiet Support, and set this item to "Enable." 2. Enter Windows, and select [Start]->[Settings]-> [Control Pannel]->[Power Options]. Enter Power Options Properties tag, and select Minimal Power Management under Power schemes. 4-15
-
 1
1 -
2
-
3
-
4
-
5
-
6
-
7
-
8
-
9
-
10
-
11
-
12
-
13
-
14
-
15
-
16
-
17
-
18
-
19
-
20
-
21
-
22
-
23
-
24
-
25
-
26
-
27
-
28
-
29
-
30
-
31
-
32
-
33
-
34
-
35
-
36
-
37
-
38
-
39
-
40
-
41
-
42
-
43
-
44
-
45
-
46
-
47
-
48
-
49
-
50
-
51
-
52
-
53
-
54
-
55
-
56
-
57
-
58
-
59
-
60
-
61
-
62
-
63
-
64
-
65
-
66
-
67
-
68
-
69
-
70
-
71
-
72
-
73
-
74
-
75
-
 76
76 -
 77
77 -
 78
78 -
 79
79 -
 80
80 -
 81
81 -
 82
82 -
 83
83 -
 84
84 -
 85
85 -
 86
86 -
87
-
88
-
89
-
90
-
91
-
92
-
93
-
94
-
95
-
96
-
97
-
98
-
99
-
100
-
101
-
102
-
103
-
104
-
105
-
106
-
107
-
108
-
109
-
110
-
111
-
112
-
113
 |
 |
