Magnavox MBP5130 User manual, English (US) - Page 43
In Software Update menu, use
 |
View all Magnavox MBP5130 manuals
Add to My Manuals
Save this manual to your list of manuals |
Page 43 highlights
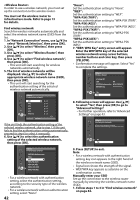
2. Use [K/L] to select "Manually enter your SSID", then press [OK]. • Wireless Router Name (SSID) entry screen will appear. Enter the wireless network name (SSID) using cursor buttons, number buttons and color key, then press [YELLOW]. Others Manually enter your SSID Wireless Router Name (SSID) _ 1234567890 abc de f gh i j k l mnopq r s t u v w x y z . - _ OK Clear All Clear a/A/@ OK • List of authentication settings will appear. 3. Follow steps 6 to 9 in "Find wireless network" on page 42. Wireless Router Status You can check the current status of "Wireless Router" setting. 1. Follow steps 1 to 3 in "Find wireless network" on page 42. 2. Use [K/L] to select "Wireless Router Status", then press [OK]. • The list of current wireless router settings, and the confirmation message will appear. Select "Yes" to complete the settings. 3. Press [RETURN] to go back to the previous screen, or press [SETUP] to exit. After you set up the "Wireless Router" setting, set the network setting to "Easy" (wireless) or "Custom"(wireless). Easy (wireless) To set the network setting to "Easy"(wireless), follow the following procedure. For details of this setting, refer to "Easy (Wired)" on page 39. • If you select "Yes" in step 7 of "Find wireless network" on page 42, skip to step 3. 1. Follow steps 1 to 2 in "Find wireless network" on page 42. 2. Use [K/L] to select "Advanced Settings", then press [OK]. 3. Use [K/L] to select "Easy", then press [OK]. Custom (wireless) To set the network setting to "Custom"(wireless), follow the following procedure. • If you select "Yes" in step 7 of "Find wireless network" on page 42, skip to step 3. 1. Follow steps 1 to 2 in "Find wireless network" on page 42. 2. Use [K/L] to select "Advanced Settings", then press [OK]. 3. Use [K/L] to select "Custom", then press [OK]. • For details of each setting, refer to following pages. "IP Address Setting" / "DNS Setting": Refer to "IP Address Setting / DNS Setting" on page 40. "Proxy Setting": Refer to "Proxy Setting" on page 40. "BD-Live Setting": Refer to "BD-Live Setting" on page 41. "MAC Address": Refer to "MAC Address" on page 41. Note • You cannot select "Advanced Settings" if "Wireless Router" setting is not completed. Disable Deactivate all the network connection and settings. 1. In "Network Connection" menu, use [K/L] to select "Network Selection", then press [OK]. 2. Use [K/L] to select "Disable", then press [OK]. 3. Press [RETURN] to go back to the previous screen, or press [SETUP] to exit. Note • The network connection can be reactivated by setting network connection to "Wired" or "Wireless". Software Update [SETUP] "Other""Software Update" This unit lets you update the software yourself using a software update disc. To update the software, you must first download the latest version software to a disc, then execute "Software Update". Current Version You can confirm the current software version. 1. In "Software Update" menu, use [K/L] to select "Current Version", then press [OK]. 2. Press [OK] or [RETURN] to exit. Disc Update 1. Prepare a software update disc: Access www.magnavox.com, and download the latest version software to a blank disc by following the directions described on the site. • Use a blank disc and download one software per disc. • For more details on how to download the software, please refer to the site. 2. In "Software Update" menu, use [K/L] to select "Disc Update", then press [OK]. 3. Use [K/L] to select "Yes", then press [OK]. • Disc tray will open automatically. 4. Insert the software update disc obtained at step 1. 5. After completing loading disc, confirmation message will appear. Select "Yes" and press [OK] to start updating. 6. After the disc update finishes, this unit will restart and eject the disc. 43
-
 1
1 -
2
-
3
-
4
-
5
-
6
-
7
-
8
-
9
-
10
-
11
-
12
-
13
-
14
-
15
-
16
-
17
-
18
-
19
-
20
-
21
-
22
-
23
-
24
-
25
-
26
-
27
-
28
-
29
-
30
-
31
-
32
-
33
-
34
-
35
-
36
-
37
-
 38
38 -
 39
39 -
 40
40 -
 41
41 -
 42
42 -
 43
43 -
 44
44 -
 45
45 -
 46
46 -
 47
47 -
 48
48 -
49
-
50
-
51
-
52
 |
 |
