Makita 4131 Owners Manual - Page 6
away from the cutting area and position - blade
 |
View all Makita 4131 manuals
Add to My Manuals
Save this manual to your list of manuals |
Page 6 highlights
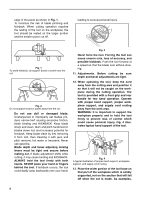
edge of the panel as shown in Fig. 1. To minimize the risk of blade pinching and kickback. When cutting operation requires the resting of the tool on the workpiece, the tool should be rested on the larger portion and the smaller piece cut off. leading to serious personal injury. Fig. 1 To avoid kickback, do support board or panel near the cut. Fig. 2 Do not support board or panel away from the cut. Do not use dull or damaged blade. Unsharpened or improperly set blades produce narrow kerf causing excessive friction, blade binding and KICKBACK. Keep blade sharp and clean. Gum and pitch hardened on blades slows tool and increases potential for kickback. Keep blade clean by first removing it from tool, then cleaning it with gum and pitch remover, hot water or kerosene. Never use gasoline. Blade depth and bevel adjusting locking levers must be tight and secure before making cut. If blade adjustment shifts while cutting, it may cause binding and KICKBACK. ALWAYS hold the tool firmly with both hands. NEVER place your hand or fingers behind the tool. If kickback occurs, the tool could easily jump backwards over your hand, Fig. 3 Never force the tool. Forcing the tool can cause uneven cuts, loss of accuracy, and possible kickback. Push the tool forward at a speed so that the blade cuts without slowing. 11. Adjustments. Before cutting be sure depth and bevel adjustments are tight. 12. When operating the tool, keep the cord away from the cutting area and position it so that it will not be caught on the workpiece during the cutting operation. The tool is provided with a front grip and rear handle for two hand operation. Operate with proper hand support, proper workpiece support, and supply cord routing away from the work area. WARNING: It is important to support the workpiece properly and to hold the tool firmly to prevent loss of control which could cause personal injury. Fig. 4 illustrates typical hand support of the tool. Fig. 4 A typical illustration of proper hand support, workpiece support, and supply cord routing. 13. Place the wider portion of the tool base on that part of the workpiece which is solidly supported, not on the section that will fall off when the cut is made. As examples, 6
-
 1
1 -
 2
2 -
 3
3 -
 4
4 -
 5
5 -
 6
6 -
 7
7 -
 8
8 -
 9
9 -
 10
10 -
 11
11 -
 12
12 -
13
-
14
-
15
-
16
-
17
-
18
-
19
-
20
 |
 |
