Makita CT322W DML186 Instruction Manual - Page 4
Operation, Maintenance, Accessories
 |
View all Makita CT322W manuals
Add to My Manuals
Save this manual to your list of manuals |
Page 4 highlights
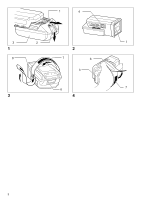
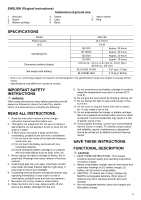
5. Use a power source with the voltage specified on the nameplate of the charger. 6. Do not charge the battery cartridge in presence of flammable liquids or gases. 7. Do not expose charger to rain or snow. 8. Never carry charger by cord or yank it to disconnect from receptacle. 9. After charging or before attempting any maintenance or cleaning, unplug the charger from the power source. Pull by plug rather than cord whenever disconnecting charger. 10. Make sure cord is located so that it will not be stepped on, tripped over, or otherwise subjected to damage or stress. 11. Do not operate charger with damaged cord or plug replace them immediately. 12. Do not operate or disassemble charger if it has received a sharp blow, been dropped, or otherwise damaged in any way; take it to a qualified serviceman. Incorrect use or reassembly may result in a risk of electric shock or fire. 13. The battery charger is not intended for use by young children or infirm persons without supervision. 14. Young children should be supervised to ensure that they do not play with the battery charger. 15. Do not charge battery cartridge when temperature is BELOW 10°C (50°F) or ABOVE 40°C (104°F). 16. Do not attempt to use a step-up transformer, an engine generator or DC power receptacle. Charging Charge the battery cartridge with the Makita charger before use. Installing or removing battery cartridge (Fig. 1) • Always switch off the tool before insertion or removal of the battery cartridge. • To remove the battery cartridge, withdraw it from the tool while sliding the button on the front of the cartridge. • To insert the battery cartridge, align the tongue on the battery cartridge with the groove in the housing and slip it into place. Always insert it all the way until it locks in place with a little click. If you can see the red part on the upper side of the button, it is not locked completely. Insert it fully until the red part cannot be seen. If not, it may accidentally fall out of the tool, causing injury to you or someone around you. • Do not use force when inserting the battery cartridge. If the cartridge does not slide in easily, it is not being inserted correctly. Lighting up the lamp (Fig. 2) CAUTION: • Do not look in the light or see the source of light directly. • Push the switch to light up the light. To turn off, push the switch again. NOTE: • When remaining battery capacity becomes lower, light turns off automatically. So you should charge the battery cartridge soon. • Operating time may be shortened according to environments and battery conditions. Installing the band (Fig. 3) Insert the band through the rings of the unit and install it with its Velcro surface facing outward in order shown in the figure. OPERATION How to use (Fig. 4) CAUTION: Fasten the band so that flashlight and a band are tightly secured. Install the battery cartridge. Slide fingers through the band and grip the unit as shown in the figure. Adjust the length of the band and then secure it in Velcro section. Operate the switch with a thumb. MAINTENANCE CAUTION: To maintain product safety and reliability, repairs, maintenance or adjustment should be carried out by a Makita Authorized Service Center. CAUTION: Never use gasoline, benzine, thinner, alcohol or the like. Discoloration, deformation or cracks may result. ACCESSORIES CAUTION: These accessories or attachments are recommended for use with your Makita tool specified in this manual. The use of any other accessories or attachments might present a risk of injury to persons. Only use accessory or attachment for its stated purpose. If you need any assistance for more details regarding these accessories, ask your local Makita service center. • Battery Charger • Battery Cartridge 4
-
 1
1 -
 2
2 -
 3
3 -
 4
4 -
 5
5 -
 6
6 -
 7
7 -
 8
8 -
 9
9 -
 10
10 -
11
-
12
 |
 |
