Makita GD0601 Owners Manual - Page 6
Operation, Maintenance, Accessories
 |
View all Makita GD0601 manuals
Add to My Manuals
Save this manual to your list of manuals |
Page 6 highlights
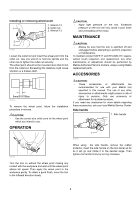
Installing or removing wheel point 1. Wrench 13 1 2. Collet nut 3. Wrench 13 2 3 007681 Loosen the collet nut and insert the wheel point into the collet nut. Use one wrench to hold the spindle and the other one to tighten the collet nut securely. The wheel point should not be mounted more than 8 mm from the collet nut. Exceeding this distance could cause vibration or a broken shaft. CAUTION: • Apply light pressure on the tool. Excessive pressure on the tool will only cause a poor finish and overloading of the motor. MAINTENANCE CAUTION: • Always be sure that the tool is switched off and unplugged before attempting to perform inspection or maintenance. To maintain product SAFETY and RELIABILITY, repairs, carbon brush inspection and replacement, any other maintenance or adjustment should be performed by Makita Authorized Service Centers, always using Makita replacement parts. ACCESSORIES 8mm(5/16")Max. 003495 To remove the wheel point, follow the installation procedure in reverse. CAUTION: • Use the correct size collet cone for the wheel point which you intend to use. OPERATION CAUTION: • These accessories or attachments are recommended for use with your Makita tool specified in this manual. The use of any other accessories or attachments might present a risk of injury to persons. Only use accessory or attachment for its stated purpose. If you need any assistance for more details regarding these accessories, ask your local Makita Service Center. Side handle 1. Side handle 1 007683 007682 When using the side handle, remove the rubber protector, insert the side handle on the tool barrel as far as it will go and rotate it to the desired angle. Then tighten the handle firmly by turning clockwise. Turn the tool on without the wheel point making any contact with the workpiece and wait until the wheel point attains full speed. Then apply the wheel point to the workpiece gently. To obtain a good finish, move the tool in the leftward direction slowly. 6
-
 1
1 -
 2
2 -
 3
3 -
 4
4 -
 5
5 -
 6
6 -
 7
7 -
 8
8
 |
 |
