Makita HR5210C Owners Manual - Page 9
Accessories - sds max
 |
View all Makita HR5210C manuals
Add to My Manuals
Save this manual to your list of manuals |
Page 9 highlights
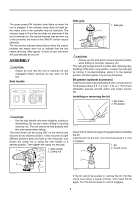
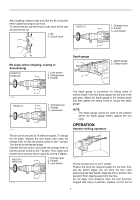
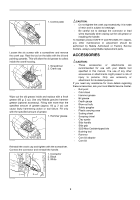
1. Control plate 1 007853 Loosen the six screws with a screwdriver and remove the crank cap. Rest the tool on the table with the bit end pointing upwards. This will allow the old grease to collect inside the crank housing. 1. Screwdriver 2. Crank cap 1 2 007854 Wipe out the old grease inside and replace with a fresh grease (60 g; 2 oz). Use only Makita genuine hammer grease (optional accessory). Filling with more than the specified amount of grease (approx. 60 g; 2 oz) can cause faulty hammering action or tool failure. Fill only with the specified amount of grease. 1 1. Hammer grease 007855 Reinstall the crank cap and tighten with the screwdriver. Connect the connector and reinstall the handle. 1. Connector 2. Black 3. White 2 CAUTION: • Do not tighten the crank cap excessively. It is made of resin and is subject to breakage. • Be careful not to damage the connector or lead wires especially when wiping out the old grease or installing the handle. To maintain product SAFETY and RELIABILITY, repairs, any other maintenance or adjustment should be performed by Makita Authorized or Factory Service Centers, always using Makita replacement parts. ACCESSORIES CAUTION: • These accessories or attachments are recommended for use with your Makita tool specified in this manual. The use of any other accessories or attachments might present a risk of injury to persons. Only use accessory or attachment for its stated purpose. If you need any assistance for more details regarding these accessories, ask your local Makita Service Center. • Bull point • Cold chisel • Hammer grease • Bit grease • Depth gauge • Blow-out bulb • Safety goggles • Plastic carrying case • Scaling chisel • Scraping chisel • Clay spade • Side handle • Side grip • SDS-Max Carbide-tipped bits • Bushing tool • Rammer • Core bit adapter • Core bit 1 3 007856 9
-
 1
1 -
2
-
3
-
 4
4 -
 5
5 -
 6
6 -
 7
7 -
 8
8 -
 9
9 -
 10
10 -
 11
11 -
 12
12 -
 13
13 -
 14
14 -
15
-
16
-
17
-
18
-
19
-
20
-
21
-
22
-
23
-
24
-
25
-
26
-
27
-
28
-
29
-
30
-
31
-
32
 |
 |
