Marantz RC2001 User Guide - Page 14
Sys.setup - a
 |
View all Marantz RC2001 manuals
Add to My Manuals
Save this manual to your list of manuals |
Page 14 highlights
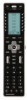
ENGLISH 3. SYS.SETUP Display the MAIN MENU on the LCD of the RC2001, then press the button next to the lSYS. SETUPz indicator. The items below can be set in the SYS.SETUP screen. 2. Use the numeric buttons (0 to 9) and cursor buttons (t and u) to set the current time. After setting the correct time, press the ENTER button. • CLOCK (Clock setting) • BACK LIGHT (Backlight illumination time setting) • LCD (LCD setting) • BEEP (Beep sound setting) • MEM CLEAR (Initialization setting) 3. The message lCOMPLETEDz is displayed in the LCD to indicate that the clock setting is completed. CLOCK (CLOCK SETTING) This sets the clock for the RC2001. 1. Press the button next to the lCLOCKz indicator in the SYS.SETUP menu screen in the LCD to display the clock setting screen. • Either press the ENTER button or wait three seconds for the LCD to automatically return to the SYS.SETUP menu. • Pressing the Home button returns the LCD to the MAIN MENU. Notes: The clock can become out of sync over time. Please check it occasionally and set to the correct time if necessary. The clock setting is not backed up when the batteries are replaced. Please reset the time after replacing the batteries. 12
-
 1
1 -
2
-
3
-
4
-
5
-
6
-
7
-
8
-
 9
9 -
 10
10 -
 11
11 -
 12
12 -
 13
13 -
 14
14 -
 15
15 -
 16
16 -
 17
17 -
 18
18 -
 19
19 -
20
-
21
-
22
 |
 |
