Maytag MBF2258XEW Use & Care Guide - Page 8
Remove and Replace Freezer Drawer, Remove and Replace Drawer Handle, Remove Drawer Front, Replace - bottom freezer
 |
View all Maytag MBF2258XEW manuals
Add to My Manuals
Save this manual to your list of manuals |
Page 8 highlights
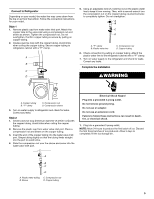
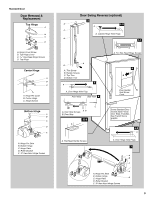
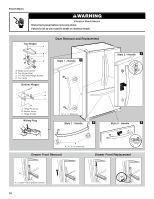
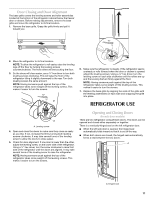
Remove and Replace Freezer Drawer IMPORTANT: ■ Two people may be required to remove and replace the freezer drawer. ■ All graphics are included later in this section after "Final Steps." Remove and Replace Drawer Handle Style 1 Handle ■ Using a or ¹⁄₈" hex key, loosen the two setscrews located on the side of each handle. Pull the handle straight out from the drawer. Make sure you keep the screws for reattaching the handles. See Style 1 Handle, graphic 2. ■ To replace the handle, reverse the directions. Style 2 Handle ■ To remove the handle, grasp the handle firmly, slide the handle to the left and pull the handle straight out from the drawer. See Style 2 Handle, graphic 2. ■ To replace the handle, position the handle so that the large holes in the mounting clips are to the right and align the holes with the door studs. Rotate the handle so that the mounting clips are flat against the drawer and slide the handle to the right to engage. See Style 2 Handle, graphic 2. Remove Drawer Front 1. Open the freezer drawer to full extension. 2. Loosen the four screws attaching the drawer glides to the drawer front. See Drawer Front Removal graphic. NOTE: Loosen screws three to four turns. Keep the screws in the drawer front. 3. Lift drawer front upward and off the screws. See Drawer Front Removal graphic. Replace Drawer Front 1. Slide the drawer glides out of the freezer compartment. Insert the screws in the top of the drawer front into the slots in the drawer brackets. See Drawer Front Replacement graphic. 2. Pull the drawer brackets toward you to insert the two screws in the bottom of the drawer front into the brackets. See Drawer Front Replacement graphic. 3. Completely tighten the four screws. Final Steps 1. Check all holes to make sure that hole plugs and screws are in place. Reinstall top hinge cover as shown in Top Hinge graphic. WARNING Electrical Shock Hazard Plug into a grounded 3 prong outlet. Do not remove ground prong. Do not use an adapter. Do not use an extension cord. Failure to follow these instructions can result in death, fire, or electrical shock. 2. Plug into a grounded 3 prong outlet. 3. Return all removable door parts to door and food to refrigerator. 8
-
 1
1 -
2
-
 3
3 -
 4
4 -
 5
5 -
 6
6 -
 7
7 -
 8
8 -
 9
9 -
 10
10 -
 11
11 -
 12
12 -
 13
13 -
14
-
15
-
16
-
17
-
18
-
19
-
20
-
21
-
22
-
23
-
24
-
25
-
26
-
27
-
28
-
29
-
30
-
31
-
32
-
33
-
34
-
35
-
36
-
37
-
38
-
39
-
40
-
41
-
42
-
43
-
44
-
45
-
46
-
47
-
48
-
49
-
50
-
51
-
52
-
53
-
54
-
55
-
56
-
57
-
58
-
59
-
60
-
61
-
62
-
63
-
64
-
65
-
66
-
67
-
68
 |
 |