Maytag MGDP475EW Use & Care Guide
Maytag MGDP475EW Manual
 |
View all Maytag MGDP475EW manuals
Add to My Manuals
Save this manual to your list of manuals |
Maytag MGDP475EW manual content summary:
- Maytag MGDP475EW | Use & Care Guide - Page 1
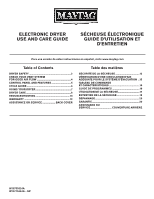
en español, visite www.maytag.com Table of Contents Table des matières DRYER SAFETY 2 CHECK YOUR VENT SYSTEM FOR GOOD AIR FLOW 4 CONTROL PANEL AND FEATURES 5 CYCLE GUIDE 6 USING YOUR DRYER 7 DRYER CARE 8 TROUBLESHOOTING 10 WARRANTY 12 ASSISTANCE OR SERVICE BACK COVER SÉCURITÉ DE LA - Maytag MGDP475EW | Use & Care Guide - Page 2
DRYER SAFETY 2 - Maytag MGDP475EW | Use & Care Guide - Page 3
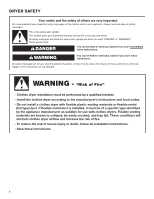
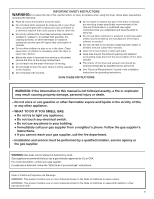
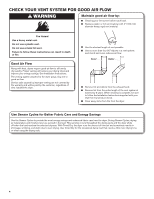
WARNING: If the information in this manual is not followed exactly, a re or explosion may result Follow the gas supplier's instructions. • If you cannot reach your gas supplier, call the re department. - Installation and service must be performed by a quali ed installer, service agency or the gas - Maytag MGDP475EW | Use & Care Guide - Page 4
dry laundry. Proper venting will reduce your drying times and improve your energy savings. See Installation Instructions. The venting system attached to the dryer plays a big role in good air flow. Service calls caused by improper venting are not covered by the warranty and will be paid by the - Maytag MGDP475EW | Use & Care Guide - Page 5
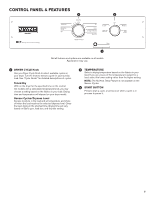
Not all features and options are available on all models. Appearance may vary. 1 DRYER CYCLE Knob Use your Dryer Cycle Knob to select available cycles on your dryer. Turn the knob to select a cycle for your laundry load. See "Cycle Guide" for detailed descriptions of cycles. Timed Dry Will run the - Maytag MGDP475EW | Use & Care Guide - Page 6
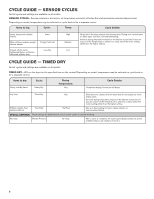
temperature to select for a load, select the lower setting rather than the higher setting. CYCLE GUIDE - TIMED DRY Not all cycles and settings are available on all models. TIMED DRY - Will run the dryer for the specified time on the control. Depending on model, temperature may be selected on cycle - Maytag MGDP475EW | Use & Care Guide - Page 7
. Do not rinse or wash screen to remove lint. Push the lint screen firmly back into place. For additional cleaning information, see Dryer Care. 2. Load the dryer Select the desired cycle for your load. See the Cycle Guide or the display for more information about each cycle. Place laundry in the - Maytag MGDP475EW | Use & Care Guide - Page 8
Cabinet Lint should be removed every 2 years, or more often, depending on dryer usage. Cleaning should be done by a qualified servicer. From the Exhaust Vent Lint should be removed every 2 years, or more often, depending on dryer usage. Cleaning the lint screen Every load cleaning The lint screen is - Maytag MGDP475EW | Use & Care Guide - Page 9
leveling legs are secure in dryer base. 4. Use tape to secure dryer door. Reinstalling the Dryer Follow the "Installation Instructions" to locate, level, and connect the dryer. Changing the drum light (on some models) 1. Unplug dryer or disconnect power. 2. Open the dryer door. Locate the light bulb - Maytag MGDP475EW | Use & Care Guide - Page 10
TROUBLESHOOTING First try the solutions suggested here or visit our website at www.maytag.com/product_help In Canada www.maytag.ca for assistance and to possibly avoid a service call. If you experience Possible Causes Solution Clothes are not drying satisfactorily, drying times are too long, or - Maytag MGDP475EW | Use & Care Guide - Page 11
TROUBLESHOOTING First try the solutions suggested here or visit our website at www.maytag.com/product_help In Canada www.maytag.ca for assistance and to possibly avoid a service been painting, staining, or varnishing in the area where your dryer is located. If so, ventilate the area. When the odors - Maytag MGDP475EW | Use & Care Guide - Page 12
a few minutes to review the Troubleshooting or Problem Solver section of the Use and Care Guide, scan the QR code on the right to access additional resources, or visit https://www.maytag.com/product_help. 2. All warranty service is provided exclusively by our authorized Maytag Service Providers. In - Maytag MGDP475EW | Use & Care Guide - Page 13
SÉCURITÉ DE LA SÉCHEUSE 13 - Maytag MGDP475EW | Use & Care Guide - Page 14
le téléphone se trouvant sur les lieux. • Appeler immédiatement le fournisseur de gaz à partir du téléphone d'un voisin. Suivre ses instructions. • À défaut de joindre votre fournisseur de gaz, appeler les pompiers. - L'installation et l'entretien doivent être effectués par un installateur quali - Maytag MGDP475EW | Use & Care Guide - Page 15
quate pour sécher efficacement le linge. Une ventilation adéquate réduit les durées de séchage et accroît les économies d'énergie. Voir les Instructions d'installation. Le système d'évacuation fixé à la sécheuse joue un rôle important dans la circulation de l'air. Les interventions de dépannage caus - Maytag MGDP475EW | Use & Care Guide - Page 16
) Appuyer sur ce bouton pour démarrer un programme ou appuyer une fois dessus pendant qu'un programme est en cours pour le suspendre. GUIDE DE PROGRAMMES - PROGRAMMES DE DÉTECTION Certains programmes ne sont pas disponibles sur certains modèles. PROGRAMMES DE DÉTECTION - Détecte l'humidité présente - Maytag MGDP475EW | Use & Care Guide - Page 17
GUIDE DE PROGRAMMES - SÉCHAGE MINUTÉ Certains programmes ne sont pas disponibles sur certains modèles. TIMED DRY (séchage minuté) - Fait fonctionner la sécheuse pour la durée - Maytag MGDP475EW | Use & Care Guide - Page 18
le programme Sélectionner le programme souhaité pour la charge. Voir le guide de programmes ou l'affichage pour plus d'informations sur chaque programme. 4. les températures de séchage pour diverses charges, consulter les instructions sur l'étiquette de soin. Caractéristique Wrinkle Prevent (anti- - Maytag MGDP475EW | Use & Care Guide - Page 19
à la base de la sécheuse. 4. Utiliser du ruban adhésif pour fixer la porte de la sécheuse. Réinstallation de la sécheuse Suivre les "Instructions d'installation" pour choisir l'emplacement, régler l'aplomb de la sécheuse et la raccorder. 4. Rincer le filtre à l'eau chaude. 5. Bien sécher le filtre - Maytag MGDP475EW | Use & Care Guide - Page 20
suggérées ici ou consulter notre site Web www.maytag.com/product_help Au Canada, www.maytag.ca - pour obtenir de l'aide et éviter direction. Un long conduit augmentera les durées de séchage. Voir les Instructions d'installation. Diamètre du conduit d'évacuation de taille correcte. Utiliser un - Maytag MGDP475EW | Use & Care Guide - Page 21
érées ici ou consulter notre site Web www.maytag.com/product_help Au Canada, www.maytag.ca - pour obtenir de l'aide et éviter pas correctement installée.Voir les la sécheuse n'est pas d'aplomb de l'avant Instructions d'installation. vers l'arrière et transversalement. Les vêtements sont emmêlés ou - Maytag MGDP475EW | Use & Care Guide - Page 22
guide d'utilisation et d'entretien, scannez le code QR ci-contre pour accéder à des ressources supplémentaires, ou rendez-vous sur le site https://www.maytag.ca/product_help. 2. Tout service entretenu conformément aux instructions jointes à ou fournies avec le produit, Maytag paiera pour les pièces - Maytag MGDP475EW | Use & Care Guide - Page 23
vous souhaitez une garantie prolongée ou plus complète que la garantie limitée fournie avec ce gros appareil ménager, renseignez-vous auprès de Maytag ou de votre détaillant à propos de l'achat d'une extension de garantie. LIMITATION DES RECOURS; EXCLUSION DES DOMMAGES FORTUITS OU INDIRECTS LE SEUL - Maytag MGDP475EW | Use & Care Guide - Page 24
Before calling for assistance or service, please check "Troubleshooting" or visit www.maytag.com/help. It may save you the cost of a service call. If you still need help, follow the instructions below. When calling, please know the purchase date and the complete model and serial number of your
-
 1
1 -
 2
2 -
 3
3 -
 4
4 -
 5
5 -
 6
6 -
 7
7 -
8
-
9
-
10
-
11
-
12
-
13
-
14
-
15
-
16
-
17
-
18
-
19
-
20
-
21
-
22
-
23
-
24
 |
 |
W10755024A
W10770464A - SP
ELECTRONIC DRYER
USE AND CARE GUIDE
Table of Contents
Table des matières
DRYER SAFETY
..................................................................
2
CHECK YOUR VENT SYSTEM
FOR GOOD AIR FLOW
......................................................
4
CONTROL PANEL AND FEATURES
...............................
5
CYCLE GUIDE
......................................................................
6
USING YOUR DRYER
........................................................
7
DRYER CARE
.......................................................................
8
TROUBLESHOOTING
......................................................
10
WARRANTY
........................................................................
12
ASSISTANCE OR SERVICE
....................
BACK COVER
SÉCURITÉ DE LA SÉCHEUSE
......................................
13
VÉRIFICATION D’UNE CIRCULATION D’AIR
ADÉQUATE POUR LE SYSTÈME D’ÉVACUATION ..15
TABLEAU DE COMMANDE
ET CARACTÉRISTIQUES
................................................
16
GUIDE DE PROGRAMMES
...........................................
16
UTILISATION DE LA SÉCHEUSE
..................................
17
ENTRETIEN DE LA SÉCHEUSE
....................................
18
DÉPANNAGE.
....................................................................
20
GARANTIE.
.........................................................................
20
ASSISTANCE OU
SERVICE
..................................
COUVERTURE ARRIÈRE
SÉCHEUSE ÉLECTRONIQUE
GUIDE D’UTILISATION ET
D’ENTRETIEN
Para una versión de estas instrucciones en español, visite www.maytag.com