Maytag MMV5165BAW Installation Instructions - Page 16
Check, Operation - microwave model
 |
View all Maytag MMV5165BAW manuals
Add to My Manuals
Save this manual to your list of manuals |
Page 16 highlights
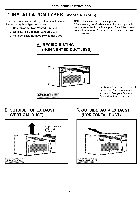
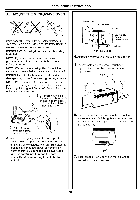
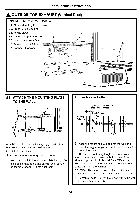
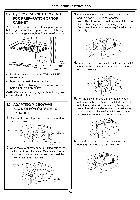
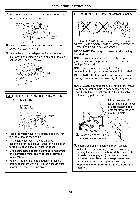
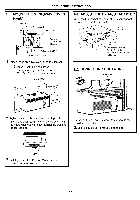
Installation Instructions 7. Secure the blower unit to the microwave with the two screws removed in Step 2. MOUNT THE MICROWAVE OVEN sRceteawin_ __ _ __ screw etaining 8. Close the blower cover and secure it with the screw removed in Step 1. 9. Attach the exhaust adaptor to the rear of the microwave by sliding it into the guides at the top center of the back of the oven. Back of Microwave CHECK FOR PROPER DAMPER OPERATION Exhaust Adaptor (absent on models shipped for recirculation exhaust) - Damper FOR EASIER INSTALLATION SAFETY, WE RECOMMEND INSTALL THIS MICROWAVE AND PERSONAL THAT TWO PEOPLE OVEN. IMPORTANT: Do not grip or use handle during installation. NOTE: If your cabinet is metal, use the nylon grommet around the power cord hole to prevent cutting of the cord. NOTE: We recommend using filler blocks if the cabinet front hangs below the cabinet bottom shelf. IMPORTANT: If filler blocks are not used, case damage may occur from over tightening screws. NOTE: When mounting the microwave oven, thread power cord through hole in bottom of top cabinet. Keep it tight throughout Steps 1-3. Do not pinch cord or lift oven by pulling cord. 1. Lift microwave, tilt it forward, and hook slots at back bottom edge onto four lower tabs of mounting plate. Place the microwave in its upright position, with the top of the unit facing up. This microwave oven may be shipped assembled for top exhaust (adaptor installed) or for recirculation exhaust (adaptor absent). Make sure tape securing damper is removed and damper pivots easily before mounting microwave. You will need to make adjustments to assure proper alignment with your house exhaust duct after the microwave is installed. 2. Rotate front of oven up against cabinet bottom __ 3. Insert a self-aligning screw through top left cabinet hole. Temporarily secure the oven by turning the screw at least two full turns after the threads have engaged. (It will be completely tightened later.) Be sure to keep power cord tight. Be careful not to pinch the cord, especially when mounting flush to bottom of cabinet. 16
-
 1
1 -
2
-
3
-
4
-
5
-
6
-
7
-
8
-
9
-
10
-
 11
11 -
 12
12 -
 13
13 -
 14
14 -
 15
15 -
 16
16 -
 17
17 -
 18
18 -
 19
19 -
 20
20 -
 21
21 -
22
-
23
-
24
 |
 |
