Maytag MVWB835DC Use & Care Guide - Page 5
Control Panel And Features - model
 |
View all Maytag MVWB835DC manuals
Add to My Manuals
Save this manual to your list of manuals |
Page 5 highlights
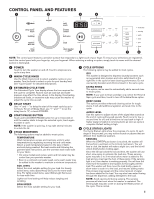
CONTROL PANEL AND FEATURES 1 2 3 4 5 6 7 8 NOTE: The control panel features a sensitive surface that responds to a light touch of your finger. To ensure your selections are registered, touch the control panel with your finger tip, not your fingernail. When selecting a setting or option, simply touch its name until the desired section is illuminated. 1 POWER Touch to turn the washer on and off. Touch to stop/cancel a cycle at any time. 2 WASH CYCLE KNOB Use the Wash Cycle knob to select available cycles on your washer. Turn the knob to select a cycle for your laundry load. See "Cycle Guide" for detailed descriptions. 7 CYCLE OPTIONS The following options may be added to most cycles. OXI This washer is designed to dispense laundry boosters such as oxygenated stain treaters and color-safe bleach at the right time in the cycle for best cleaning performance. Do not use laundry boosters and chlorine bleach in the same cycle. 3 ESTIMATED CYCLE TIME The Estimated Cycle Time display shows the time required for the cycle to complete. Factors such as load size and water EXTRA RINSE This option can be used to automatically add a second rinse to most cycles. pressure may affect the time shown in the display. Overloading, NOTE: If you want to Drain and Spin only, select the Rinse & unbalanced loads, or excessive suds may cause the washer to Spin cycle and then, touch to turn off the Extra Rinse option. adjust the cycle time as well. DEEP CLEAN 4 DELAY START Use "+" and "-" to delay the start of the wash cycle by up to 12 hours. To turn off Delay Start, use "+" and "-" to set the This option provides enhanced cleaning action for tough stains. It will add additional agitation and soak time to the cycle. delay time to "0," or touch POWER. AUDIO LEVEL 5 START/PAUSE BUTTON Touch and hold START/PAUSE button for up to 3 seconds or until the washer starts to begin the selected cycle; touch again to pause a cycle. NOTE: If the washer is spinning, it may take several minutes Use this option to adjust volume of the signal that sounds at the end of cycle and key pad sounds. Touch once for low, a second time for off, and a third time to loop back to high. A higher signal is helpful in removing items as soon as cycle is complete. Default setting is high. to unlock the lid. 8 CYCLE STATUS LIGHTS 6 CYCLE MODIFIERS The following options may be added to most cycles. TEMPERATURE Wash temperature senses and maintains uniform water temperatures by regulating incoming hot and cold water. Select a wash temperature based on the type of fabric and soils being washed. For best results and following the garment label instructions, use the warmest wash water safe The Cycle Status Lights show the progress of a cycle. At each stage of the process, you may notice sounds or pauses that are different from traditional washers. SENSING When the START/Pause button is touched, the washer will first perform a self-test on the lid lock mechanism. You will hear a click, the basket will make a slight turn, and the lid will unlock briefly before locking again. for your fabric. Once the lid has locked the second time, the washer will use • On some models and cycles, warm and hot water may be cooler than your previous washer. • Even in a cold and cool water wash, some warm water may be added to the washer to maintain a minimum temperature. short, slow spins to estimate the load size. These sensing spins may take 2 to 3 minutes before water is added to the load and you may hear the hum of these spins. If the sensing light is on, then washer is working properly. You will hear the motor turn the basket in short pulses to thoroughly wet the SOIL LEVEL load. The washer will then move the load briefly, pause to Select the most suitable setting for your load. For heavily allow water to soak in to the load, and resume adding water. soiled items, select Extra Heavy Soil Level for more wash This process may repeat until the correct amount of water time. For lightly soiled items, select Extra Light Soil Level has been added for the load. You may also hear water flowing for less wash time. through the dispenser, adding detergent to the load. Lighter soil level setting will help reduce tangling and wrinkling. SPIN SPEED Select the most suitable setting for your load. NOTE: Avoid opening lid during sensing. The sensing process will start over when the washer is restarted. The sensing light may also come on during the Wash portion of the cycle. This is normal. 5
-
 1
1 -
 2
2 -
 3
3 -
 4
4 -
 5
5 -
 6
6 -
 7
7 -
 8
8 -
 9
9 -
 10
10 -
 11
11 -
12
-
13
-
14
-
15
-
16
-
17
-
18
-
19
-
20
-
21
-
22
-
23
-
24
-
25
-
26
-
27
-
28
-
29
-
30
-
31
-
32
-
33
-
34
-
35
-
36
-
37
-
38
-
39
-
40
 |
 |
