Memorex MVDP1076 User Manual - Page 11
Location Of Controls Continued
 |
View all Memorex MVDP1076 manuals
Add to My Manuals
Save this manual to your list of manuals |
Page 11 highlights
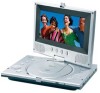
LOCATION OF CONTROLS (CONTINUED) SIDE 5 6 7 1 8 2 9 3 10 4 1. AUDIO (IN/OUT) Jack 2. Headphone 2 Jack 3. Headphone 1 Jack 4. VOLUME Control 5. PUSH (Release) Button (Top of the Battery Pack) 6. Battery Pack 7. CHARGE Indicator (Top of the Battery Pack) 8. VIDEO (IN/OUT) Jack 9. COAXIAL OUT Jack 10. DC IN Jack 9V z REMOTE 1 15 2 16 17 18 3 19 20 21 4 5 22 6 23 24 7 8 25 9 26 10 27 11 28 12 29 13 30 14 31 NOTE: Press the POWER button (on the main unit) to turn the unit on; the Power indicator will light red. When the unit is on, if you press the STANDBY button (on the remote), the unit will turn to the Standby mode. To reduce the unit's power consumption, press the POWER button (on the main unit) to turn the unit off; the Power indicator will turn off. Also, the STANDBY button is just for turning the unit to Standby mode. To turn the unit on or off, press the POWER button (on the main unit). 10 1. MUTE Button 2. STANDBY Button 3. Number (0-9, 10+) Buttons 4. LCD Button 5. RETURN Button 6. TITLE Button 7. STEP Button 8. MENU Button 9. PAUSE (p) Button 10. PLAY (®) Button 11. Search ®® Button 12. Search √√ Button 13. REPEAT A-B Button 14. REPEAT Button 15. SEARCH Button 16. OSD Button 17. SUBTITLE Button 18. AUDIO Button 19. ANGLE Button 20. CLEAR Button 21. PROG. Button 22. SETUP Button 23. ENTER Button 24. Navigation Buttons 25. ZOOM Button 26. STOP (I) Button 27. SLOW Button 28. Skip (o) Button 29. Skip (n) Button 30. VOL - Button 31. VOL + Button
-
 1
1 -
2
-
3
-
4
-
5
-
 6
6 -
 7
7 -
 8
8 -
 9
9 -
 10
10 -
 11
11 -
 12
12 -
 13
13 -
 14
14 -
 15
15 -
 16
16 -
17
-
18
-
19
-
20
-
21
-
22
-
23
-
24
-
25
-
26
-
27
-
28
-
29
-
30
-
31
-
32
-
33
-
34
-
35
-
36
-
37
-
38
-
39
-
40
-
41
-
42
-
43
-
44
 |
 |
