Motorola V3X User Manual - Page 17
GPS Receiver Operating Basics - orange
 |
View all Motorola V3X manuals
Add to My Manuals
Save this manual to your list of manuals |
Page 17 highlights
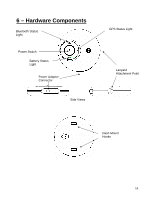
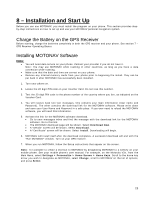
7 - GPS Receiver Operating Basics Connecting the Car Charger Plug the car charger into any auxiliary power/cigarette lighter jack. Remove the rubber dust cap from the GPS receiver's power adapter connector and insert the other end of the charger cord into the connector. Once the battery has been charged, as indicated by the battery status light turning green, remove the power connector and replace the dust cap. Note that when the GPS receiver is on, the battery will charge when a charger is connected, but the status light will not turn green. Note: Store the GPS battery at room temperature to avoid capacity loss. Turning the GPS Receiver On and Off To turn the GPS receiver on, press the power button for longer than 2 seconds. This is indicated by the battery status light turning on, then the GPS status light, and then the Bluetooth status light. Pressing the power button for longer than 2 seconds again will turn the receiver off. This is indicated by the Bluetooth status light turning off, then the GPS status light turning off, and then the battery status light turning off (the reverse sequence of powering on). Power Saving Features Once the Bluetooth link is connected and the GPS receiver has acquired a position fix, the status lights will turn off after 10 seconds to conserve battery power and to reduce distraction during normal use. Momentarily pressing the power button will turn them back on to allow you to view the status of the receiver. If the Bluetooth link is disconnected or if the GPS receiver loses position fix, the LED's will start flashing to indicate this condition. If there is no Bluetooth connection for 1 hour, the GPS receiver will turn off to save battery power. If you want to use it again, you will have to turn it back on using the power button. Under normal circumstances, the GPS receiver should get approximately ten hours of life out of one full charge. Indicator Lights Battery Status Light This light indicates the amount of power left in the battery. A flashing red light means you need to charge the battery. A green light means the battery is fully charged. An orange light indicates the battery is midway between fully charged and needing a charge. Plugging in the power adaptor cable will cause the battery status light to remain on in order to show the state of charge on the battery. A flashing red light will turn solid red when the charger is plugged in. Unplug the power adaptor cable when the light turns green. GPS Status Light The GPS status light will blink orange when it is not locked on to any GPS satellites. A flashing GPS status light means that your location cannot be determined. If a GPS lock cannot be achieved, you may have to move the location of your GPS receiver to get a better view of the sky. Indoor operation generally does not give sufficient signal strength to achieve a GPS lock. Move the receiver to a window for stronger signal strength. The initial GPS lock may take several minutes to achieve. 17
-
 1
1 -
2
-
3
-
4
-
5
-
6
-
7
-
8
-
9
-
10
-
11
-
 12
12 -
 13
13 -
 14
14 -
 15
15 -
 16
16 -
 17
17 -
 18
18 -
 19
19 -
 20
20 -
 21
21 -
 22
22 -
23
-
24
-
25
-
26
-
27
-
28
-
29
-
30
-
31
-
32
-
33
-
34
-
35
-
36
-
37
-
38
-
39
-
40
-
41
-
42
-
43
-
44
-
45
-
46
 |
 |
