NEC 2010x User Manual - Page 24
Using headphones - cd
 |
View all NEC 2010x manuals
Add to My Manuals
Save this manual to your list of manuals |
Page 24 highlights
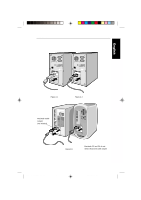
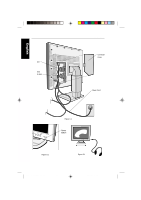
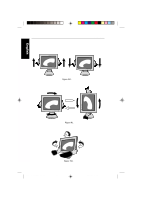
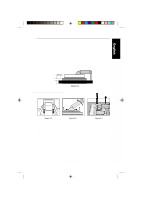
English Deutsch Français E - 9 Installation 3. Remove connector cover. Connect the DVI signal cable to the connector on the back of the monitor. Connect the 15-pin mini D-SUB signal cable (not included) to the connector on the back of the monitor. Place the video signal cable (Figure C.1). Replace connector cover. NOTE: Incorrect cable connections may result in irregular operation, damage display quality/components of LCD module and/or shorten the module's life. 4. Connect one end of the power cord to the AC inlet on the back of the monitor and the other end to the power outlet (Figure C.1). 5. Turn on the monitor (Figure D.1) and the computer. 6. To complete the setup of your MultiSync LCD monitor, use the following OSM controls: • Auto Adjust Contrast (Analog input only) • Auto Adjust (Analog input only) Refer to the Controls section of this User's Manual for a full description of these OSM controls. NOTE: If you have any problems, please refer to the Troubleshooting section of this User's Manual. NOTE: Refer to User's Manual in the NEC LCD Setup Software CD case for installation and operation of this software. Using headphones 1. Connect the audio cable to "Line-in" on the back of the monitor and the other end to the "Audio out" terminal of the computer. Replace connector cover. 2. Headphones may be connected to the "Headphones" output on the right side of the monitor (Figure E.1). Headphones can be purchased from your local electronics store. Español Italiano Appendix CN971B/LCD2010X/7A812101 24 00.8.30, 2:21 PM
-
 1
1 -
2
-
3
-
4
-
5
-
6
-
7
-
8
-
9
-
10
-
11
-
12
-
13
-
14
-
15
-
16
-
17
-
18
-
 19
19 -
 20
20 -
 21
21 -
 22
22 -
 23
23 -
 24
24 -
 25
25 -
 26
26 -
 27
27 -
 28
28 -
 29
29 -
30
-
31
-
32
-
33
-
34
-
35
-
36
-
37
-
38
-
39
 |
 |
