NEC DTP-16HC User Guide - Page 2
nstallation, of Accessories, peration, eatures and, Settings - 1 headset
 |
UPC - 722580156075
View all NEC DTP-16HC manuals
Add to My Manuals
Save this manual to your list of manuals |
Page 2 highlights
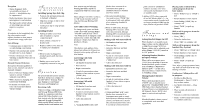
Reception • Shares frequency with several different types of devices - interference may be experienced • Radio interference may cause interruption to conversation • Moving handset while talking or relocating base unit may improve reception Note: If reception is lost completely during conversation mode, replace handset on base unit to resynchronize range; call is lost. Out of Range • Communication is halted for 30 seconds during conversation • Handset will automatically search for and select a clear channel • If none is found, an error tone will ring on handset when not on base station Manual Channel Selection If reception becomes garbled or static occurs, channels can also be manually changed. • Press ["CH"] key during conversation to activate 3-channel semi-auto scan (MCA) • While channel is changing, low battery LED will blink • If channel not found, error tone will sound and channel will not change I nstallation of Accessories Installing Spring-Type Belt Clip • Position clip, spring pointing up, to backside of handset • Align four prongs on clip to four slots on handset • Gently press clip to snap prongs into place Installing Headset • Pull back rubber cover from side of headset to expose connection port • Insert 2.5mm connector of headset jack • Replace rubber cover after use to ensure port cleanliness Notes: 1.When headset is plugged in, handset speech path becomes disabled. 2. Rubber cover need not be completely removed to use port. O peration All operational instructions assume that these features are assigned to the DTP-16HC-1 Terminal: Prime Line Pickup to your Primary Extension and Ringing Line. Receiving Calls When receiving a call, handset rings and Message Waiting LED blinks rapidly in conjunction with base station LED.When handset is on base station, only the base station rings and Message Waiting LED blinks rapidly.When handset is in standby mode, both handset and base station ring and Message Waiting LED blinks rapidly in conjunction with base station LED. Note: When [Ringer "ON/OFF"] switch is in "Off" mode, handset will not ring, but Message Waiting LED flashes. Auto Talk Feature Switching To change mode, press and hold ["TRF"] key while moving [Ringer "ON/OFF"] Switch from "Off" to "On."When mode is changed, confirmation tone sounds: Auto Talk Off produces 3 beeps; Auto Talk On produces 2 beeps. Note: This feature only applies if telephone type allows for Prime Line selection when going off-hook on that station. Answering Calls with Auto Talk Off • Lift handset from base unit • Press any key • Begin conversation • At end of conversation, return handset to base station or press ["TALK"] key • Call is disconnected Answering Calls with Auto Talk On • Lift handset from base unit • Begin conversation • At end of conversation, return handset to base station or press ["TALK"] key • Call is disconnected Notes: 1. ["TALK/BATTERY LOW"] LED flashes then remains lit as communication path is established between handset and base station. 2.The Auto Standby feature (no need to press ["TALK"] key to disconnect call) only applies when returning handset to base station. 3.While in talk mode, Message Waiting LED is inactive; when call is disconnected, Message Waiting LED is reactivated and flashes if messages are waiting. Making Calls with Auto Talk Off • Lift handset from base unit • Press any key • Listen for dial tone and dial number • Begin conversation • At end of conversation, return handset to base station or press ["TALK"] key • Call is disconnected Making Calls with Auto Talk On • Lift handset from base unit • Listen for dial tone and dial number • Begin conversation • At end of conversation, return handset to base station or press ["TALK"] key • Call is disconnected Notes: 1. ["TALK/BATTERY LOW"] LED flashes then remains lit as communication path is established between handset and base station, and dial tone is heard. The communication time out is 5 seconds. If communications path cannot be established within 5 seconds, error tone will sound and handset reverts to standby mode. 2.Applies ONLY when connected to an NEC Electra Elite® 2 - In conversation mode, handset will no longer produce DTMF, but the base station will produce DTMF. F eatures and Settings Setting Handset Ringer On/Off When handset is in standby mode, ringer volume can be adjusted Low or High by pressing ["VOL"] key. Ringer volume can be adjusted even when [Ringer "ON/OFF"] switch is in "Off" position. Adjusting Handset/Headset Reception Volume When call is in progress, press ["VOL"] key repeatedly to increase handset/headset speaker volume from NORMAL to MEDIUM to HIGH to LOW - in this order. After disconnect, volume reverts to NORMAL setting. Muting Handset/Headset Volume When call is in progress, press ["MUTE"] key to disable microphone.The ["TALK/BATTERY LOW"] LED flashes when handset/headset is muted.Voice is not transmitted in MUTE mode. Press ["MUTE"] key again to reactivate microphone. Note: Handset/headset volume control is compatible with new HAC regulations. Placing Calls on Hold with a call in progress from the base station: • Press ["HOLD"] key or ["TALK"] key • Return handset to base station • Press flashing ["LINE"] key to continue call • Press ["TALK"] or pick up handset With a call in progress from the handset (PBX): • Press ["TRF"] • Listen for stutter tone • Press ["TRF"] to continue call With a call in progress from the handset (Key System): • Press ["TRF"] key or ["TALK"] key • Return handset to base station • Press flashing ["LINE"] key to continue call • Press ["TALK"] or pick up handset Note: After a preprogrammed time, any held call will recall to the originating terminal. Conference Calling with a call in progress: • For Electra Elite/Electra Professional - Press ["CONF"] key on base station • For NEAX®2400/2000 - Press ["TRF"] • Place second call (internal or external) • Announce conference (optional) • Press ["CONF"] from base station to establish conference
-
 1
1 -
 2
2 -
 3
3
 |
 |
