NEC NP-M322W User's Manual - Page 71
Viewing the Help file of Image Express Utility Lite, Select Network and click OK.
 |
View all NEC NP-M322W manuals
Add to My Manuals
Save this manual to your list of manuals |
Page 71 highlights
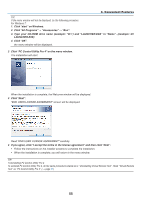
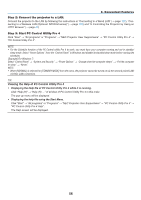
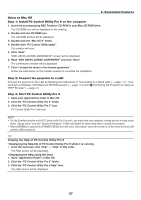
3. Convenient Features Step 3: Start Image Express Utility Lite. 1. On Windows, click "Start" → "All programs" → "NEC Projector UserSupportware" → "Image Express Utility Lite" → "Image Express Utility Lite". Image Express Utility Lite will start. The select window for network connection will be displayed 2. Select Network and click "OK". The select window for destination will show a list of connectable projectors. • When connecting the computer directly to the projector by one-to-one, "Easy Connection" is recommended. • When one or more networks for "EASY CONNECTION" are found, the "Easy Connection Selection Screen" window will be displayed. • To check for the network available for connected projectors, from the menu, select [INFO.] → [WIRELESS LAN] → [SSID]. 3. Select the network you wish to connect, and click "Select". The target selection window will be displayed. 4. Place a check mark for projectors to be connected, and then click "Connect". • When one or more projectors are displayed, from the menu on the projector, select [INFO.] → [WIRELESS LAN] → [IP ADDRESS]. When connecting with the projector is established, you can operate the control window to control the projector. (→ page 46) NOTE: • When [NORMAL] is selected for [STANDBY MODE] from the menu, the projector that is turned off will not be displayed in the select window for destination TIP: Viewing the "Help" file of Image Express Utility Lite • Displaying the Help file of Image Express Utility Lite while it is running. Click the [?] (help) icon on the control window. The Help screen will be displayed. • Displaying the Help file of GCT while it is running. Click "Help" → "Help" on the edit window. The Help screen will be displayed. • Displaying the help file using the Start Menu. Click "Start" → "All programs" or "Programs" → "NEC Projector User Supportware" → "Image Express Utility Lite" → "Image Express Utility Lite Help". The Help screen will be displayed. 60
-
 1
1 -
2
-
3
-
4
-
5
-
6
-
7
-
8
-
9
-
10
-
11
-
12
-
13
-
14
-
15
-
16
-
17
-
18
-
19
-
20
-
21
-
22
-
23
-
24
-
25
-
26
-
27
-
28
-
29
-
30
-
31
-
32
-
33
-
34
-
35
-
36
-
37
-
38
-
39
-
40
-
41
-
42
-
43
-
44
-
45
-
46
-
47
-
48
-
49
-
50
-
51
-
52
-
53
-
54
-
55
-
56
-
57
-
58
-
59
-
60
-
61
-
62
-
63
-
64
-
65
-
 66
66 -
 67
67 -
 68
68 -
 69
69 -
 70
70 -
 71
71 -
 72
72 -
 73
73 -
 74
74 -
 75
75 -
 76
76 -
77
-
78
-
79
-
80
-
81
-
82
-
83
-
84
-
85
-
86
-
87
-
88
-
89
-
90
-
91
-
92
-
93
-
94
-
95
-
96
-
97
-
98
-
99
-
100
-
101
-
102
-
103
-
104
-
105
-
106
-
107
-
108
-
109
-
110
-
111
-
112
-
113
-
114
-
115
-
116
-
117
-
118
-
119
-
120
-
121
-
122
-
123
-
124
-
125
-
126
-
127
-
128
-
129
-
130
-
131
-
132
-
133
-
134
-
135
-
136
-
137
-
138
-
139
-
140
-
141
-
142
-
143
-
144
-
145
-
146
-
147
-
148
-
149
-
150
-
151
-
152
-
153
-
154
-
155
-
156
-
157
-
158
-
159
-
160
-
161
-
162
-
163
 |
 |
