NEC NP-P451X User's Manual - Page 217
Viewing the Help of PC Control Utility Pro 5
 |
View all NEC NP-P451X manuals
Add to My Manuals
Save this manual to your list of manuals |
Page 217 highlights
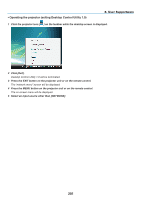
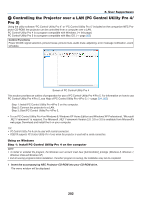
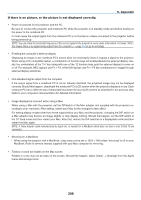
8. User Supportware Using on Mac OS Step 1: Install PC Control Utility Pro 5 on the computer 1. Insert the accompanying NEC Projector CD-ROM in your Mac CD-ROM drive. The CD-ROM icon will be displayed on the desktop. 2. Double-click the CD-ROM icon. The CD-ROM window will be displayed. 3. Double-click the "Mac OS X" folder. 4. Double-click "PC Control Utility.mpkg". The installer will start. 5. Click "Next". "END USER LICENSE AGREEMENT" screen will be displayed. 6. Read "END USER LICENSE AGREEMENT" and click "Next". The confirmation window will be displayed 7. Click "I accept the terms in the license agreement". Follow the instructions on the installer screens to complete the installation. Step 2: Connect the projector to a LAN Connect the projector to the LAN by following the instructions in "Connecting to a Wired LAN" (→ page 151), "Connecting to a Wireless LAN (Optional: NP02LM series)" (→ page 152) and "❾ Controlling the Projector by Using an HTTP Browser" (→ page 42) Step 3: Start PC Control Utility Pro 5 1. Open your Applications folder in Mac OS. 2. Click the "PC Control Utility Pro 5" folder. 3. Click the "PC Control Utility Pro 5" icon. PC Control Utility Pro 5 will start. NOTE: • For the Schedule function of the PC Control utility Pro 5 to work, you must have your computer running and not in sleep mode. Select "Energy Saver" from the "System Preferences" in Mac and disable its sleep mode before running the scheduler. • When [POWER-SAVING] is selected for [STANDBY MODE] from the menu, the projector cannot be turned on via the network (wired LAN/wireless LAN) connection. • When [NETWORK STANDBY] is selected for [STANDBY MODE] from the menu, the projector cannot be turned on via wireless LAN connection. TIP: Viewing the Help of PC Control Utility Pro 5 • Displaying the Help file of PC Control Utility Pro 5 while it is running. • From the menu bar, click "Help" → "Help" in this order. The Help screen will be displayed. • Displaying the Help using the Dock 1. Open "Application Folder" in Mac OS. 2. Click the "PC Control Utility Pro 5" folder. 3. Click the "PC Control Utility Pro 5 Help" icon. The Help screen will be displayed. 205
-
 1
1 -
2
-
3
-
4
-
5
-
6
-
7
-
8
-
9
-
10
-
11
-
12
-
13
-
14
-
15
-
16
-
17
-
18
-
19
-
20
-
21
-
22
-
23
-
24
-
25
-
26
-
27
-
28
-
29
-
30
-
31
-
32
-
33
-
34
-
35
-
36
-
37
-
38
-
39
-
40
-
41
-
42
-
43
-
44
-
45
-
46
-
47
-
48
-
49
-
50
-
51
-
52
-
53
-
54
-
55
-
56
-
57
-
58
-
59
-
60
-
61
-
62
-
63
-
64
-
65
-
66
-
67
-
68
-
69
-
70
-
71
-
72
-
73
-
74
-
75
-
76
-
77
-
78
-
79
-
80
-
81
-
82
-
83
-
84
-
85
-
86
-
87
-
88
-
89
-
90
-
91
-
92
-
93
-
94
-
95
-
96
-
97
-
98
-
99
-
100
-
101
-
102
-
103
-
104
-
105
-
106
-
107
-
108
-
109
-
110
-
111
-
112
-
113
-
114
-
115
-
116
-
117
-
118
-
119
-
120
-
121
-
122
-
123
-
124
-
125
-
126
-
127
-
128
-
129
-
130
-
131
-
132
-
133
-
134
-
135
-
136
-
137
-
138
-
139
-
140
-
141
-
142
-
143
-
144
-
145
-
146
-
147
-
148
-
149
-
150
-
151
-
152
-
153
-
154
-
155
-
156
-
157
-
158
-
159
-
160
-
161
-
162
-
163
-
164
-
165
-
166
-
167
-
168
-
169
-
170
-
171
-
172
-
173
-
174
-
175
-
176
-
177
-
178
-
179
-
180
-
181
-
182
-
183
-
184
-
185
-
186
-
187
-
188
-
189
-
190
-
191
-
192
-
193
-
194
-
195
-
196
-
197
-
198
-
199
-
200
-
201
-
202
-
203
-
204
-
205
-
206
-
207
-
208
-
209
-
210
-
211
-
 212
212 -
 213
213 -
 214
214 -
 215
215 -
 216
216 -
 217
217 -
 218
218 -
 219
219 -
 220
220 -
 221
221 -
 222
222 -
223
-
224
-
225
-
226
-
227
-
228
-
229
-
230
-
231
 |
 |