Nady 151 VR Manual - Page 3
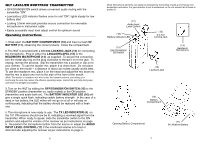
Battery Compartment 1, On/off/volume Wheel 8, Low Batt Led 9, Antenna 2, Mute Control 3, Tx Led 4, - systems
 |
View all Nady 151 VR manuals
Add to My Manuals
Save this manual to your list of manuals |
Page 3 highlights
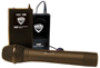
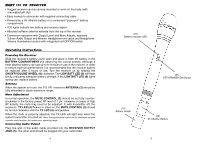
NADY 151 VR RECEIVER • Rugged receiver can be camera mounted or worn on the body (with removable belt clip) • Easy hookup to camcorder with supplied connecting cable • Powered by a 9V Alkaline battery in a convenient "pop-open" battery compartment • LED lights indicate low battery and receiver signal • Attached softwire antenna extends from the top of the receiver • Convenient operation with Output Level and Mute Adjusts, separate 3.5mm Audio Output and Monitor Headphone mini jacks and Headphone Volume thumbwheel control with integrated unit OFF/ON switch Operating Instructions Powering the Receiver Slide the receiver's battery cover open and place a fresh 9V battery in the BATTERY COMPARTMENT (1), observing the correct polarity. Although a fresh alkaline battery can last up to 8-10 hours in use in the receiver, in order to ensure optimum performance it is recommended that the receiver battery be replaced after 5 hours of use. Turn the receiver on by rotating the ON/OFF/VOLUME WHEEL (8) clockwise. The LOW BATT LED (9) will flash briefly, indicating adequate battery strength. If the LOW BATT LED (9) lights during use, replace battery. Antenna When the system is in use, the 151 VR receiver's ANTENNA (2) should be fully extended to obtain maximum range. Mute Adjustment In normal operation, the MUTE CONTROL (3) should be set fully counterclockwise to the factory preset RF level of 1 µV. However, in areas of high RF activity, the mute may need to be adjusted. If, with transmitter off, the receiver's TX LED (4) flickers or stays on, the MUTE CONTROL (3) should be turned clockwise until the TX LED (4) extinguishes. When the mute is properly adjusted, the TX LED will light only when the system transmitter is turned on. Note: Turning the mute control too far clockwise will yield a quieter mute function, but reduce your operating range. Connecting Audio Output Plug one end of the audio cable provided into the RECEIVER OUTPUT JACK (5). The other end should be plugged into your camcorder. 4 (22) Battery Indicator LED (21) OFF/STANDBY/ON Switch (19) Battery Holder (20) 9V Alkaline Battery 9
-
 1
1 -
 2
2 -
 3
3 -
 4
4 -
 5
5
 |
 |
