Nady PEM-1000 Manual - Page 5
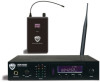
PEM-1000R Receiver - wireless in ear monitoring system
 |
View all Nady PEM-1000 manuals
Add to My Manuals
Save this manual to your list of manuals |
Page 5 highlights
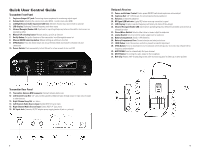
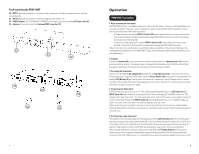
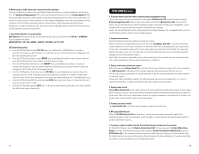
6. Monitoring on audio signal and connection with earphones The sound technician can monitor the signal being transmitted with a pair of wired headphones via the stereo 1/4" TRS Earphone Output Jack (1). The volume can be adjusted as desired with the Volume Knob (2). Both the left and right channels of a stereo signal are adjusted simultaneously by this control in the same manner. To monitor the sound, plug the stereo earphones into the earphone/headphone output jack, the earphone jack must be stereo 1/4"at the same time please rotate the volume knob to adjust the proper monitoring volume. (Please note: In order to protect your ears, the volume must be adjusted properly, it can't be too loud, and if too loud the earphone output will be distorted.) 7. Transmitter function set up procedure: SET Button (7): This button has five functions/menus and works conjunction with the UP (6), or DOWN (8), they are explained as below: MAIN DISPLAY➞SET CH➞MODE➞GROUP➞RF PWR➞AF IN➞EXIT SET Button Illustration: a. Press the SET Up Button to select SET CH menu, press Manual UP or DOWN button to increase or decrease the frequency to get the ideal one, meanwhile you can see the frequencies are changed per 125 KHz on the LCD displaying screen. b. Press the SET Up Button again to select MODE menu, press Manual Up button to be in Stereo mode and press Manual Down button to be in Mono mode (only R input is used). c. Press the SET Up Button third time to enter GROUP menu, press Manual Up or Down to increase or decrease the frequencies to get the wanted frequency, meanwhile you can see the channel numbers are changed per 10 CH a time on the LCD displaying screen. d. Press the SET Button the fourth time to select RF PWR menu, press Manual Up or Down to choose the emission power HI or LOW. It has been preset to be LOW power at 10mW, HI is 100mW. Please kindly check with your local wireless transmission control gets the relative regulation on its allowable power limit. e. Press the SET Button the fifth time entering input AF IN menu, press Up or Down to choose the max audio input level, either +4dB or +10dB. f. Press the SET Up Button again to EXIT menu, in this preset menu after 8 seconds the unit will be existed to the default main menu automatically. 9 PEM-1000R Receiver 1. Using the battery and the battery automatically management system The receiver requires two pieces of normal or rechargeable AA-Batteries (25). Insert the batteries into the Battery Compartment (25). Observe the correct polarity and close the Battery Door (26). The normal AA battery can run more than 8 hours. When the battery voltage is less than 1.9V the power management system will power off the unit automatically to protect the batteries from leakage. (Notes: The normal batteries must be with good quality and without leakage. The rechargeable battery must be the Ni-H battery without memory effect but large capacity.) 2. Earphone connection Connect the stereo monitoring earphones jack into the receiver. Plug in the stereo monitoring earphone jack to the 1/4" stereo Earphone Jack (18), or can also connect any normal earphone or put the output terminals to be connected with other audio equipments' audio signal input. (Please note: The earphone output jack is stereo output, please pay attention to the fact that the connecting plug must be stereo plug, if it is the mono jack, it will be possible to get short-circuit on the output and then damage one side of the earphone output.) (Note: Wipe the earphones and rubber mounts with an antiseptic before and after each use to avoid infection. Stop using the earphones if they are causing discomfort or infection.) 3. Power on the unit and volume control Rotate the power and Volume Knob (17) on the top of the receiver clockwise to power on the unit, meanwhile the LCD Display (21) is showing out the working frequencies and battery status. After the unit is on, continuously rotate the volume knob in clockwise direction to get the volume louder and turn counter clockwise to reduce the volume. (Please note: When the battery is weak or too little remaining, the unit can't be powered on, it is a must to change new batteries or to check if the batteries are well installed with right polarity.) 4. Sound mode switch Stereo-Mono Switch (23) can be used to choose if the current earphone should be stereo output or mono output, when the stereo is chosen, it must work with the transmitter and the transmitter should be tuned to be stereo too. (Please note: When the stereo output mode is chosen, the sound performance is good while the S/ N ratio is not good as when choosing mixed sound in mono mode output). 5. Sound Limit mode switch The Limit Switch (24) is used to keep the headphone output to a limited level. 6. RF signal LED Indicator When the RF LED Indicator (20) has been lit up, it means there has gotten transmitter's signal. If the interference signals at the same frequency, it will also light up. To eliminate the interference please switch to the non-interference frequency. 7. Frequency setup for either from the Transmitter-Receiver or Receiver-Transmitter For Transmitter-Receiver: Open the Battery Compartment (26) of the receiver, get the Infrared Receiving IR (22) to be seen, and should be pointing to the transmitter Infrared Transmission Window (5), press the SYNC Button (9) on the transmitter until the receiver has gotten the same frequency as the transmitter. Now the system has been set up successfully set up. Close the receiver's battery compartment. If you have more than one receiver, use this procedure to sync the additional receiver. 10
-
 1
1 -
 2
2 -
 3
3 -
 4
4 -
 5
5 -
 6
6 -
 7
7 -
 8
8
 |
 |
