Netgear AFT603 Installation Guide
Netgear AFT603 Manual
 |
View all Netgear AFT603 manuals
Add to My Manuals
Save this manual to your list of manuals |
Netgear AFT603 manual content summary:
- Netgear AFT603 | Installation Guide - Page 1
Installation NETGEAR ProSAFE M6100 Chassis Switch XCM8944, XCM8948, XCM8944F, XCM8924X, XCM89P, XCM89UP - Netgear AFT603 | Installation Guide - Page 2
Contents M6100 Series Front Panels 3 Before Installing the Switch Blade 4 Install the Chassis...5 Install the Fan Tray...6 Install the Switch Blade 7 Install the Power Supply 9 Install Optional PoE (XCM89P) or UPoE (XCM89UP) Board 10 Configure the Switch Blade 11 2 - Netgear AFT603 | Installation Guide - Page 3
M6100 Series Front Panels XCM8924X Console OoB port ports USB port XCM8944 10G SFP+ ports 10G RJ-45 ports Console OoB port ports USB port 1G RJ-45 ports XCM8944F 10G SFP+ ports 10G RJ-45 ports Console ports OoB port USB port XCM8948 1G SFP ports 10G SFP+ ports 10G RJ-45 ports - Netgear AFT603 | Installation Guide - Page 4
into a rack before installing any switch blades. For more information about how to install the XCM8903 rack-mount switch chassis, see the XCM8903 Hardware Installation Guide. 4 - Netgear AFT603 | Installation Guide - Page 5
a rack or install the chassis using the included rails. For more information about installing the chassis using rails, see the XCM8903 Hardware Installation Guide. ¾¾ To bracket-mount the chassis: 1. Partially screw two of the included screws into the rack where you want the bottom of the chassis - Netgear AFT603 | Installation Guide - Page 6
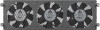
3. Screw the rest of the bracket to the rack. Install the Fan Tray ¾¾ To install the fan tray: 1. Carefully slide the fan tray all the way into the fan tray bay at the rear of the chassis. The fan tray is connected to power when it has been inserted completely into the fan tray bay. 6 - Netgear AFT603 | Installation Guide - Page 7
2. Screw the fan tray to the rear of the chassis using the included screws. Install the Switch Blade ¾¾ To install a switch blade in a M6100 series chassis switch: 1. Select a slot for the switch blade. 2. Remove a blank front panel from the chassis slot, if necessary. Any unoccupied switch blade - Netgear AFT603 | Installation Guide - Page 8
6. Using both hands, push both handles toward the center of the switch blade, as shown. Supervisor XCM8948 OOB PSWtatRu/s Reset Console USB 1 2 3 4 5 6 7 8 9 10 PoE 11 (Max 60W 12 per port): Off 13 = no PD 14 Green = Po1E5powere1d6Yellow 17 = PoE 18 fault RJ4159SPD/Lin2k0/Act - Netgear AFT603 | Installation Guide - Page 9
CAUTION: Be careful to avoid over torquing and stripping the screw heads. Install the Power Supply ¾¾ To install the power supply: 1. Carefully slide the power supply all the way into the power supply bay until it clicks into place. Locking handle CAUTION: Do not slam the power supply into the - Netgear AFT603 | Installation Guide - Page 10
AC power cord to the AC input connector below each power supply. WARNING: Be sure that the source outlet is properly grounded before plugging the AC power cord into the input connector. Install Optional PoE (XCM89P) or UPoE (XCM89UP) Board You can install an optional PoE (XCM89P) or UPoE (XCM89UP) - Netgear AFT603 | Installation Guide - Page 11
management interface or by using the command-line interface (CLI) through a console port. This guide shows you how to configure your switch using the web management interface. It also covers using about CLI management, see the M6100 CLI Reference Manual and the M6100 Software Administration - Netgear AFT603 | Installation Guide - Page 12
configured for your network. For more information about switch management using the OoB port, see the M6100 CLI Reference Manual and the M6100 Software Administration Manual. To configure your switch using web management, use one of the following procedures, depending on how your Windows computer - Netgear AFT603 | Installation Guide - Page 13
Computer with a Static IP Address When the computer is in this mode, the switch must also be assigned a static IP address. To assign a static IP address, connect a VT100/ANSI terminal or a workstation to one of the switch's console ports. A cable for the mini USB port and a straight-through RJ-45 - Netgear AFT603 | Installation Guide - Page 14
USB port on the computer to connect to the switch. 3. Configure the TEP to use the following settings: • Baud rate. 115200 bps • Data bits. 8 • Parity. None • Stop bit. 1 • Flow control. None 4. At the command prompt User:, log in to the switch using the user name admin and press the Enter key. 5. - Netgear AFT603 | Installation Guide - Page 15
15 - Netgear AFT603 | Installation Guide - Page 16
16 - Netgear AFT603 | Installation Guide - Page 17
. The system information screen displays. 12. Configure the switch for your network. For more information on configuration settings and options, see the M6100 Software Administration Guide. 17 - Netgear AFT603 | Installation Guide - Page 18
Computer in DHCP Client Mode with a DHCP Server By default, the switch is configured as a DHCP client to obtain its IP address from a DHCP server in the connected network. You must access the switch from either the mini USB or RJ-45 console port. ¾¾ To configure the switch: 1. Make sure that the - Netgear AFT603 | Installation Guide - Page 19
. The system information screen displays. 10. Configure the switch for your network. For more information about configuration settings and options, see the M6100 Software Administration Guide. 19 - Netgear AFT603 | Installation Guide - Page 20
general/contact/default.aspx for phone numbers. For product updates and web support, visit http://support.netgear.com. NETGEAR recommends that you use only the official NETGEAR support resources. You can get the user manual online at http://downloadcenter.netgear.com or through a link in the product
-
 1
1 -
 2
2 -
 3
3 -
 4
4 -
 5
5 -
 6
6 -
 7
7 -
8
-
9
-
10
-
11
-
12
-
13
-
14
-
15
-
16
-
17
-
18
-
19
-
20
 |
 |

Installation
NETGEAR ProSAFE M6100 Chassis Switch
XCM8944, XCM8948, XCM8944F, XCM8924X, XCM89P,
XCM89UP