Netgear WG511v1 WG511v1 Reference Manual - Page 22
Con your WG511
 |
View all Netgear WG511v1 manuals
Add to My Manuals
Save this manual to your list of manuals |
Page 22 highlights
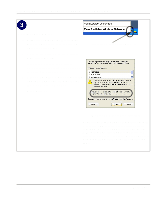
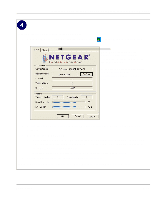
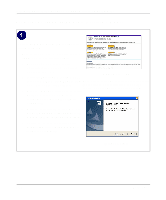
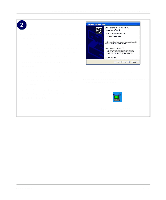
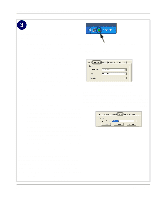
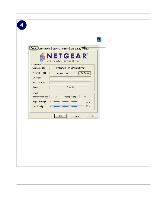
Installation Guide for the NETGEAR 54 Mbps Wireless PC Card WG511 Configure your WG511 and save the Profile. a. Click on the WG511 systray icon in the Click here to open the configuration utility. to open the WG511 configuration utility. The WG511 Wireless PC Card WG511 system tray icon configuration utility displays. b. Change the Network Name SSID to match your network. Tip: As an alternative to typing in the SSID, you can use the Site Survey tab to view the available wireless networks, choose the one you want, and click the WG511 Configuration Utility Connect button. Note: The NETGEAR default settings are c. Click the Profile tab. Enter a name for Infrastructure mode, with NETGEAR for the wireless your profile. d. Click the Save button to save all your network name SSID, and WEP disabled. If your WLAN settings are different from the Netgear default settings, you will not connect. Set up your WG511 accordingly. settings in the Profile, and then click the Activate button. You can save multiple profiles and activate whichever one you need to use. Tip: If you use your notebook PC to connect to a wireless network at work and at home, create profiles called work and home. Then, activate whichever one you need for wherever you are located. e. Click OK to close the utility. Note: This procedure assumes you are connecting to a wireless network which is not using WEP security. If your network includes WEP settings, click the Security tab page and configure the WG511 accordingly. For help with these steps, please see "Enabling Wireless Security Features" on page 3-28 below. 2-16 Basic Setup
-
 1
1 -
2
-
3
-
4
-
5
-
6
-
7
-
8
-
9
-
10
-
11
-
12
-
13
-
14
-
15
-
16
-
 17
17 -
 18
18 -
 19
19 -
 20
20 -
 21
21 -
 22
22 -
 23
23 -
 24
24 -
 25
25 -
 26
26 -
 27
27 -
28
-
29
-
30
-
31
-
32
-
33
-
34
-
35
-
36
-
37
-
38
-
39
-
40
-
41
-
42
-
43
-
44
-
45
-
46
-
47
-
48
-
49
-
50
-
51
-
52
-
53
-
54
-
55
-
56
-
57
-
58
-
59
-
60
-
61
-
62
-
63
 |
 |