Nextar X3B X3B Hardware Manual - Page 6
View of Main Unit - sd card
 |
UPC - 714129930116
View all Nextar X3B manuals
Add to My Manuals
Save this manual to your list of manuals |
Page 6 highlights
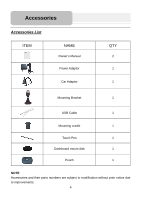
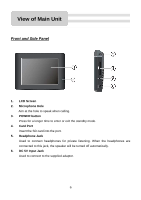
View of Main Unit Front and Side Panel 1. LCD Screen 2. Microphone Hole Aim at the hole to speak when calling. 3. POWER button Press for a longer time to enter or exit the standby mode. 4. Card Port Insert the SD card into the port. 5. Headphone Jack Used to connect headphones for private listening. When the headphones are connected to this jack, the speaker will be turned off automatically. 6. DC 5V Input Jack Used to connect to the supplied adaptor. 6
-
 1
1 -
 2
2 -
 3
3 -
 4
4 -
 5
5 -
 6
6 -
 7
7 -
 8
8 -
 9
9 -
 10
10 -
 11
11 -
 12
12 -
13
-
14
-
15
-
16
-
17
-
18
-
19
-
20
-
21
-
22
-
23
-
24
-
25
-
26
-
27
-
28
-
29
-
30
-
31
-
32
 |
 |

6
Front and Side Panel
1.
LCD Screen
2.
Microphone Hole
Aim at the hole to speak when calling.
3.
POWER button
Press for a longer time to enter or exit the standby mode.
4.
Card Port
Insert the SD card into the port.
5.
Headphone Jack
Used to connect headphones for private listening. When the headphones are
connected to this jack, the speaker will be turned off automatically.
6.
DC 5V Input Jack
Used to connect to the supplied adaptor.
View of Main Unit