Nikon 25420 User Manual - Page 23
Basic Setup, Follow the steps below to choose a language and set the time
 |
UPC - 689466112382
View all Nikon 25420 manuals
Add to My Manuals
Save this manual to your list of manuals |
Page 23 highlights
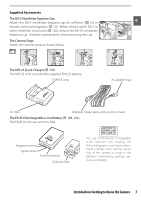
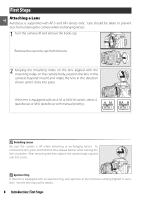
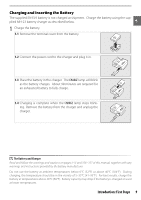
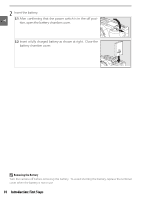
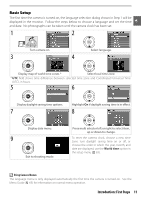
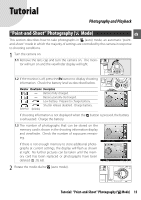
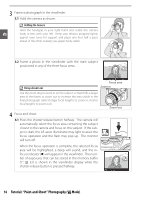
Basic Setup The first time the camera is turned on, the language selection dialog shown in Step 1 will be displayed in the monitor. Follow the steps below to choose a language and set the time and date. No photographs can be taken until the camera clock has been set. 1 2 Turn camera on. 3 Select language. 4 Display map of world time zones.* Select local time zone. * UTC field shows time difference between selected time zone and Coordinated Universal Time (UTC), in hours. 5 6 Display daylight saving time options. 7 Highlight On if daylight saving time is in effect. 8 Display date menu. 9 Exit to shooting mode. Press multi selector left or right to select item, up or down to change. To reset the camera clock, choose a new time zone, turn daylight saving time on or off, or choose the order in which the year, month, and date are displayed, use the World time option in the setup menu ( 83). Using Camera Menus The language menu is only displayed automatically the first time the camera is turned on. See the Menu Guide ( 63) for information on normal menu operation. Introduction: First Steps 11
-
 1
1 -
2
-
3
-
4
-
5
-
6
-
7
-
8
-
9
-
10
-
11
-
12
-
13
-
14
-
15
-
16
-
17
-
 18
18 -
 19
19 -
 20
20 -
 21
21 -
 22
22 -
 23
23 -
 24
24 -
 25
25 -
 26
26 -
 27
27 -
 28
28 -
29
-
30
-
31
-
32
-
33
-
34
-
35
-
36
-
37
-
38
-
39
-
40
-
41
-
42
-
43
-
44
-
45
-
46
-
47
-
48
-
49
-
50
-
51
-
52
-
53
-
54
-
55
-
56
-
57
-
58
-
59
-
60
-
61
-
62
-
63
-
64
-
65
-
66
-
67
-
68
-
69
-
70
-
71
-
72
-
73
-
74
-
75
-
76
-
77
-
78
-
79
-
80
-
81
-
82
-
83
-
84
-
85
-
86
-
87
-
88
-
89
-
90
-
91
-
92
-
93
-
94
-
95
-
96
-
97
-
98
-
99
-
100
-
101
-
102
-
103
-
104
-
105
-
106
-
107
-
108
-
109
-
110
-
111
-
112
-
113
-
114
-
115
-
116
-
117
-
118
-
119
-
120
-
121
-
122
-
123
-
124
-
125
-
126
-
127
-
128
-
129
-
130
-
131
-
132
-
133
-
134
-
135
-
136
-
137
-
138
-
139
 |
 |
