Nikon F65 Instruction Manual - Page 12
Set Date and Time F65D only
 |
UPC - 018208002320
View all Nikon F65 manuals
Add to My Manuals
Save this manual to your list of manuals |
Page 12 highlights
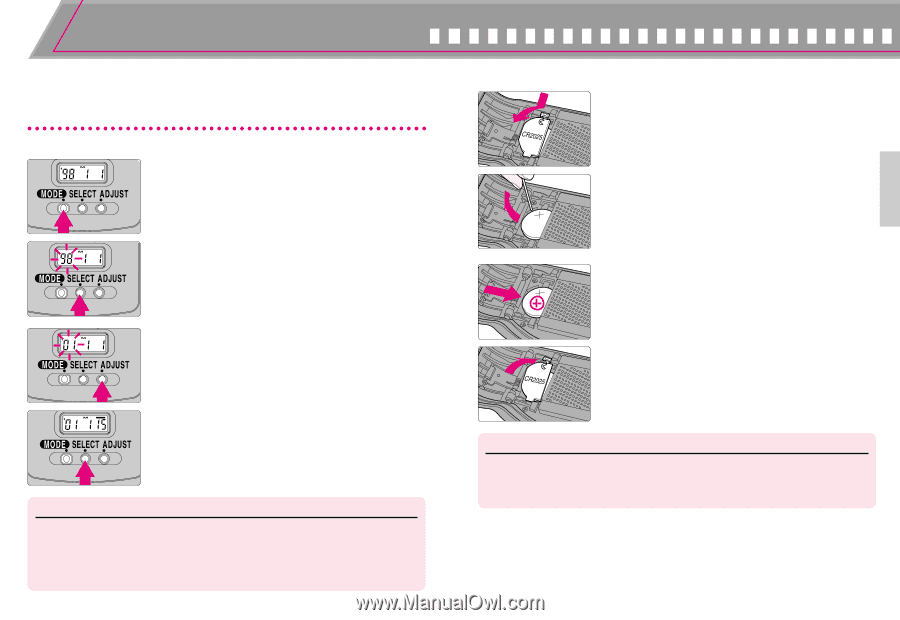
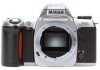
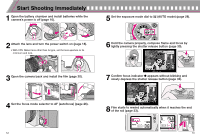
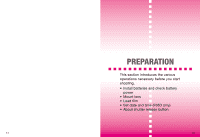
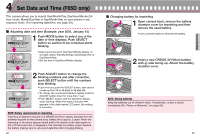
4 Set Date and Time (F65D only) This camera allows you to imprint Year/Month/Day, Day/Hour/Minute (24hour clock), Month/Day/Year or Day/Month/Year on your picture in any exposure mode. (For imprinting date/time, see page 39.) • Adjusting date and time (Example: year 2001, January 15) 1 Push MODE button to select one of the date or time displays. Push SELECT button so section to be corrected starts blinking. • Date cannot be set in Day/Hour/Minute display. To set date, select Year/Month/Day, Month/Day/Year or Day/Month/Year. • Set the time in Day/Hour/Minute display. 2 Push ADJUST button to change the blinking numbers and after correction, push SELECT button until the numbers stop blinking. • Each time you push the ADJUST button, year section moves up from 98 to 49 (back to 98 after 49). • To change the numerical indication rapidly, hold the ADJUST button down for more than 1 sec. • Push SELECT button until the date/time display stops blinking. When the imprint indicator - appears in the data imprint LCD panel, the setting is complete. NOTE: Battery requirements for imprinting Imprinting of date/time requires one CR2025 3V lithium battery separate from the batteries required for the camera body. Battery life is approx. 3 years. When the imprinting on the photo appears faded and/or the display of the data imprint on the LCD becomes faint or disappears, this indicates low battery power. Replace the battery (making sure to set correct date/time after changing battery). 22 • Changing battery for imprinting 1 Open camera back, remove the battery chamber cover for imprinting and then remove the used battery. • Use a pointed object to remove the battery. 2 Insert a new CR2025 3V lithium battery with ´ side facing up. Attach the battery chamber cover. NOTE: Storing batteries Keep the batteries out of children's reach. If swallowed, contact a doctor immediately. (For "Notes on Batteries", see page 98.) 23 PREPARATION
-
 1
1 -
2
-
3
-
4
-
5
-
6
-
 7
7 -
 8
8 -
 9
9 -
 10
10 -
 11
11 -
 12
12 -
 13
13 -
 14
14 -
 15
15 -
 16
16 -
 17
17 -
18
-
19
-
20
-
21
-
22
-
23
-
24
-
25
-
26
-
27
-
28
-
29
-
30
-
31
-
32
-
33
-
34
-
35
-
36
-
37
-
38
-
39
-
40
-
41
-
42
-
43
-
44
-
45
-
46
-
47
-
48
-
49
-
50
-
51
-
52
-
53
-
54
-
55
-
56
-
57
-
58
-
59
 |
 |