Nikon Z 7 Setting Guide Video Edition - Page 4
Getting Ready, The Video Recording Workflow
 |
View all Nikon Z 7 manuals
Add to My Manuals
Save this manual to your list of manuals |
Page 4 highlights
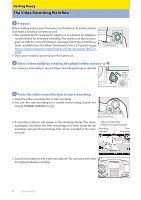
Getting Ready The Video Recording Workflow 1 Prepare. Before making videos, learn the names and locations of camera controls and insert a battery and memory card. ● The supplied EH-7P charging AC adapter or an optional AC adapter is recommended for extended recording. The camera can also be powered via USB. For more information, see page 744 of the Z 9 Reference Guide, available from the Nikon Download Center's Z 9 product page (https://downloadcenter.nikonimglib.com/en/products/589/Z_9. html). ● Once you're ready to proceed, turn the camera on. 2 Select video mode by rotating the photo/video selector to 1. The camera is now ready to record. Adjust recording settings as desired. 3 Press the video-record button to start recording. ● Press the video-record button to start recording. ● You can also start recording via a control chosen using Custom Setting g2 [Custom controls] (0 52). ● A recording indicator will appear in the shooting display. The shoot- Video recording time ing display also shows the time remaining, or in other words the ap- (length of footage recorded) proximate amount of new footage that can be recorded to the mem- Recording Time ory card. indicator remaining ● Sound is recorded via the video microphone. Do not cover the video microphone during recording. 4 Getting Ready
-
 1
1 -
 2
2 -
 3
3 -
 4
4 -
 5
5 -
 6
6 -
 7
7 -
 8
8 -
 9
9 -
 10
10 -
11
-
12
-
13
-
14
-
15
-
16
-
17
-
18
-
19
-
20
-
21
-
22
-
23
-
24
-
25
-
26
-
27
-
28
-
29
-
30
-
31
-
32
-
33
-
34
-
35
-
36
-
37
-
38
-
39
-
40
-
41
-
42
-
43
-
44
-
45
-
46
-
47
-
48
-
49
-
50
-
51
-
52
-
53
-
54
-
55
-
56
-
57
-
58
-
59
-
60
-
61
-
62
-
63
-
64
-
65
-
66
-
67
-
68
-
69
-
70
 |
 |
