Nokia 3361 User Guide
Nokia 3361 - Cell Phone - AMPS Manual
 |
View all Nokia 3361 manuals
Add to My Manuals
Save this manual to your list of manuals |
Nokia 3361 manual content summary:
- Nokia 3361 | User Guide - Page 1
Nokia PC Suite 5.1 User Guide and PC/PDA Connectivity Guide for the following Nokia phones: 5100, 6100, 6200, 6610, 6800, 7210, 7250, and 7250i - Nokia 3361 | User Guide - Page 2
Nokia 6800 phone is approved for use in GSM 850 MHz and 1900 MHz networks. The Nokia 5100, Nokia 6100, Nokia 6610, Nokia 7210, Nokia 7250, and Nokia 7250i phones are approved for use in GSM . If you require assistance, contact your local service facility. This device complies with part 15 of - Nokia 3361 | User Guide - Page 3
an image 18 8 Nokia Application Installer 22 About Java applications 22 Install an application 22 Erase an application 22 Learn about multiple phones 22 9 Nokia Phone Browser 23 Tour Nokia Phone Browser 23 Learn about folders 23 10 Nokia Phone Editor 25 Phone memory and PC storage - Nokia 3361 | User Guide - Page 4
and Contacts window 25 Manage contacts using Phone Editor 26 Tour the Messages window 27 Send and manage SMS messages 28 Edit Settings 29 Launch other PC suite applications 29 11 Wireless modem setup 30 Select Nokia Modem Option 30 Perform hardware installation for IR 31 IR and Windows - Nokia 3361 | User Guide - Page 5
to recognize your Nokia phone as the active modem (see "Wireless modem setup" on page 30). Note: This feature is available only if your service provider's network supports digital data and fax calls. Check with your service provider for the capabilities of their services. • PRINT THIS GUIDE You may - Nokia 3361 | User Guide - Page 6
) Personal Information Manager Internet Service Provider • COMPLY WITH SAFETY NOTES • Please refer to the user guide of the product for instructions on operation, care and maintenance, including important safety information. • Do not switch on your phone when wireless phone use is prohibited, or - Nokia 3361 | User Guide - Page 7
PC. • LEARN ABOUT PC SUITE VERSIONS This user guide can be used with Nokia 5100, Nokia 6100, Nokia 6200, Nokia 6610, Nokia 6800, Nokia 7210, Nokia 7250, and Nokia 7250i phones. The version number of PC Suite for your phone may be an incremental version of Nokia PC Suite 5.1. For example, PC Suite - Nokia 3361 | User Guide - Page 8
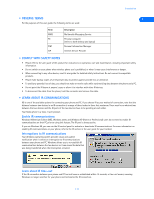
install cable communications services. 1 Select Cable connection, then click Next. 2 Click Next to confirm the detection of your phone on the correct A FAMILIAR NAME Nokia PC Suite supports multiple users and several different phone models. The first time you connect phone and PC after - Nokia 3361 | User Guide - Page 9
PC Suite 5.1 Important: The DKU-5 data cable and software must be installed properly before you can update your installation of Nokia PC Suite. Please follow the instructions found in the data cable sales package prior to updating PC Suite. • CHANGE LANGUAGE OR REMOVE PC SUITE 2 The language - Nokia 3361 | User Guide - Page 10
on your PC prior to selecting IR in Connection Manager. Important: Even though your Nokia phone does not support Bluetooth wireless technology, Bluetooth support is included for compatibility with other Nokia phones. Disable Connection Manager for wireless modem use When you close one of the PC - Nokia 3361 | User Guide - Page 11
The following table shows a list of Nokia phones compatible with Nokia Content Copier (other than your Nokia 5100, 6100, 6200, 6610, 6800, 7210, 7250 or 7250i phone), as well as the method of connection to the PC: Nokia model Method of connection 3320, 3360, 3361 IR 2270, 2272, 2280, 2285, DKU - Nokia 3361 | User Guide - Page 12
to your PC. Once you have connected your Nokia 5100, 6100, 6200, 6610, 6800, 7210, 7250 or 7250i phone ("target" phone) using IR or cable, follow the instructions, "Copy information to the target phone." Save the source phone data Once the source phone data is read, save the information to your - Nokia 3361 | User Guide - Page 13
return to the beginning of the Nokia Content Copier wizard. • Click Finish to exit Nokia Content Copier. • OTHER PHONES 4 Due to software and hardware differences between generations of phone technology, the following phones are not compatible with Nokia Content Copier: Protocol TDMA CDMA GSM1900 - Nokia 3361 | User Guide - Page 14
MIDI files (.mid) for use with your Nokia phone. Nokia Sound Converter also supports several common ringing tone file formats (.ott, .nrt, and .rtpl). Once you convert and transfer these files to your phone you can use them with MMS (Multimedia Messaging Service) messaging and as ringing tones. Now - Nokia 3361 | User Guide - Page 15
the MIDI file you want to convert, then click Open. 4 Confirm that your phone appears as the selected destination, and note the number of simultaneous notes and/or instruments your phone can support. 5 5 Click Next. Nokia Sound Converter analyzes your GM file and moves what it determines as the - Nokia 3361 | User Guide - Page 16
user guide. 1 From the Save dialog, click the Update to phone button. 2 Make any changes to the MIDI file title using the Update As dialog box, then click OK. 3 Click Finish to return to the beginning of the Nokia Sound Converter wizard, or click the close button to exit the application. [ 12 ] - Nokia 3361 | User Guide - Page 17
and your Nokia mobile phone. You can use Nokia PC Sync to keep information up to date in both locations. PC Sync supports a variety contacts list, calendar, and to-do list of your phone, refer to the technical specifications section of the handset user guide. 1 Click the Calendar/To-do tab. 2 Use - Nokia 3361 | User Guide - Page 18
a contact from your phone, you can restore it by synchronizing again. Deselecting the Ignore contact deletions option instructs PC Sync to permanently list memory only. Numbers stored on the SIM card are not synchronized with your PIM application. Nokia PC Sync remains running in the background - Nokia 3361 | User Guide - Page 19
the user guide for your phone. • USE THE NEW SYNCHRONIZATION COMMAND If you upgrade to a newer version or change PIM applications, you must configure PC Sync to work with the new application. Select New Synchronization from the Nokia PC Suite program group, then follow the instructions, "Configure - Nokia 3361 | User Guide - Page 20
. UPDATE OUTLOOK SETTINGS IN PC SYNC To update PC Sync settings to synchronize with your custom list: 1 Establish a connection between your phone and PC. 2 Launch Nokia PC Sync from your PC Start menu. 3 Right-click the PC Sync tray icon, then click Properties. 4 Click the Microsoft Outlook - Nokia 3361 | User Guide - Page 21
+ V to place copies of the selected contacts into the new list. UPDATE LOTUS ORGANIZER SETTINGS IN PC SYNC 1 Establish a connection between your phone and PC. 2 Launch Nokia PC Sync from the Start menu. 3 Right-click the PC Sync tray icon, then click Properties. 4 Click the Lotus Organizer tab - Nokia 3361 | User Guide - Page 22
your phone is at idle state) • MMS-used to create and upload images optimized for use with MMS messages Once you select the type of image you want to work with, Nokia Image Converter provides several image editing, special effects, and image enhancement options. Nokia Image Converter supports some - Nokia 3361 | User Guide - Page 23
wish to use with the current image, as well as resize the image prior to any additional edits. 1 Click the Select phone drop-down arrow, then select the model of your Nokia phone from the list. 2 Click Image resizing (optional), then drag the slider to resize your image. 3 Click OK to confirm the - Nokia 3361 | User Guide - Page 24
on the available effects, refer to the online help files for Nokia Image Converter (Definitions - Enhancements menu). When you are finished image are as follows: • Save your work to disk. • Transfer the image to your phone. To complete the process: 1 Click the Save to file button , then enter a - Nokia 3361 | User Guide - Page 25
Save. Note: Nokia recommends you save MMS and wallpaper images as JPEG (.jpg) files. When saving JPEG files, Nokia Image Converter prompts phone. For more information on the storage capacity of your phone, refer to your phone user guide. 3 Click Update to phone. You can also select Update to phone - Nokia 3361 | User Guide - Page 26
functionality to your phone. This may include (for example): • New games • Stock portfolio manager • World clock • Currency converter You can use Nokia Application Installer to install applications you download to your PC from the Internet (including those downloaded from your service provider's Web - Nokia 3361 | User Guide - Page 27
multimedia files stored in your phone • Use the Nokia Phone Browser icons to launch other Nokia PC Suite applications • TOUR NOKIA PHONE BROWSER The illustration below introduces you to the Phone Browser interface: Folders pane Local folders Phone folders Phone subfolders 9 Shortcuts for launching - Nokia 3361 | User Guide - Page 28
Nokia Phone Browser Phone subfolders You can click the + next to your phone folder to expand the view and display the Gallery folder in your phone. You can click the + next to the Gallery folder to expand the view and display all of the subfolders currently available in the Gallery. You - Nokia 3361 | User Guide - Page 29
Nokia Phone Editor 10 Nokia Phone Editor The Nokia Phone Editor program allows you to edit and manage many phone functions from your PC. Phone Editor consists of the following components: • Contacts-is used to manage contacts list entries in your SIM card and in the phone memory. Also used to store - Nokia 3361 | User Guide - Page 30
change. 2 Click Contacts, point to Change Memory, then click either Phone or SIM. Note: Your SIM card does not support multiple numbers per name (or other information such as e-mail addresses). For more information on copying contacts list entries to your SIM card, see your phone user guide. [ 26 ] - Nokia 3361 | User Guide - Page 31
Nokia Phone Editor Copy and move contacts Your PC hard drive offers you substantially more storage space for names and numbers than your phone memory. You can copy contacts list entries to the Phone caller group feature, see your phone user guide. 1 Right-click the contact (SIM card and phone message memory) - Nokia 3361 | User Guide - Page 32
phone (and the phone of the recipient) must support linked message. For more information on linked message, refer to the user guide for your phone , you can act on the message in a variety of ways: Action Read Instructions Double-click the message header in the Inbox to view the message. Use the - Nokia 3361 | User Guide - Page 33
Nokia Phone Editor Action Reply Forward Print Delete Instructions Click the Reply button. Enter your reply work in conjunction with your phone profiles. • User-is used to edit and store your user information. • LAUNCH OTHER PC SUITE APPLICATIONS The Phone Editor navigation bar contains buttons - Nokia 3361 | User Guide - Page 34
for your operating system. • SELECT NOKIA MODEM OPTION If you select Nokia Modem Option as one of the choices during PC Suite installation, the software needed to use your phone as a wireless modem is installed automatically. The following instructions guide you through the wireless modem setup - Nokia 3361 | User Guide - Page 35
Next and allow Windows to automatically locate the modem software already installed by Nokia PC Suite. 11 3 Click Next to confirm that Windows has located the correct software for your phone. 4 Accept any Windows alert messages regarding digital signatures or hardware compatibility and continue - Nokia 3361 | User Guide - Page 36
though you have installed the Nokia Modem Option software during PC Suite installation, Windows XP detects your phone and installs it automatically as a Standard Modem over IR link. For optimal performance, update the Windows modem software manually using the instructions below. UPDATE THE MODEM - Nokia 3361 | User Guide - Page 37
of IR services with the release of Windows 2000 Professional. To make an IR serial connection between IR-equipped Nokia phones and IR- August 19, 2001, located in the list of search results. 4 Follow the instructions for downloading the software to your PC hard drive. 5 Double-click the software - Nokia 3361 | User Guide - Page 38
. • Select the desired data transmission rate. 11 • Enter a new GPRS access point for modem services. Important: In order to use high speed circuit-switched data (HSCSD), your Nokia phone must support this feature. Check for the availability of HSCSD and other digital data options shown in NMO - Nokia 3361 | User Guide - Page 39
requested and billing is based on the amount of data you transfer GPRS data services work much the same way as a PC connected to a corporate network. or phone remains in an idle state. 12 Enhanced data rates for GSM evolution (EDGE) (Nokia 6200 only) The Nokia 6200 series phone supports an - Nokia 3361 | User Guide - Page 40
may need to use CSD services when: • You need to send a fax to a machine connected to a traditional phone line. • Your corporate an access point Once you enter an APN and alias (user-friendly name) for an access point, you must activate that Nokia Modem Option. APN information entered here overrides - Nokia 3361 | User Guide - Page 41
wireless service provider's access point. To access the GPRS or EDGE data network, use the following dialing string instead of a traditional phone number click Next. 4 Select only your Nokia phone as the active modem, then click Next. 5 Enter the GPRS network access code, *99# , then click Next. - Nokia 3361 | User Guide - Page 42
Configure your data and fax software 5 Click the Set up my connection manually option, then click Next. 6 Click the Connect using a dial-up modem option, then click Next. 7 Select only your Nokia phone as the active modem, then click Next. 8 Type a name for your new connection (for example, - Nokia 3361 | User Guide - Page 43
and verified. Note: Your wireless service provider must support digital data and fax services for this feature to work. Contact your service provider for more information. 12 • CONFIGURE AOL FOR CSD Your AOL software can be configured to use your Nokia phone as a wireless modem when you - Nokia 3361 | User Guide - Page 44
proprietary software. Important: These examples are provided for your information only. Nokia does not endorse or provide support for any of the above applications or services. • CONFIGURE YOUR FAX SOFTWARE Before you can use your phone to send and receive fax calls, you must configure your fax - Nokia 3361 | User Guide - Page 45
Nokia phone are possible only if your service provider supports digital data and fax service. You may be required to subscribe to these services. Check with your service to select your Nokia phone as the number assigned to your phone) • Initialization: 19200 your phone keypad. All data and - Nokia 3361 | User Guide - Page 46
PHONE AS A WIRELESS MODEM Important: This feature is available only if your service provider's network supports general packet radio service (GPRS), enhanced data rates for GSM keyword: PDA Check your owners manual or the PalmOS web site for Palm OS device and your Nokia phone as a wireless modem, you - Nokia 3361 | User Guide - Page 47
tap New. 4 Enter a name for this service (for example, GPRS). Leave user name and password fields blank. 5 Tap the Connection drop-down arrow, then tap the name of the connection device (for example, Nokia). 13 6 Enter the GPRS network access code, *99# , in the Phone field. The setup is now - Nokia 3361 | User Guide - Page 48
services (sometimes known as GSM data). A subscription to these services may also be necessary. Check with your service provider for more details. You can use your Nokia phone may require additional software from another manufacturer. Check the user guide or Web site for your handheld device, or the - Nokia 3361 | User Guide - Page 49
baud rate to 57600, then tap Next. 6 Enter the GPRS network access code, *99# , in the Phone number field, then click Next. Important: You may need to click the . Use your new GPRS/EDGE modem connection To connect to your Internet service provider or corporate network: 1 Tap the Start icon , then tap - Nokia 3361 | User Guide - Page 50
procedure for creating a new modem connection for use with your Nokia phone is similar to that found in the various Windows desktop operating consult the user guide for your handheld device. CREATING A MODEM CONNECTION To create a new Pocket PC modem connection for your Internet service provider or - Nokia 3361 | User Guide - Page 51
Pocket PC device configuration 7 Enter the area code (if necessary) and phone number, then tap Next. 8 Tap Wait service provider or corporate network: 1 Tap the Start icon , then tap Programs. 2 Tap Connections, then tap your new modem connection (for example, Internet-Nokia phone). 3 Enter your user - Nokia 3361 | User Guide - Page 52
Pocket PC device configuration Before you make a digital data call Before initiating the data call from your Pocket PC device, make sure you establish a connection between your phone and handheld device. Also see "Understand requirements for digital data calls" on page 1. 14 [ 48 ] - Nokia 3361 | User Guide - Page 53
37 Edit settings 29 effects 19 Enhanced Data Rates for GSM Evolution 35 enhancements 20 F Fax configuring software 40 modem selection 41 file transfer using Nokia Phone Browser 24 folders Nokia Phone Browser 23 G General Packet Radio Service (GPRS) 35 GPRS dial-up connection for PalmOS 43 make - Nokia 3361 | User Guide - Page 54
) 39 New Synchronization 15 Nokia Modem Option 30 Nokia Phone Browser file transfer 24 folders 23 update views 24 Nokia Phone Browser components 23 O Other exit application 14 New Synchronization 15 options 15 starting application 14 supported PIMs 13 synchronize for the first time 14 task bar icon - Nokia 3361 | User Guide - Page 55
make a data call (GPRS) 45 overview (PalmOS) 42 overview (PocketPC OS) 44 Wireless modem setup 30 Index 15 [ 51 ]
-
 1
1 -
 2
2 -
 3
3 -
 4
4 -
 5
5 -
 6
6 -
 7
7 -
8
-
9
-
10
-
11
-
12
-
13
-
14
-
15
-
16
-
17
-
18
-
19
-
20
-
21
-
22
-
23
-
24
-
25
-
26
-
27
-
28
-
29
-
30
-
31
-
32
-
33
-
34
-
35
-
36
-
37
-
38
-
39
-
40
-
41
-
42
-
43
-
44
-
45
-
46
-
47
-
48
-
49
-
50
-
51
-
52
-
53
-
54
-
55
 |
 |
Nokia PC Suite 5.1
User Guide
and
PC/PDA Connectivity Guide for
the following Nokia phones:
5100, 6100, 6200,
6610, 6800, 7210,
7250, and 7250i